
In this article you will find some background information about digital IR and UV photography. Furthermore I will give you guidance for getting started with these sorts of photography with a small budget. The described setups work, I have used them or still use them myself.
|
|
|
|
|
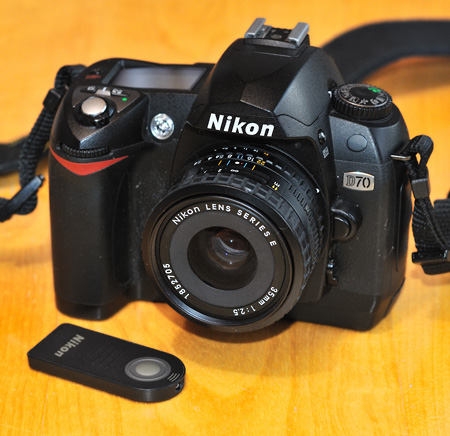
The Nikon D70 in conjunction with the series E 35mm f/2.5 lens is a great (and cheap) unit for both infrared and ultraviolet photography. The remote control ML-L3 is a very helpful accessory for that sort of imaging. |
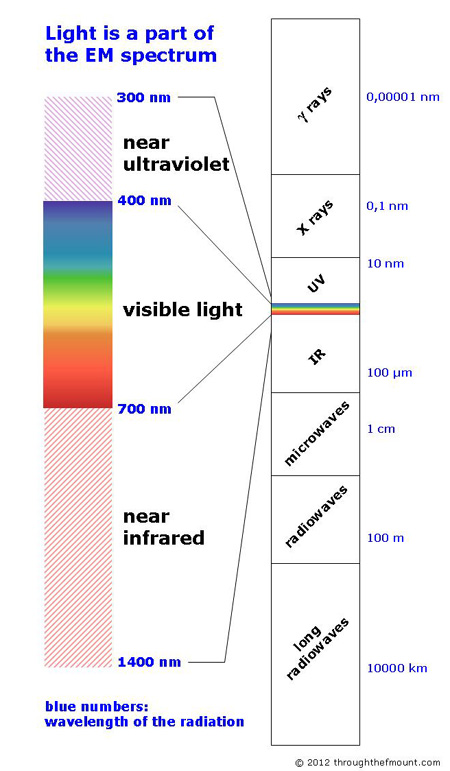
Light is electromagnetic radiation. Visible light has wavelengths between 400 and 700nm. If you like frequencies more than wavelenghts: you get the frequency of the radiation by dividing the speed of light by the wavelength - the longer the wavelength, the shorter the frequency. For example: red light with a wavelength of 600nm has a frequency of approx.
300000 km/s / 600nm = 5x10¹⁴Hz.
When we say 'visible light' we mean visible for us human beings. Some animals see a different range of light, e. g. the eyes of a bee are sensitive to UV light, too.
We distinguish the different colours because they have different wavelengths (or frequencies). In the range of visible light violet light has the shortest wavelength and red light has the longest one, see figure to the right. Light below 400nm is therefore called ultraviolet light and above 700nm we speak about infrared light. From a photographic point of view that is light because lenses still work with it. But that's only true for approx. the near range of UV light (300-400nm) or IR light (700-1400nm).
The sensors of our DSLRs are sensitive to UV and IR light as well. The UV response is mostly poor and on top of that modern lenses attentuate UV light. In contrast, most sensors have a significant IR sensitivity up to about 1000nm. An image captured by the sensor itself would be mostly a mix of visible and IR light. Therefore the camera manufacturers mount a filter in front of the sensor, which primarily blocks IR light.
Over the years those filters have got better. In general you can say: early DSLRs have a better response in invisible light than the newer ones. A very good Nikon model for this purpose is the D70. You get it cheap on ebay (as of 2012 for about 150 €) and it can be used without modification for both IR and UV. For example the filter of the D70 attenuates IR light by approx. seven f-stops, but still transmits IR.
It depends on the particular sensor, which of the RGB channels will record the invisible light. However, the camera maps it into the RGB space. That gives us a visible impression of the invisible world. But it is a wrong impression! It's a bit like watching two-dimensional shadows of three-dimensional objects. Pragmatic implication: feel free to set the colours in post-processing however you like it! Every colour is as wrong as any other.
We use a Nikon D70 for the first try. As mentioned above, this camera is very suitable for this job. It is reported that the D40, D50, D70s and D2H are usable, too. But I have not tried them myself.
It's a good idea to use a manual focus prime lens with a 52mm filter thread and an infrared index on the focussing scale for the first try. Such lenses are offered dirt cheap.
|
|
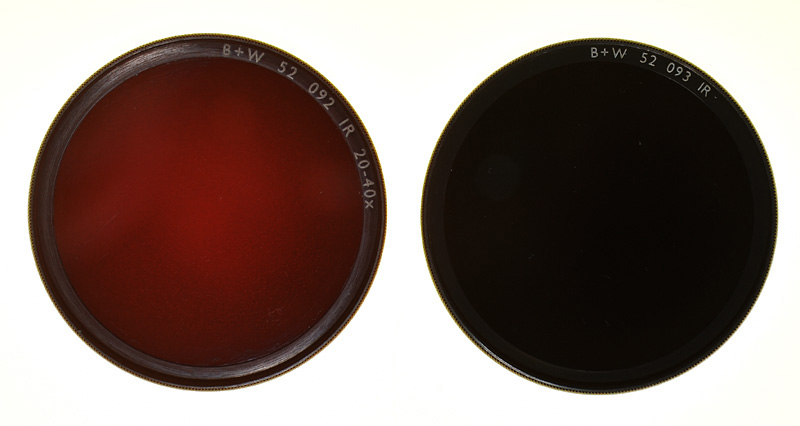
Longpass filters with a threshold wavelength of 695nm and 830nm. Through the left one you just see your subject as a reddish shilouette, through the right one you can't see anything. |
Then you need a screw-in longpass filter (that is not a cheap filter and in 77mm size it costs twice as much as in 52mm). Such a filter - often also called IR filter - is available for different wavelengths (meaning shorter wavelengths are blocked, longer are transmitted). On a non-modified camera you should take one with about 700nm or more. Examples are the 695nm filter B+W 092 and the 830nm B+W 093 (have a look to my "links" section for the transmission curves of B+W filters).

|
|
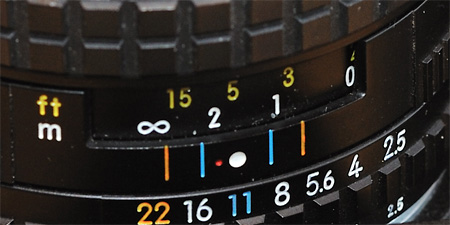
Infrared focus shift: 1. focus as usual without the filter. |
|
|
2. shift the focus setting from the white dot to the small red one (that's the infrared index mark). |
Finally you should make a white balance preset on the D70. Screw in the longpass filter and point the camera towards a uniform area with plants (e.g. grass) and do the preset. The weather should be sunny for it.
Why? The sun produces a lot of IR radiation. Plants reflect these radiation in order to avoid drying out. Thus, in infrared daylight, plants are the brightest objects on earth, just like white things are in our visible world.
For shooting put the camera on a tripod. Then compose and focus without the filter. If your lens has an infrared index mark, shift the focus setting to it and screw in the filter again.
Please note: the metering system of the camera doesn't work really proper in infrared light. You can use an automatic exposure as a starting point and then dial in an exposure correction after having checked the result on the D70's (terribly small) monitor. I prefer to work completely in manual mode for IR with the D70. Keep in mind that the 'M' mode is the only available mode of the D70 if a non-CPU lens is mounted!
In sunny weather and with a 700nm filter, start at about F11 and 1 sec at ISO 200. With the 830nm filter set the shutter speed to 4 sec instead. As in visible light I recommend you to shoot RAW. That allows you among others to correct the exposure a bit in post-processing. That is important, because you may overlook an overexposure in a detail on the camera's monitor.
|
|
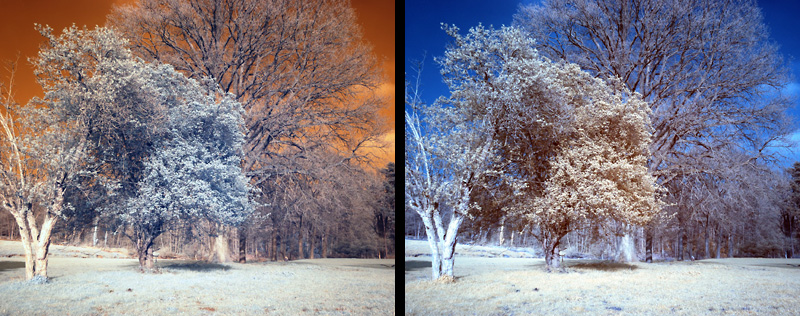
Example image with a 695nm longpass filter. Captured on a sunny afternoon in early spring with the Nikon D70 at ISO 200 and 2 sec, Nikkor 20mm f/3.5 at F11. On the left you see the image as it comes out of the camera. On the right the same image with the blue and red channels swapped. That is a usual method for post-processing such infrared images. Feel free to do so or not. |

|
|
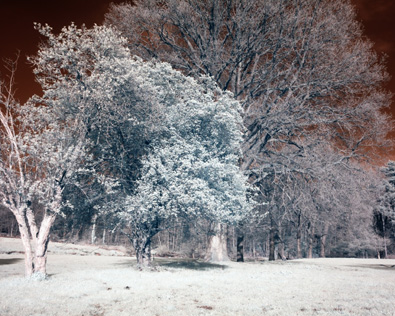
The same subject captured with an 830nm longpass filter. The shutter speed here was 8 sec. Again on the left the original out of the camera. Because there is only a little bit of colour information, it is usual to convert such infrared images to black and white. |
|
|
|
|
This image was captured with a IR modified D70 at ISO 200, F11 and 1/125sec. There is a 700nm longpass filter in front of the sensor and no filter on the lens. The colours are a bit different from those of the non-modified D70 with the 695nm longpass filter (see above), because here the sensor gets much more IR light in relation to visible light. |
If you like IR photography, you should think about an IR modification of your camera. That means that a specialised repair service replaces the IR blocking filter in front of the sensor by a longpass filter (have a look at my 'links' section). After such a modification your camera is only usable for IR photography. But you have important advantages with an IR modified camera:
For such a modification you have to make a decision about the threshold wavelength of the filter. I have a 700nm filter in my D70IR. If you are not sure, you may start with a non-dedicated camera, which means there is only clear glass in front of the camera, the whole filtration must be done by screw-in filters. See below under "Take it all?" for further explanations.
UV photography is a bit more difficult than IR photography!
Even here we use the D70. But only a very few lenses are really suitable for UV photography. You can buy a lens of special glass for a few thousand euros (like the UV-Micro-Nikkor 105mm f/4.5). But there are much cheaper alternatives, as long as you can pass on two or three f-stops of UV transmission and you can live with a focus shift. Prime lenses with only four or five elements and with a "bad" coating are candidates for UV work. I recommend the use of a Nikon Series E 35mm f/2.5. The Series E 28mm f/2.8, 50mm f/1.8 or 100mm f/2.8 can be used, too. Just a feeling, but I prefer the older all black versions of the Series E lenses for UV work.
First of all you need a shortpass screw-in filter. An example is the B+W 403. This type of filter is not a real counterpart to a longpass filter, because it only blocks the visible spectrum but not IR! Have a look at the transmission curve of the B+W 403, see 'links' section! With only this filter on your lens the sensor gets a mix of UV and IR. You can use an additional IR attenuating filter like the B+W 489 or an IR blocking filter like the Schott BG38 to reduce the amount of IR light. See examples below.
|
|
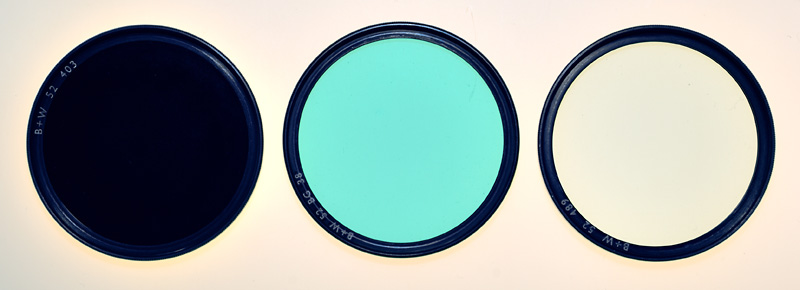
Filters for UV photography, from left to right: Shortpass or UV pass filter. It blocks visible light but transmits UV light. Problem: it also transmits IR light. IR blocking filter. It blocks IR light but transmits UV and visible light. IR attenuating filter. Useful, if you want to capture some IR light, too. |
Now you need a subject that will prove that you are really capturing UV light.
Many blossoms have a colour pattern that helps the bees to find the way to the centre. Because bees can also see in ultraviolet light, some blossoms have such a pattern which is only visible in UV light. A well-known and easy-to-find example for that is the dandelion. Or search for other flowers with strong UV signatures, very helpful is the UV flower gallery of Bjørn Rørslett on naturfotograf.com (have a look at my 'links' section).
|
|
|
My findings about the ultraviolet focus shift of the Series E 35mm: at infinity and below 0.5m use the infrared index; otherwise use the left blue stripe. |
I have tried different white balance settings for my UV photography, but my preferred one I found accidentally: most of the time I use the infrared WB!
Like in infrared, put the camera on a tripod and then compose and focus without the filter (you can't see anything through the shortpass filter). There is a focus shift in UV light, too. The direction of the shift is the same than it is for IR light. For the first try you can therefore use the infrared index mark as an orientation, although the necessary amount of shift is not ever the same than it is in the infrared world. Screw in the filter again, set the camera to M mode and in sunny weather try 15 seconds at F11 and ISO 200. If necessary correct these values.
|
|
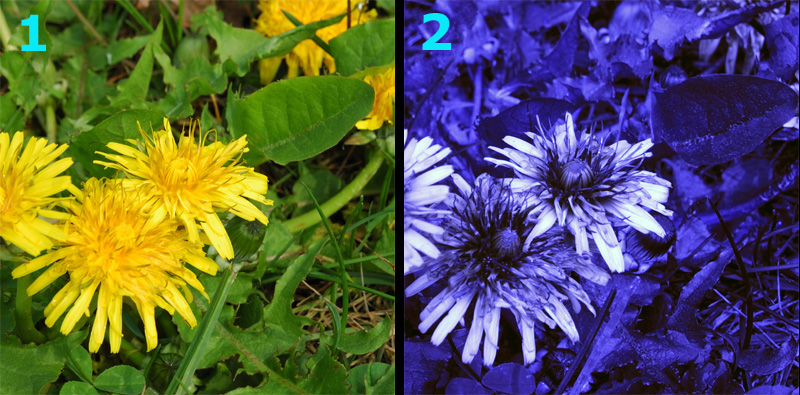
Dandelions on a sunny afternoon in early spring. Captured with the Nikon D70 at ISO 200 and the Nikon Series E 35mm f/2.5 at F11. The image on the left was taken without any filter and with a shutter speed of 1/125 sec. For the image on the right a B+W 403 shortpass filter and a Schott BG38 IR blocking flter was used. The shutter speed was 30 sec. |
|
|
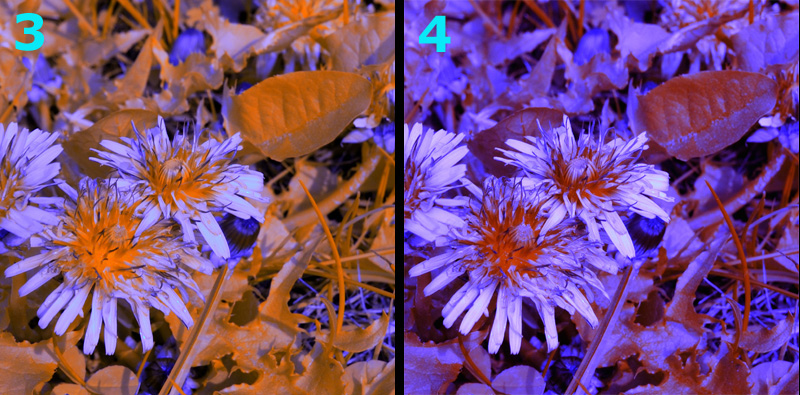
In my opinion UV images often look better with a small amount of IR contamination, because that makes the image coloured. The image on the left was made with the B+W 403 only and with a shutter speed of 10 sec. For number four an IR attenuating filter B+W 489 in conjunction with the B+W 403 was put into service, the speed was 20 sec. This is my preferred kind of filtration for UV photography. I optimised both images a bit in Nikon Capture in terms of colours. |
|
|
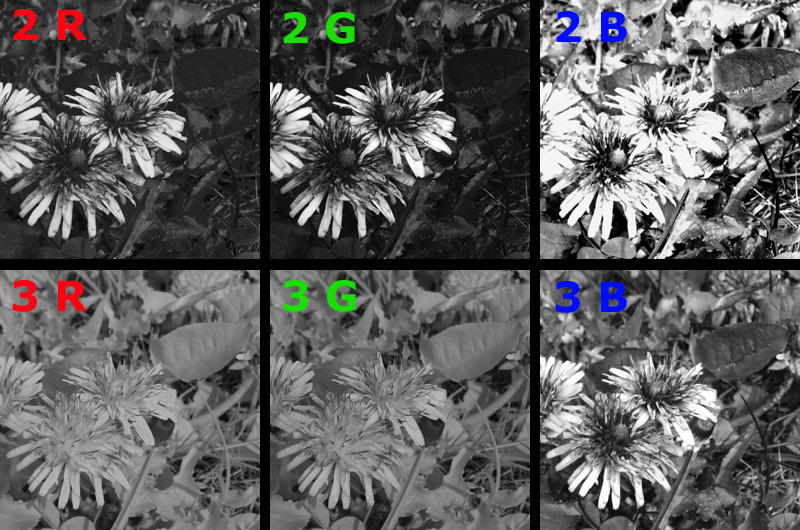
This comparison shows - without any modification - the R, G and B channels of the two extremes from above. All of the three colour channels of image number two show the UV signature. The blue channel is much brighter than the others. In image number three there is no UV signature in the red and in the green channel. These channels seem to be dominated by infrared light. But the blue channel has the signature of the dandelion. Overall it's clear: the blue channel of the D70 is the most sensitive one for UV. |
The most powerful enemy of the UV photographer is the wind because of the very long exposure times. If you are primarily interested in UV patterns of flowers you can use a blacklight bulb as a UV light source. Even here you need very long exposure times, but you can do your work inside with no wind. If the room is dark except for the blacklight bulb you can go without any filter. An alternative are UV LEDs, but I have no experiences. Another option is a UV capable flash unit. But those are very rare and expensive (example: Nikon SB-140, for many years out of production). A Vivitar 285HV seems to be the cheapest alternative (around 150€ new). It is reported that the newer samples should radiate UV light as well. If not, you have to modify it by yourself (search the Web for instructions). I have not tried flashes for my UV photography yet.
Be careful - UV light sources can be dangerous for your health!

|
|
Artificial UV illumination: a bouquet of dandelions in the light of my 25W energy saver blacklight lamp. Nikon D70 with Nikon Series E 35mm without any filter at ISO 200, automatic WB, F11 and 10sec. The distance between lamp and flowers was about 35cm. Analysis of the colour channels: the green channel is properly exposed, but has no signature. In the blue and in the red channel the dandelion's signature is clearly visible. The blue channel is much brighter than the others. |
Analogue to IR an UV modification of your camera at a specialised repair service is possible. The IR blocking filter in front of the sensor will be replaced by a shortpass filter like the B+W 403. The IR blocking filter of the D70 is very similar to the Schott BG38. That means that the results of a non-modified D70 with a B+W 403 on the lens will be comparable to the results of a UV modified D70 with a Schott BG38 on the lens. And the sensitivity is nearly the same, too. From my point of view, a dedicated UV camera has only one advantage: You can use the viewfinder even with the filter, because the BG38 is transparent (although a bit blueish).
There is another opportunity to modify a DSLR: replacing the IR blocking filter with just clear glass. Such a camera is usually called an 'UVIR'-model. I own a D70UVIR. It was my first modified camera. This body helped me to find out which type of longpass filter for IR I like most. Afterwards I have used it for both IR and UV photography for a long time.
|
|
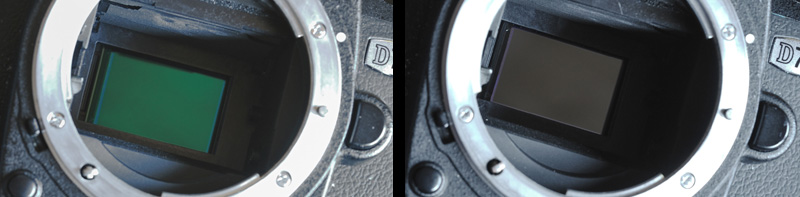
A look at the sensor. On the left a non-modified D70 with the IR blocking filter, on the right a D70UVIR with clear glass on the sensor. |
The D70UVIR has no real advantages for UV photography over a non-modified D70. The sensitivity is a little bit higher (about 1/2 f-stop) and I like the colours it produces a little bit better. But I would not buy a D70UVIR only for UV photography!
For infrared photography you have the same fast shutter speeds as with a dedicated IR camera. But you need a screw-in filter. On the other hand you are free to use any type of longpass filter you like. You can even use a longpass filter with a threshold wavelength within the visual spectrum. That is not really possible with a non-modified camera, because the visible light would dominate the image.
|
|
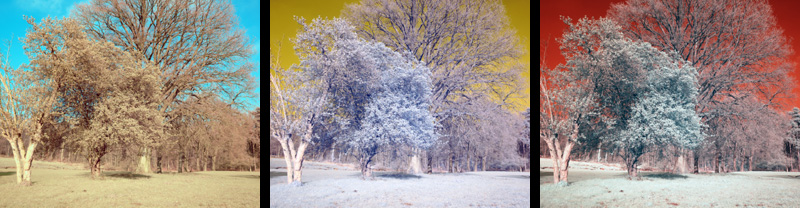
Mixing visible and IR light with a D70UVIR. From left to right: without any filter, with a 560nm longpass filter (Nikon O56 orange filter), with a 630nm longpass filter (B+W 091 red filter). But be warned: because of the focus shift between visible and IR light you might have serious sharpness problems. The Nikkor 20mm f/3.5 used here has hefty problems in the corners! |
Of course, you can also use an UVIR model without any filtration, too. With the D70 in daylight you get a mix of visible and IR light. UVIR cameras without filtration are often used for astrophotography, a sort of photography I have not tried yet. The problem for photographing the full spectrum is the focus shift between the different types of light. For astrophotography, usually mirror lenses are used, because mirrors have no focus shift.
A UVIR camera is still usable for normal photography. You have to screw in an IR blocking filter on your lens for doing it. On my D70UVIR the BG38 works fine for that.
|
|
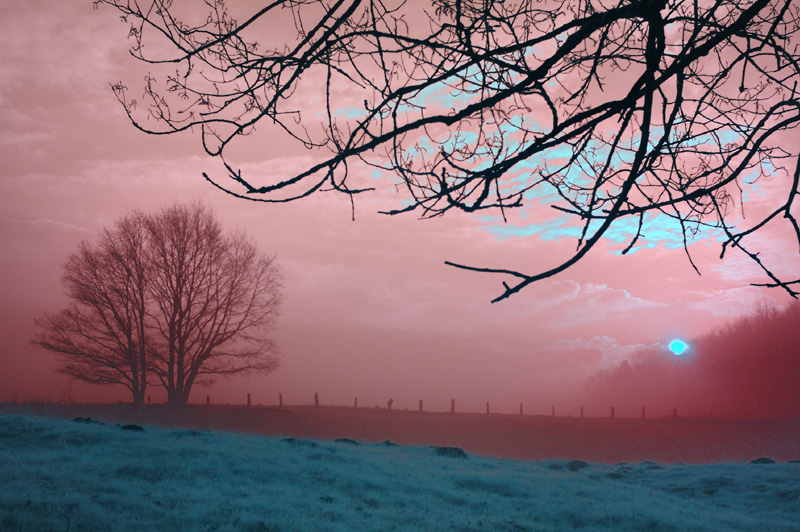
Sunrise in infrared. Nikon D70IR, Nikon Series E 35mm f/2.5, at ISO400, F16 and 1/250sec. |
|
|
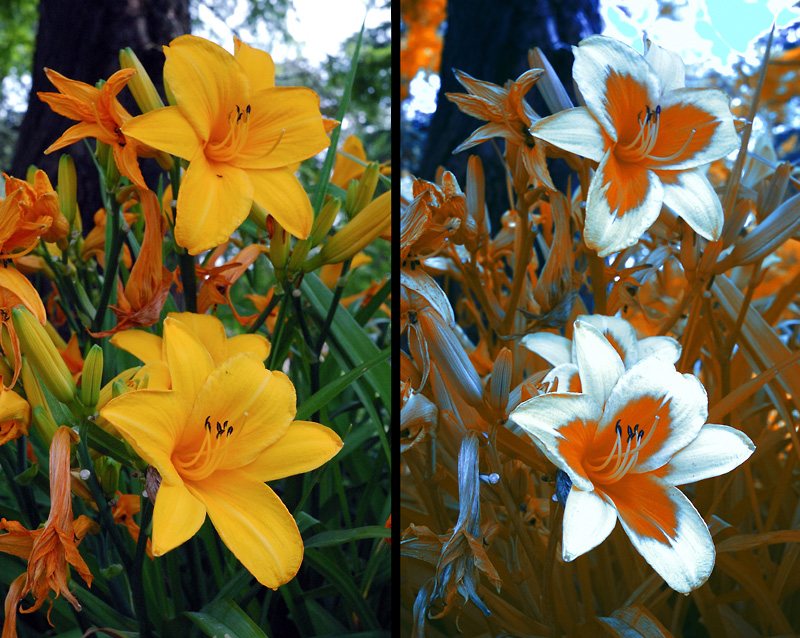
Lilium bulbiferum, on the left in vivible light, on the right in UV light. Both images were taken with the Nikon D70UVIR at ISO 400 and the Nikon Series E 35mm f/2.5 at F11. For the left image a BG38 was used and the shutter speed was 1/200 sec. The UV image was exposed for 20sec and three filters were used: B+W 403 + BG38 + B+W 489. |
|
|
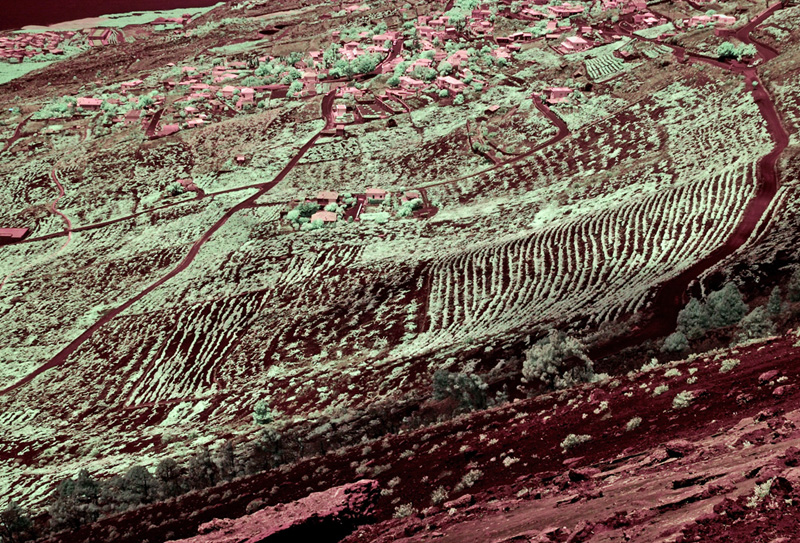
Infrared wine! Wine cultivation in the volcanic landscape in the south of the island of La Palma, Canary Islands. Captured with the Nikon D70IR at ISO 200 and 1/250sec and the Nikkor 18-55mm f/3.5-5.6 GII at 26mm and F8. |
|
|
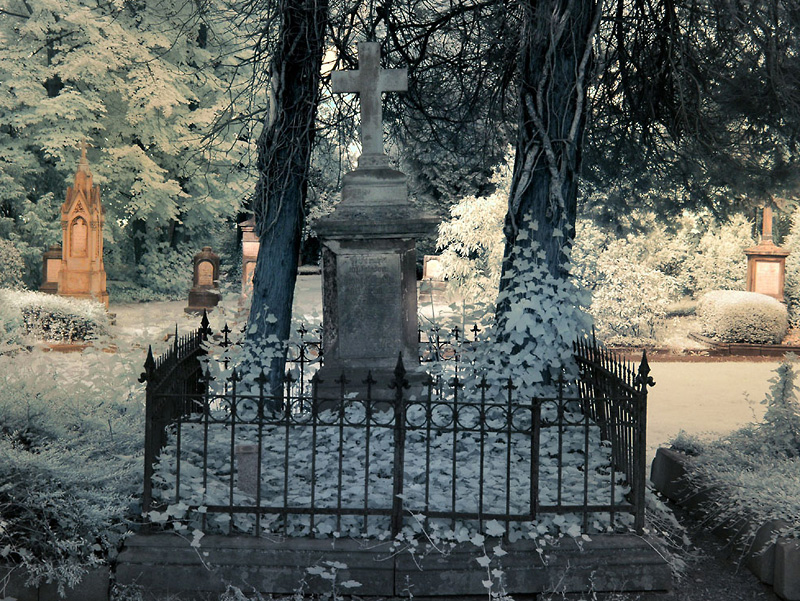
The old graveyard of Rheine. This infrared image was captured with the D70UVIR at ISO 200 and 1/30sec, Nikkor 18-55mm f/3.5-5.6 GII at 35mm and F11, B+W 092. |
|
|
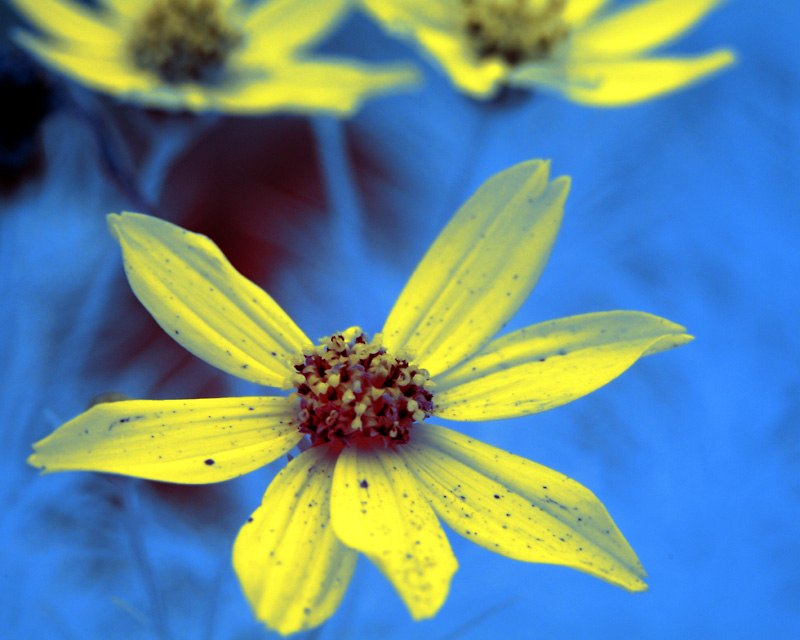
Infrared blossoms. Nikon D70IR, Micro-Nikkor 55mm f/3.5, at ISO200, F8 and 1/60sec. |
|
|
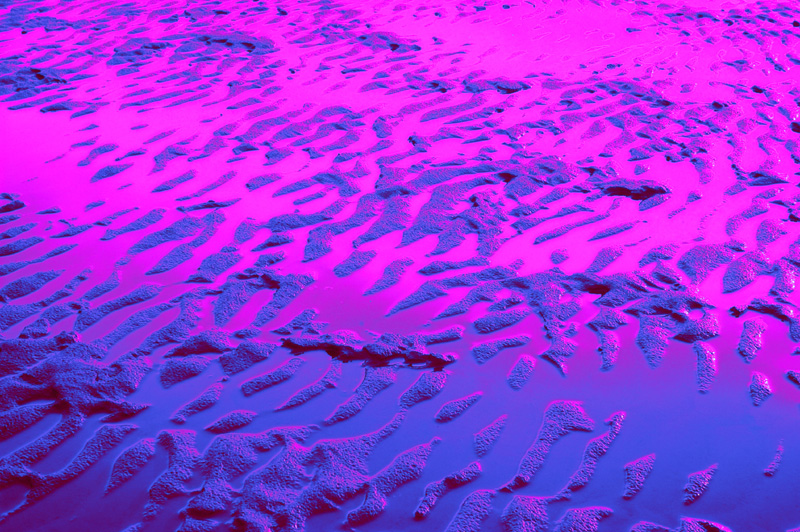
Mudflat at the German coastline near Cuxhaven, captured in the last ultraviolet sunlight of the day. Nikon D70, Nikon Series E 35mm f/2.5 with B+W 403 and B+W 489, at ISO 200, F16 and 30sec. |