
Before you think about DIY digitising: many labs offer the scanning of your slides or negatives as a service. If you know a good one you trust in, that's a good idea, especially if you only have a few slides or negatives you want digitised. The typical price per slide or negative in Germany is about 35 cents. But keep in mind that you have to give away your originals!
In 1998 - five years before I started with digital photography - I bought a Nikon Coolscan III 35mm film scanner. In those years I digitised slides and negatives exclusively for printing them on my inkjet photo printer. Before, I had to give my originals to a lab for that.
Later, I have used my scanner mainly for getting my important images into the digital world. Still today, there are a lot of rolls of negative film and a few hundred mounted slides in my cupboard, waiting for getting digitised. Off and on I spend some time on that. In December 2016 I wanted to scan a lot of colour negatives. But my Coolscan stopped working. Therefore I made some new trials with photographing slides or negatives. But finally, I bought a "new used" scanner, because the scanning workflow appears overall easier to me. Being concerned again with this subject was the reason why I revised and updated this article.
This article deals with the two ways for DIY digitising: scanning or photographing.
|
|
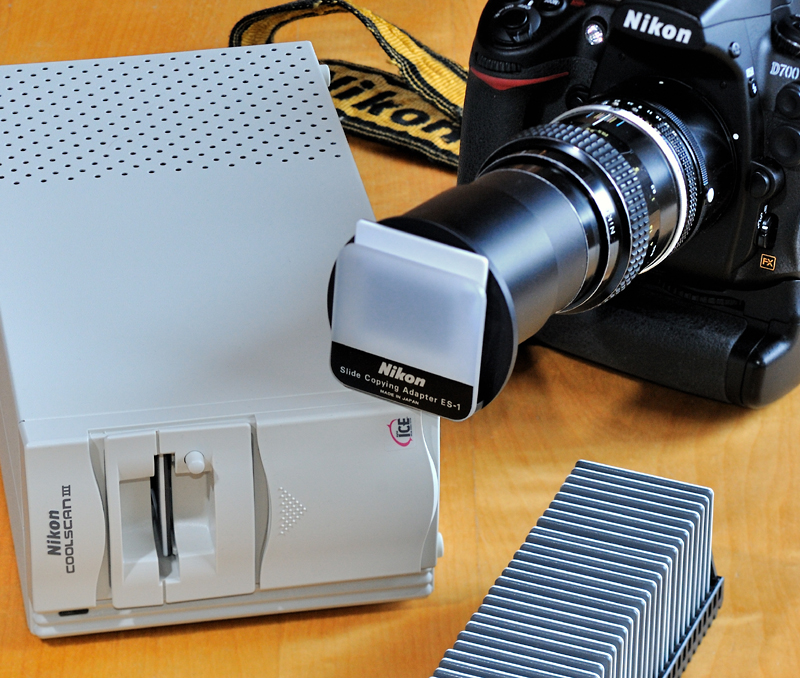
Coolscan III vs. Micro-Nikkor 55mm f/3.5 on the D700.
|
My Coolscan III scans with 2700 dpi, thus it converts a slide into a 9 megapixel digital image. If I photograph a slide with my D700 I have some borders around the actual image, so that the resolution is not significantly higher than that of the scanner.
In terms of optical quality the Micro-Nikkor 55mm f/3.5 is one of the best lenses you can get for macro work (see my review here). Here I used the lens set to F8. The D700 was set to ISO 200 and to produce 14 bit RAW files. You can photograph a slide by holding the unit against the sky, but that method will not produce reliable results in terms of colour temperature. Therefore I prefer to use a flash as a light source. For the example in this article my SB-700 was used.
|
|
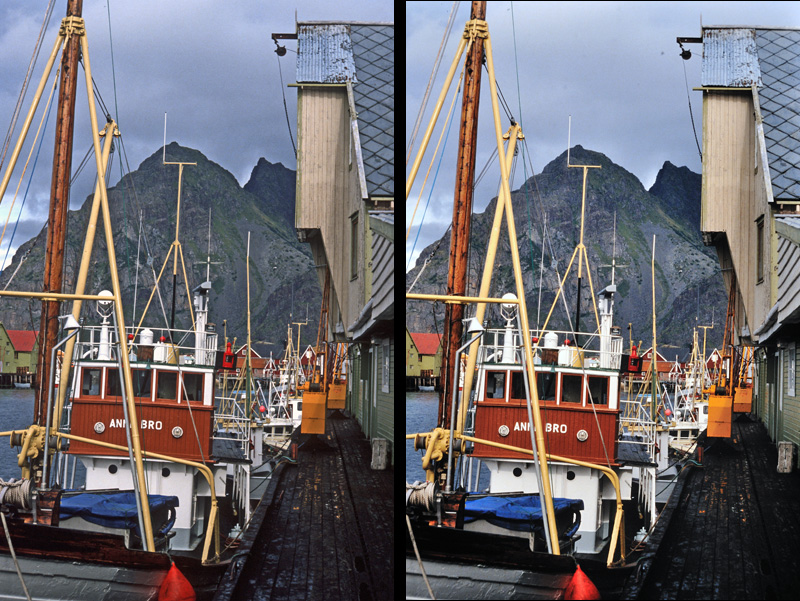
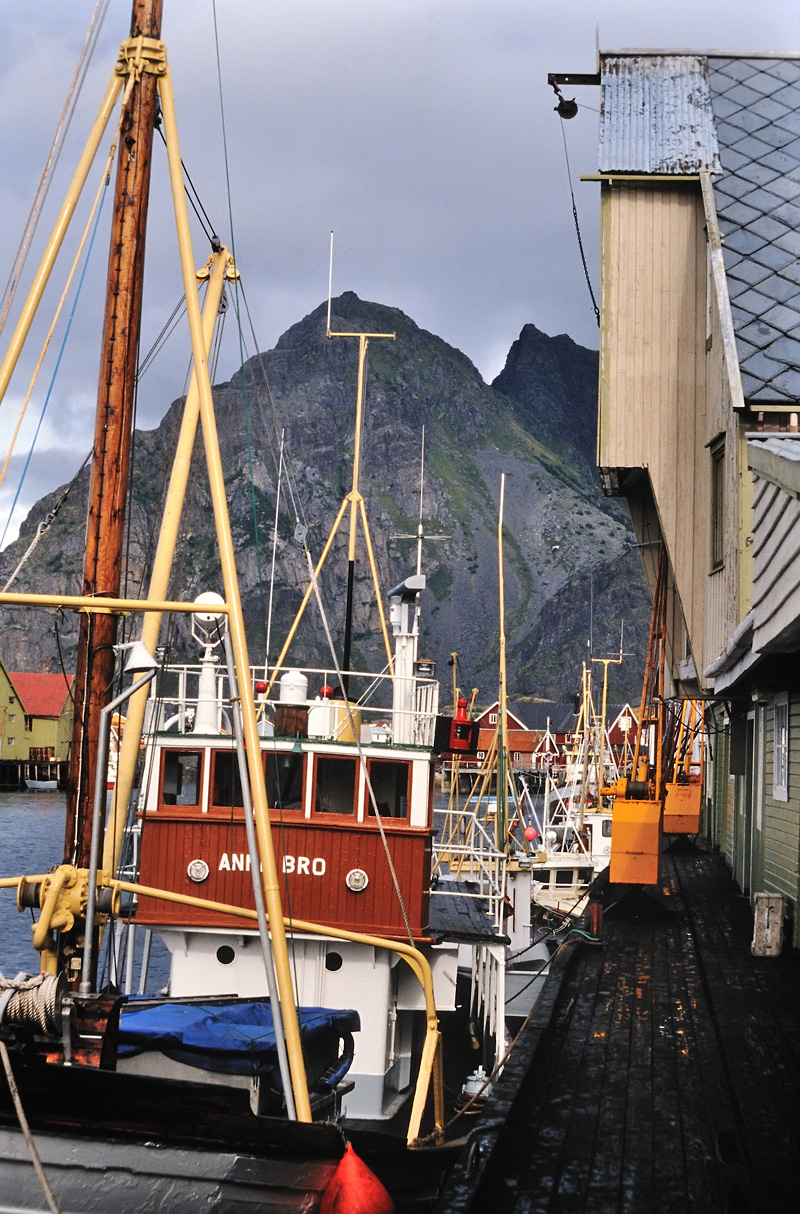
This slide was captured in summer 1990 with a Nikon F-801 plus AF-Nikkor 85mm f/1.8 on Fujichrome Sensia (ISO 100). It shows the sleepy fishing harbour of Henningsvær, Lofoten, North Norway. The image on the left is from the Coolscan, the one on the right is from the D700, just raw converted by Nikon Capture NX. Please ignore the slight differences in colour temperature and brightness. |
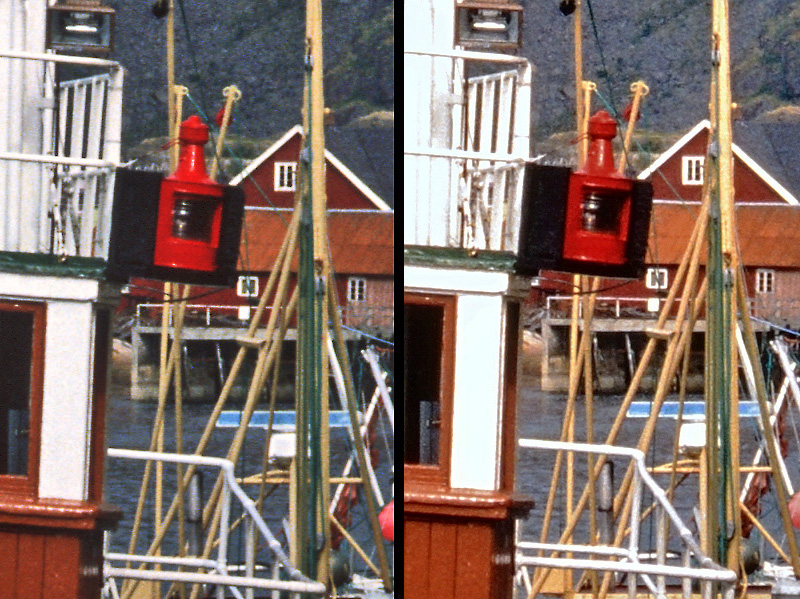
At first glance you notice a difference between the two images: the photographed one (see below on the right) has a couple of specks. That is a mix of dust specks on both on the sensor of the camera and on the slide itself. As a DSLR photographer you know this problem very well. The scanner normally does not have such a problem. It has no image sensor with possible specks on it and due to its "ICE" technology dust specks and even small scratches on the slide are removed automatically. That makes the workflow with the scanner a bit faster.

|
|
No specks on the scanned image!
|
Now let's have a closer look to the sharpness of the two images.
The Coolscan was set to AF mode. I also tried manual focussing. But the results with AF were the best. On the D700 I used the camera's focus indicator for focussing.
|
|
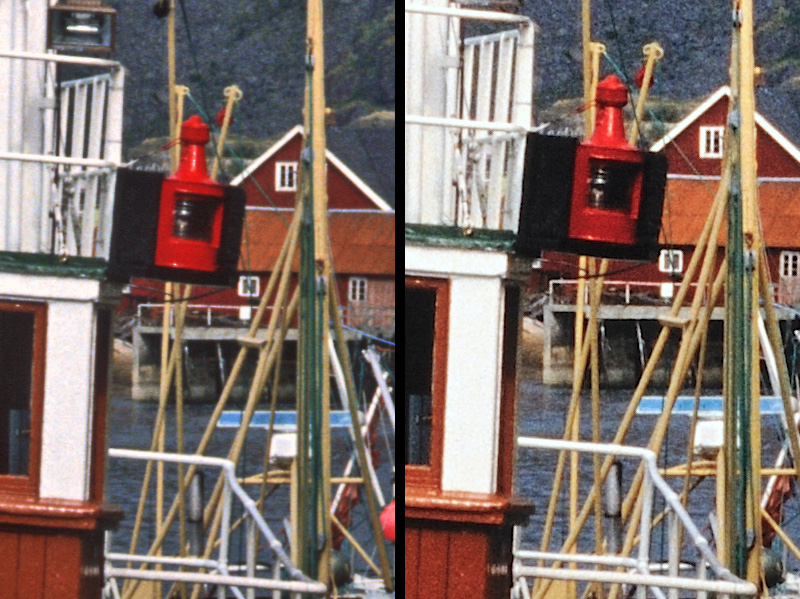
100% crops of the two images.
|
The photographed image seems to be the clear winner. But some unsharp masking on the scanned image makes the difference less significant, see below.
|
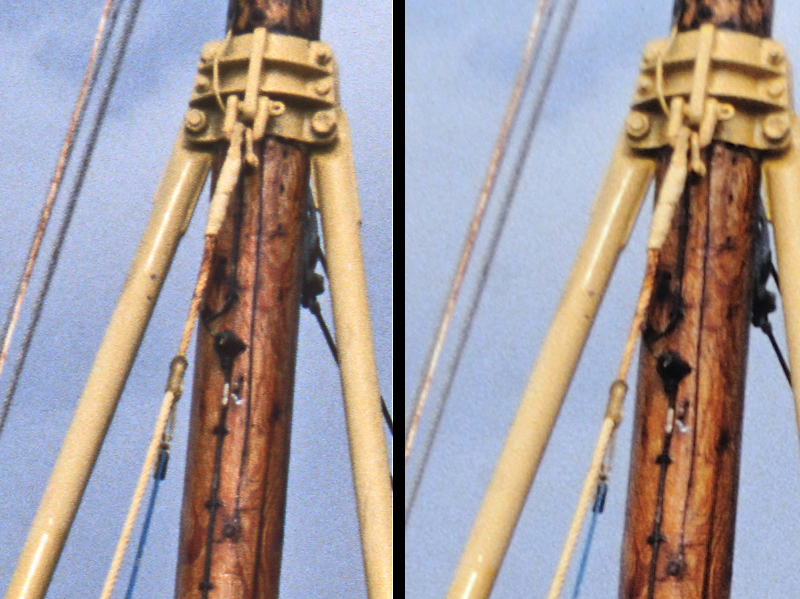
In the corners, things are a bit different. Here the scanned image is slightly sharper, see below.
In general, lenses are softer in the outer corners than in the centre of the frame. In contrast, a scanner has the same sharpness everywhere. Nevertheless I guess the depth of field is the main factor here, because the slide itself has a curvature that matches the sharpness pattern of the photographed image. But I don't have any information about the depth of field of the Coolscan III.
|
|
100% crops of the upper left corners.
|
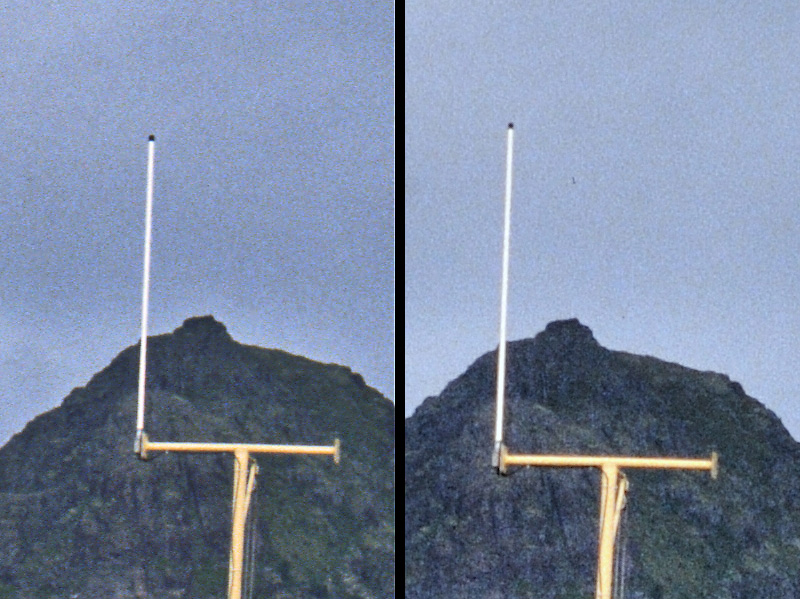
A closer look to the top of the mountain shows - see 100% crops below -, that the Coolscan III produces a little bit of colour fringing. I guess, that is the reason why the newer Coolscan models use ED glass.
|
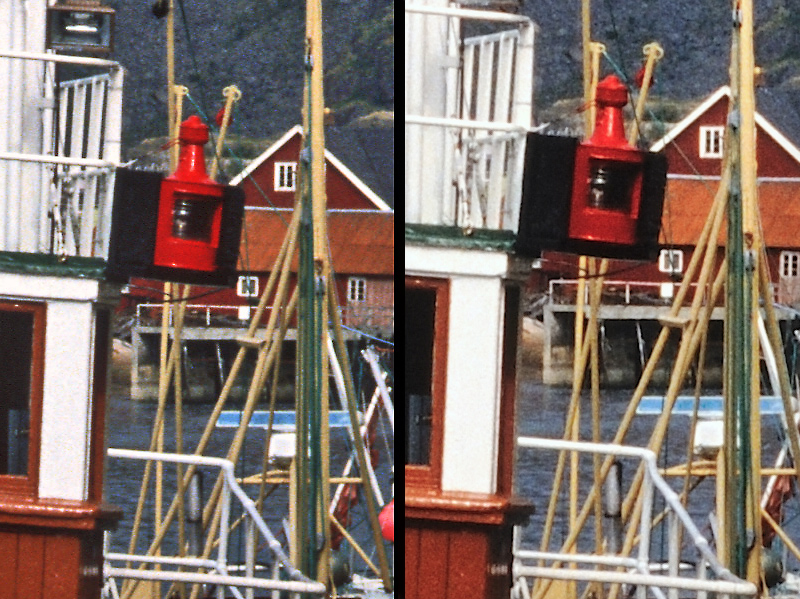
For the post-processing of digitised slides you need a very good noise reduction software. I use Imagenomic's Noiseware Standard plugin for Photoshop for that job and I'm very satisfied with it. You can control every detail of the noise reduction process and save these settings in order to use them again later. For instance I created custom settings for landscapes on Fujichrome Sensia, which I even used for this slide. Here are the results:

|
Here comes the final result of the post-processing described above. It is the photographed image.
|
| A digital image, captured more than 25 years ago... |
In my opinion both methods deliver absolutely usable results. The overall quality of the photographed image is a little bit better, but not really worth mentioning.
If you want to photograph your slides and negatives you can also use a DX camera. The results will be as good as from an FX camera, because the film limits the image quality! Here are two 100% crops, the left one comes from the coolscan, the right one was photographed with the Nikon D5100 plus bellows plus AF-Nikkor 3.3-4.5/35-70mm at 65mm:
|
The state-of-the-art 35mm film scanner ist the Nikon Super Coolscan 5000 ED, introduced in 2003 and discontinued in 2009. Today you have to pay around 2500 euros for a good sample on ebay.de! You can also rent one: you have to pay 200 euros or more per week.
My Coolscan III worked fine for 17 years. Then it began to make unusual noises and a few hours later it stopped working completely. It is a usual problem of old scanners: they must be dismounted, cleaned and greased. On ebay.com and ebay.de there are people offering such a service. You pay between 100 and 150 euros for it. An alternative ist to buy a refurbished scanner. That's what I did and I paid 180 euros for a Nikon LS-2000 (without any accessories). The LS-2000 ist the professional brother of the Coolscan III (aka LS-30). Both scanners are completely identical, but the firmware of the LS-2000 works with a colour depth of 12 Bit while the Coolscan III only offers 10 Bit.
The problem of these old scanners is their SCSI interface, which is a bit exotic today. I use an Adaptec AHA-2940au SCSI controller (today, you get it for less than 20 euros on ebay) in a desktop PC running Windows Vista. Because Microsoft will stop delivering security updates for Vista in April 2017, I use this old computer offline only now. Under Windows 7, 8 and 10 it is more problematical to run a SCSI scanner (but some people report it would work).
The first Nikon scanner with a USB interface was the Coolscan IV. This model is relatively difficult to find today. For a good sample you have to pay around 500-600 euros (including accessories). With an USB scanner you should not have a problem with your modern computer.
For your calculation you must keep in mind that you need software for running the scanner. My clear recommendation is to use Vuescan Professional from Hamrick Software, see "links" section. It costs $80 and supports a lot of scanners including all Nikon models. BTW: I also own a 15-year-old Canon FB630U flatbed scanner. Canon provided drivers up to Windows XP for this model. Thanks to Vuescan this scanner still works under Windows 10. But it has begun to make strange noises...
The combination Coolscan III plus Vuescan works relatively fast. It takes a litle bit more than one minute to scan a slide at 2700 dpi incl. ICE into a .TIF file.
You can use both methods even for digitising black and white negatives. But please note: the "ICE" dust and scratch removal technology of the scanner works only with colour film. In other words: an important advantage of scanning is gone!
Colour negatives have a strong orange mask. Formerly, I thought the scanner would correct it with a special mix of its RGB light components. But I was wrong - it is just software.
Scanning negatives is easy. But the results need more post-processing than scanned slides, especially tonal and colour corrections.

|
| Swinging without holding on. A photographed negative, inverted with Vuescan and post processed with Nikon Capture NX2. |
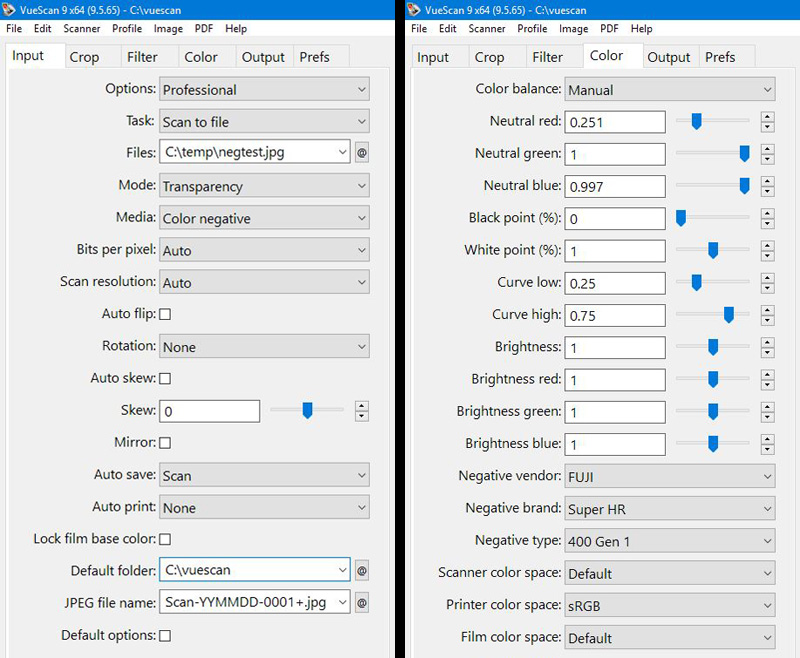
If you photograph negatives you need software for inverting the image. Adobe Photoshop (Elements) offers the CTRL-I command for doing that. Nikon Capture NX2 allows manual inverting by reversing the toning curve. Another option is Vuescan! It can "scan" from an image file (even .NEF!). Advantage: you have the same options you have in conjunction with your scanner, for example:
|
The output of such a scanned file is very similar to a scanned negative. In my opinion Vuescan delivers the best output for easy further processing, better than Adobe PSE or Nikon Capture NX2.

|
|
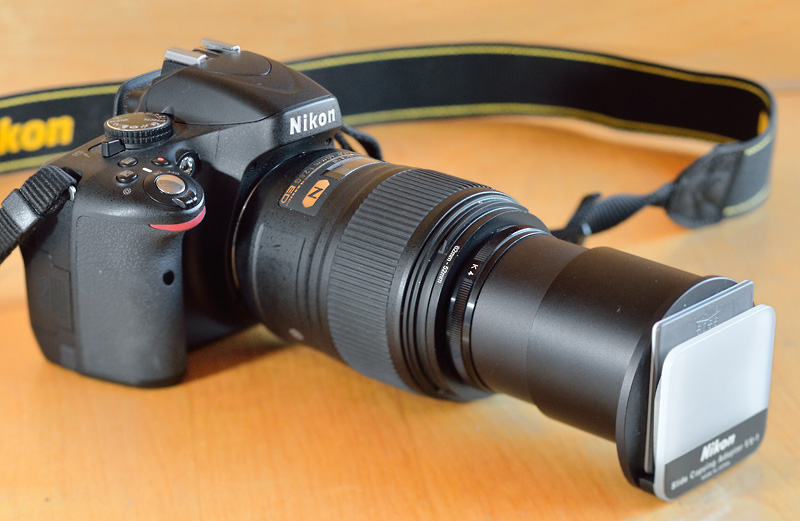
Setup for digitising slides: D700 + PK-13 + Micro-Nikkor 55mm f/3.5 + ES-1.
|
Using the Nikon ES-1
A cheap way for photographing slides is the Nikon Slide Copying Adapter ES-1. It is still in production and you can buy it new for about 90 euros. That is a slide holder with an extendable tube and a 52mm thread. The length of the tube can be varied in the range from 45mm to 70mm.
On an FX camera the combination of the PK-13, Micro-Nikkor 55mm f/3.5 and ES-1 is ideal for photographing slides. I guess the Micro-Nikkor 55mm f/2.8 can be used too. But with a DX camera you can not photograph the complete slide with this combination, because the tube of the ES-1 is too short. You can fix this problem by using a K5-ring (tube for M52, length is 20mm, part of Nikon's K Ring Set) between the Micro-Nikkor and the ES-1.
If you own another macro lens and you think about using an ES-1, just focus it to a rectangular subject with a size of 36x24mm and measure the distance between the front of the lens and the subject. Then you will know whether the ES-1 works on its own or whether you need additional tubes for it. If your macro lens has a front thread of 62mm you may try a step-down ring.
I use my SB-700 on its stand, about 10cm away from the slide. In order to have the flash in the optical axis I use a couple of books (e-books don't work here ;o). Of course, you can interconnect flash and camera with a cable (SC-17 or SC-29), too. But because I'm lazy and because the internal flash of the camera cannot affect the image, I used the SB-700 in remote mode.
There is one thing that makes the handling of the ES-1 a bit annoying: after having replaced one slide by another you have to align the unit again, which is not that easy! Additionally you have to focus again (or you use an autofocus lens).
The ES-1 is not usable for negatives unless you put them in a slide mount or you use a film strip holder like the Nikon FH-2 or FH-3 (accessory of the Coolscans).
|
|
A comfortable setup with an autofocus lens: Nikon D5100 plus AF-S Micro-Nikkor 60mm f/2.8 G plus 62mm to 52mm thread adapter plus Nikon K4 ring (10mm tube with 52mm screw threads) plus Nikon ES-1. |

|
|
You can use a film strip holder for photographing negatives with the ES-1. The FH-2 is an accessory of my Coolscan III. |
Update May 13, 2018:
Using a bellows unit in conjunction with a dedicated slide copying adapter
If you already own a bellows unit it may be a good idea to use it for digitising your slides or negatives. Nikon offers special slide copying adapters for their bellows units. That is a slide holder with a bellows and a 52mm snap-on mount. You pay around 50 euros on ebay for such an adapter.
I own the PB-4 bellows unit and the PS-4 slide copying adapter. The main advantage over the ES-1 is that you don't have to realign anything after changing the slide. Besides, if you have a series of slides with the same type of mount you can perhaps skip the refocussing.
|
|
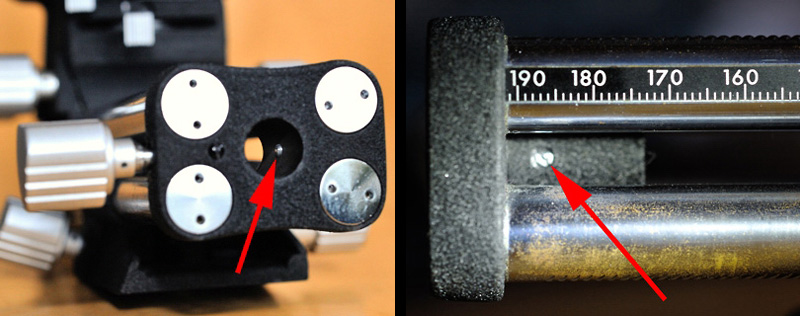
If you have problems to mount the PS-4 onto the PB-4: keep the little pin and setscrew shown above in mind! |
The combination of PB-4 and PS-4 works fine with the Micro-Nikkor 55mm f/3.5 on an FX camera. The usable length of the PS-4 is between 3cm and 10cm. With another lens you may have to use M52 tubes like the K5-ring between the lens and the PS-4.
|
|
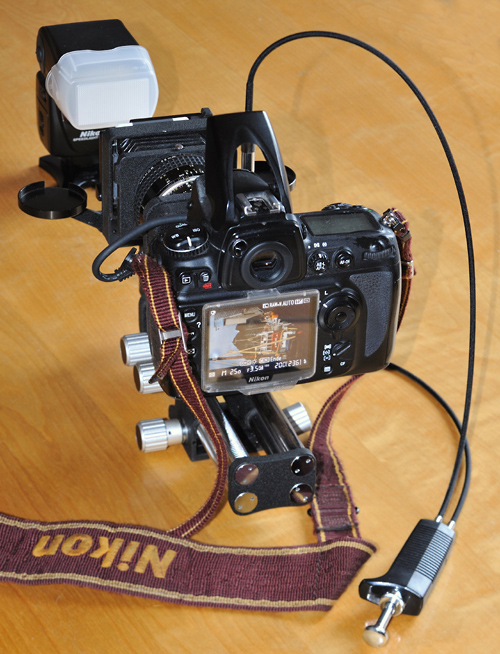
This is a good setup if you plan to digitise a lot of slides: Nikon D700 + Bellows unit PB-4 + Micro-Nikkor 55mm f/3.5 + Slide Copying Adapter PS-4.
|
|
|
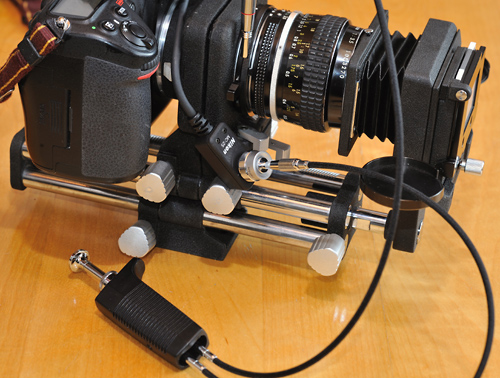
Between the bellows unit and the lens you see the BR-4 tube for enabling an automatic stop down of the lens, connected to the double cable release AR-7.
|
There are two more advantages of the PS-4 over the ES-1: firstly, the PS-4 offers the option to work with film strips instead of mounted slides. Secondly, it allows to decentre the slide in each direction. That's fine, if you want to zoom in for photographing only a part of the slide.
For easier focussing you can use a BR-4 tube between the bellows unit and the lens, which holds open the aperture of your lens and allows to stop it down with a cable release. In conjunction with a double cable release the lens is stopped down before the camera is released, just as if the lens would be directly mounted on the camera. I use an AR-7 double cable release for doing that. I need two adapters for connecting the "later" release cable of the AR-7 to my D700: an MR-3 plus an MC-25.
The focussing can be done with the camera's focus indicator. An alternative is the use of live view for focussing, which is perhaps more exact. If I do so I activate live view with the camera's release button and shoot with the AR-7. Please note: normally the camera stops down the lens in live view mode. But in this setup the aperture is open until the AR-7 is released. That's fine, because it makes focussing more precise!
On a DX camera the minimum magnification of the PB-4 plus the Micro-Nikkor 55mm is too high. You are not able to photograph the complete slide! The only solution is the usage of a longer lens. I recommend three cheap options for this job: AF-Nikkor 35-70mm f/3.3-4.5, AF-Nikkor 28-70mm f/3.5-4.5(D) and AF-Nikkor 35-80mm f/4-5.6 D. These standard zooms from the 80s and early 90s set to about 65mm (PB-4 at minimum extension) will deliver great quality here! My impression is that the 35-70mm is the best among these three, but the differences are minor. Please keep in mind: we are speaking about lenses that you can get used for less than 50 euros!

|
|
A very good DX setup: D5100 + PB-4 + 35-70mm + K5 ring + K4 ring + PS-4. |
Because the filter threads of these lenses rotate I fixed the focussing ring with sticky tape at infinity. That makes the handling much easier. The little bellows of the PS-4 is too short. It is necessary to make it a bit longer with M52 tubes. The K4 and K5 rings (part of Nikon's K-ring set) I used have an extension of 30mm in total. The K5 (20mm extension) on its own is just a bit too short.
Because the D5100 is a CPU-interface-only camera you do not have exposure metering in such a setup. That is even true for flashing. I set the D5100's internal flash to manual mode. It releases my remote SB-700 (set to SU-4 mode) as the main light source. For easier focussing a torch on top of the flash is helpful!
The finder of the D5100 is not great for such applications but live view makes focussing easy and safe. Don't forget to open the aperture for focussing and to close it before shooting.
The combinations PB-5 + PS-4 and PB-6 + PS-6 offer the same possibilities for digitising slides like the above described combination of PB-4 and PS-4.
An alternative to the PS-4 is the PS-5. That is a simplified version of the PS-4 that offers neither the possibility to scan film strips nor the decentering option. It works in conjunction with the PB-4 and the PB-5.
Please note that the Nikon PB-3 has no slide copying option!
For the Nikon Model II Bellows Unit (the oldest for the F-Mount, Model I was the one for the S-Mount) Nikon offers a slide copying adapter. But that bellows unit has a limitation for the size of the camera - the Nikon D700 is too big. In contrast to the D700 the very small and compact D5100 should be usable in conjunction with smaller bellows units as well.
As of February 2017 I have mostly completed the digitising of my negatives. Next winter I will scan the rest of my slides and that's it. I guess my LS-2000 will be my last film scanner! If there should be a single slide or negative to be digitised in the future, I can photograph it.
Why do I prefer scanning? I think it depends on the film! I used mostly Fuji films - the RD-100 (Sensia) for slides and the Superia 400 and 1600 for negatives. Today - in an age of 15 or more years - these films show a lot of curvature. Therefore the corners and often also the borders are soft when I photograph them. The scanner delivers a more uniform sharpness with these films. Together with the very helpful ICE feature that is the reason for me to prefer the scanner.
But: for a few months in 2002 I used the Kodak Supra 800 negative film, which shows much less curvarture! Thus, it is a good idea to take a closer look at your films before you make your decision! And don't forget: the ICE feature does not work with B&W film.