
|
No, I have not switched back to analogue photography. I photographed analogue for more than 30 years and I do not want to go back! Except for landscape photography the digital technology gave me a kick forward. It enabled me to shoot images that had not been possible for me in the old times. That is especially true for wildlife photography.
Currently we see a retro trend to analogue photography. The believers of it say analogue is better because less is more. Having only 36 frames on a roll instead of a few thousand on the memory card is an advantage. The wait until the results come back from the lab instead of the possibility to evaluate the results instantly is an advantage. The necessity to set everything manually instead of having the option to do that is an advantage... In my eyes that is simply baloney.
But I can understand that younger people want to try analogue photography, preferredly with a mechanical camera. It is a look into the past (just like studying a steam engine today or a gasoline engine in 20 years;). And it is a good idea to do it today because analogue photography is a dying technology. In 10 years, it will probably no longer be possible. In this article I want to give you some guidance for finding the proper Nikon camera on the cheap.
In 1982 I bought my first Nikon, an FM2. Sometimes I take it out of the cupboard just to play with it. I love the sound of the spring mechanics when using longer shutter speeds! Many memories are associated with this (type of) camera for me. Therefore this article is for older photographers like me, too. Maybe, you also would like to have a mechanical SLR to play with, sometimes, while remembering the good old times...
|
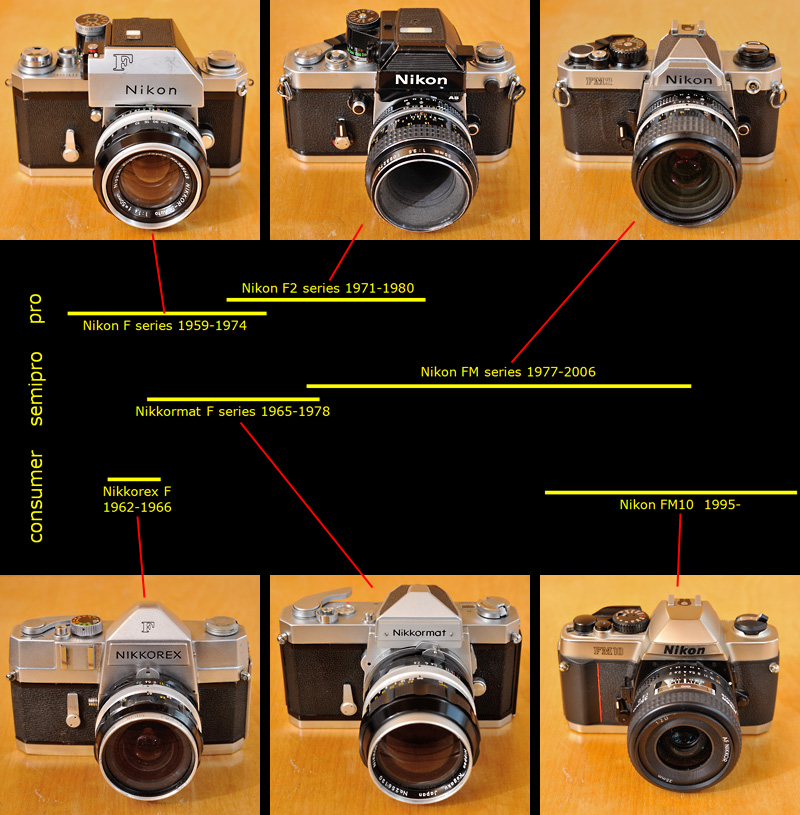
In 1959, when the F-Mount was introduced, shutters worked mechanically. Ten years later the first electronically controlled shutters were developed. Nikon's first SLR with an electronic shutter was the Nikkormat EL, introduced in 1972. By the end of the 70s, Nikon offered four camera bodies: The professional mechanical F2, the semipro electronical FE, the semipro mechanical FM and the electronical consumer model EM. Only four years later Nikon's lineup consisted of six bodies, with only one mechanical body amongst.
BTW: the two consumer mechanics are not real Nikon products. The Nikkorex was built from Mamiya and the FM10 is built by Cosina.
I would set three filters for our selection:
1.) Metering
I would not buy a body without (TTL-)metering! Yes, you can guess the proper exposure or you can use an external meter or a metering app on your smartphone. But the TTL-metering is easier, faster and in most situations more precise. TTL stands for through-the-lens. This way of metering was introduced in the 60s and became a standard immediately. Of course, even our modern DSLRs use TTL-metering.
2.) Interface
In 1977 Nikon made some modifications to the coupling elements of the F-Mount: they introduced the AI coupling. That made handling the mount much easier. I recommend taking only AI cameras into account, unless you do not want to explicitly explore the old bayonet coupling logic (see my article Understanding the F-Mount: the wild early years).
3.) Price
The F2 is a beautiful piece of mechanics. In conjunction with the DP-12 (the most advanced Photomic finder for the F2) you will have to pay 400 euros or more for a fully working sample. In the same price range you can get a used FM3a, the last member of the semi-pro FM series, which was built from 2001 to 2006. Both are great cameras, but in my opinion that is way too much money for our intention. I would set the limit to approx. 100 euros for the camera body. Please note, you will probably have additional costs, e.g. for a lens, an eyepiece, new seals or a carrying strap.
With these restrictions only three camera models come into consideration: Nikkormat FT3, Nikon FM and Nikon FM10.
Around the Y2K I tried nearly every Nikon SLR, amongst others two samples of the Nikkormat FT3 and three samples of the FM. I bought cameras on ebay and resold most of them later on. I did not keep an FM or an FT3. Moreover, I have never had an FM10 in my hands. For giving you a knowledgable report about these three candidates, I decided to buy one sample of each on ebay. Here are the results of my investment:
Nikkormat FT3
The last member of the Nikkormat/Nikomat F series, built from 1977 to 1978. It is the only Nikkormat with an AI coupling. It was produced in silver and in black. I paid only 41 euros for this black sample. The description said "fully functional" and that's correct. Seals and bumper look good. A very good deal!
|
|
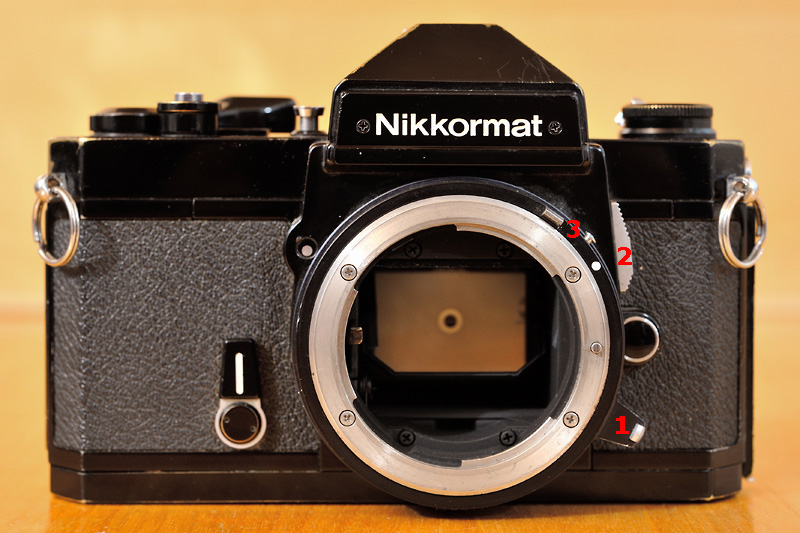
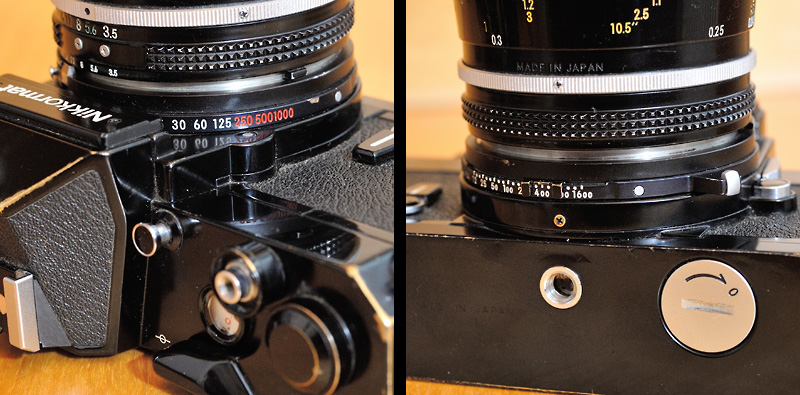
In contrast to every other classical Nikon SLR the Nikkormat F series has the shutter speed dial around the bayonet mount. The lever (1) is for setting the shutter speed. Thus, your left hand must set the shutter speed. The Nikkormat FT cameras allow to fold up the mirror independently from the shutter by the sliding switch (2). The usage of non-AI lenses is possible, press the little button right from the (3) and fold up the AI coupling (left from the 3). Then, you must press the depth-of-field (DOF) preview button for determining the proper exposure (stop-down metering). |
|
|
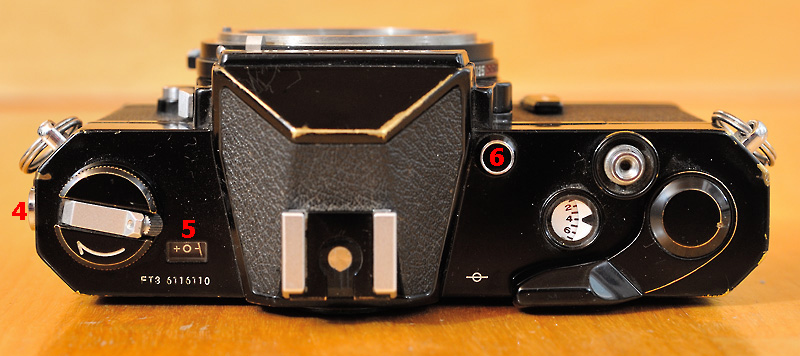
In addition to the hot-shoe the Nikkormat FT3 also offers a sync terminal (4) for connecting a flash unit. There is a little exposure window (5) on top of the camera, allowing you to determine the proper exposure without looking through the finder. The DOF preview button is located on top of camera (6). |
|
|
|
|
|
Opposite of the shutter speed lever you can read out the current shutter speed. If you pull the lever you can set the ISO value. |
Nikon FM
The first member of the FM series. Built from 1977 to 1981. It is smaller and lighter than the Nikkormat and it allows mounting a motor drive. The FM is available in silver and black. I paid 115 euros for this sample in a very nice cosmetic condition. The seller said: "Everything, including meter, works correctly. New seals". That is mostly right, but off and on the shutter has problems with the longer times (1/4, 1/2, 1 and B). The shorter times always work fine. Thus, this transaction was not a great deal...
|
|
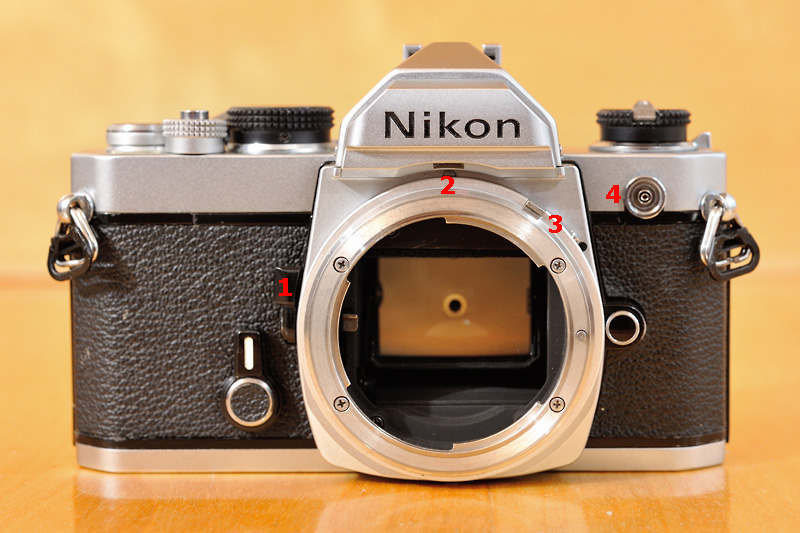
The DOF preview button is located on the front side (1). The FM is the first non-professional body with ADR (Nikonish for aperture-direct-readout). Through the little window (2) with integrated optics the number from the aperture ring of an AI lens is projected into the finder. The usage of non-AI lenses is possible, press the little button right from the (3) and fold up the AI coupling (left from the 3). For flash usage the FM offers both a hot-shoe and a sync terminal (4). |
|
|
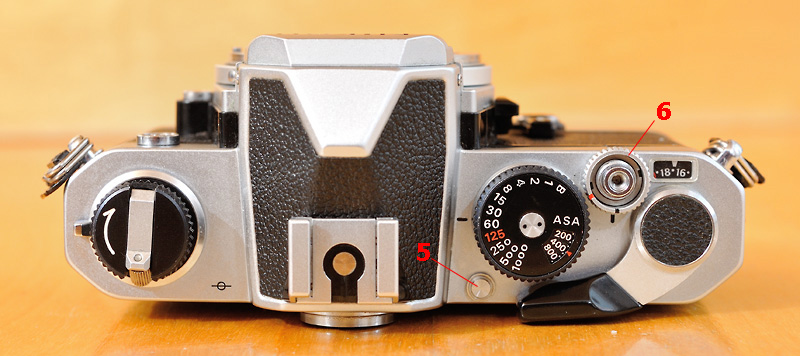
The FM allows multiple exposures with the help of a little lever (5). This is an early version of the FM. The shutter release button can be locked with the switch around it (6). If a motor drive is mounted, it must be in the (red) locked position! Later versions of the FM do not have this switch - they have the lock/unlock function combined with the meter on/off function of the film-advance lever. |
|
|
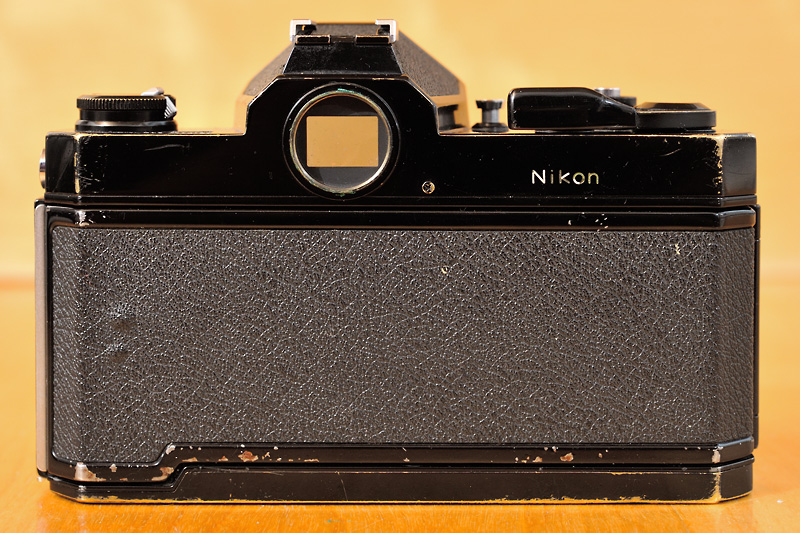
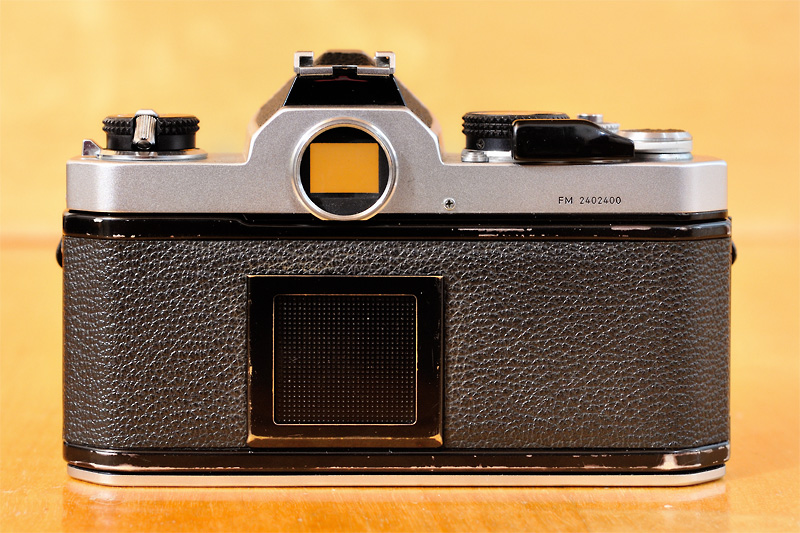
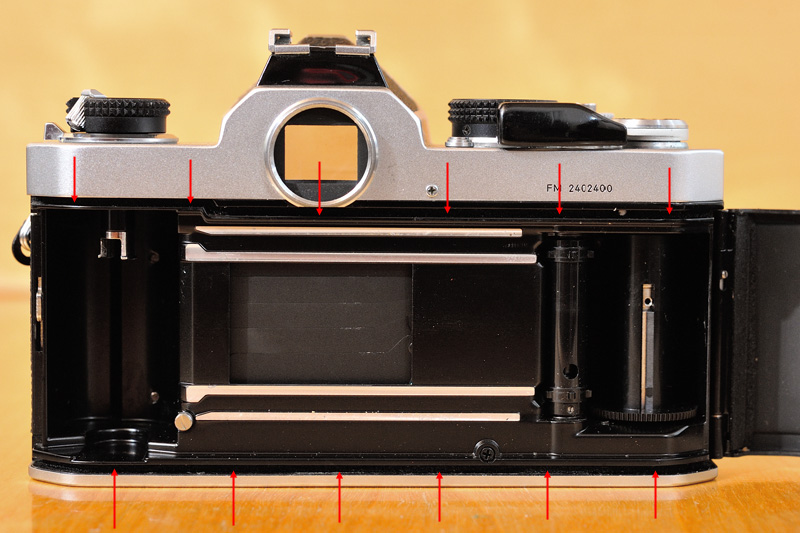
The back of the FM has a memo holder, for example to hold the end flap of a film carton to remind you of the type of film loaded. |
|
|
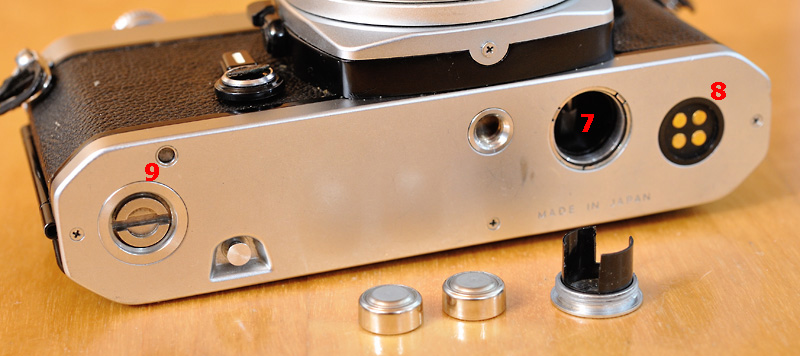
Two LR-44 batteries are required in the battery chamber (7) for the exposure meter. Even with attached motor drive, the batteries are required for metering! The motor drive is connected to the camera body both electrically (8) and mechanically (9). |
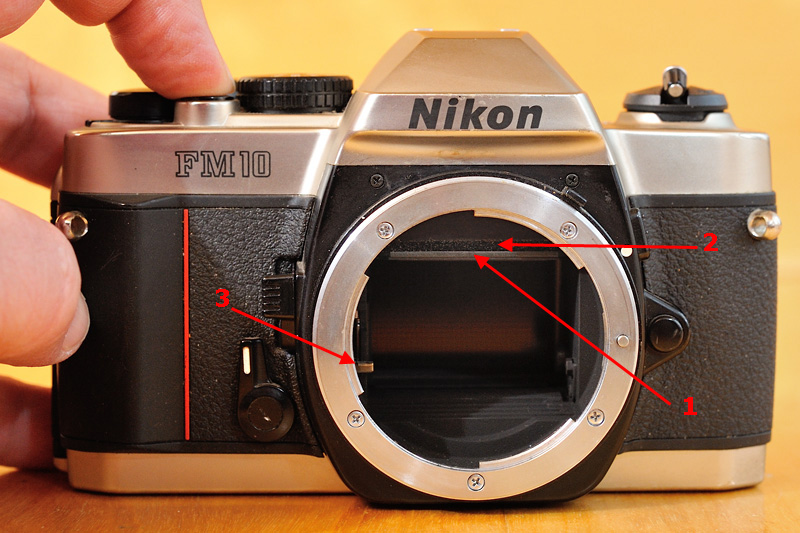
Nikon FM10
Despite its name it is not a member of the semipro FM series. It is a consumer model that is oriented towards the FM series in some ways. Introduced in 1995, this body was intended for the Asian markets. But today it is also avaiable in the US (new for a way too high price of more than 500 euros!). In Europe, the FM10 is a rare model. It is only available in one colour, I would call it "champagne". I paid 80 euros for this sample. The professional seller wrote "shutter works, meter not tested". Because he offered around 10 other mechanical Nikons with the same description I risked buying. Result: everything works fine and because it is a young camera, seals and bumper are ok as expected. Good deal.
|
|
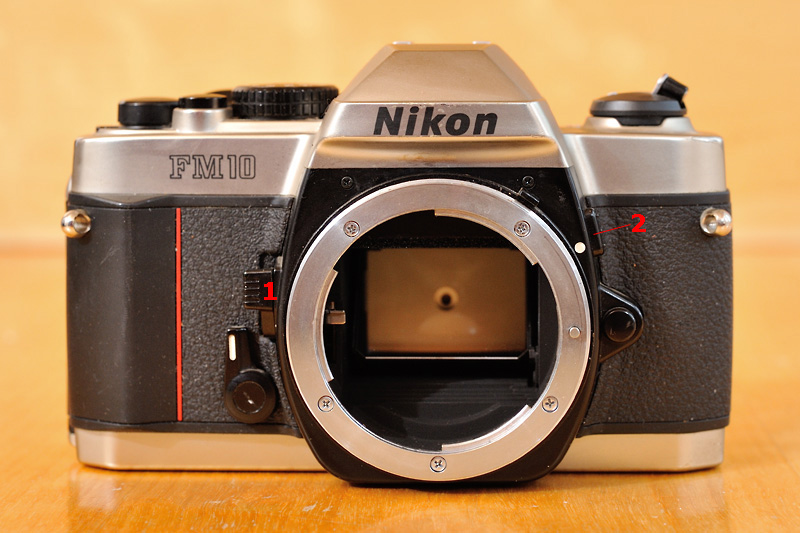
The DOF preview button (1) is located as with the FM. In addition to the shutter release it is possible to activate the meter with a little button near the bayonet mount (2). I don't know what that is good for!? |
|
|
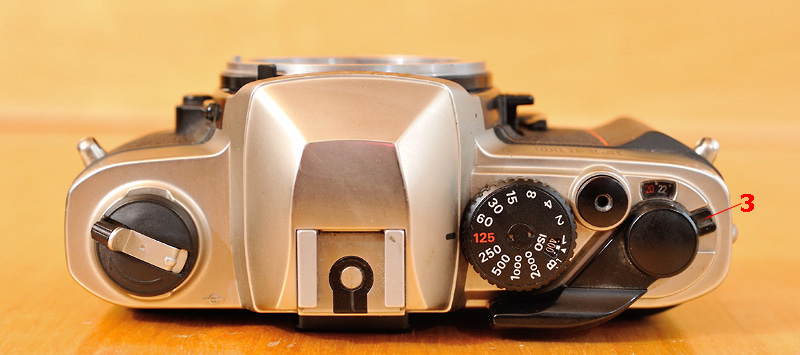
The multiple exposure lever (3) is situated at the film advance lever, as with the FM2 and FM3a. |
|
|
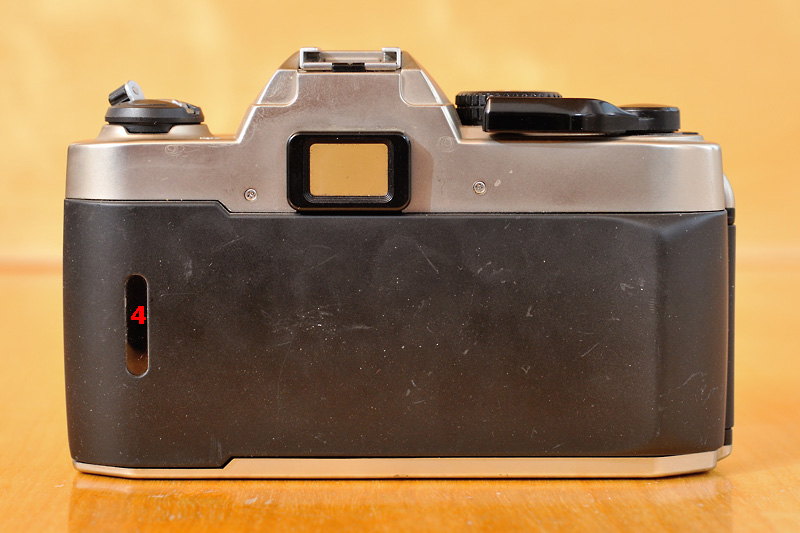
As usual in the 90s, the FM10 has a film window (4) in the back. |
The three cameras have these features in common:
|
|
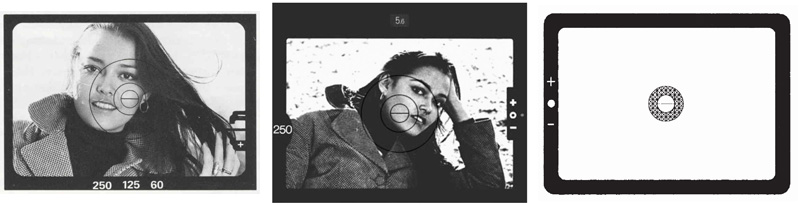
Copied from the manuals: the views through the finders of Nikkormat FT3, Nikon FM and Nikon FM10. |
Check the aperture lever:
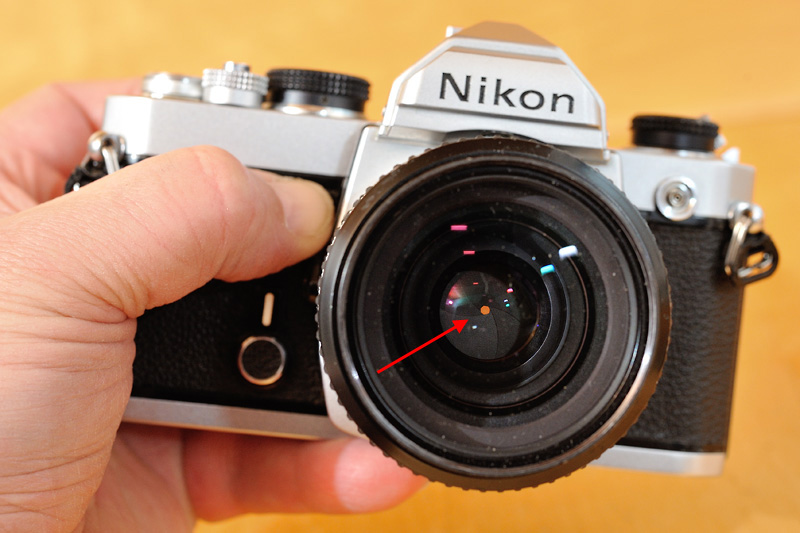
Put a lens onto the camera and look into the lens. The camera should hold the aperture wide open. Please check: you must not see the aperture blades of the lens! Now stop down the lens to the highest aperture value (16, 22 or 32). Press the depth-of-field preview button and hold it. Now you must see the aperture blades of the lens, only a small hole in the middle should remain, see image below! Now remove the lens slowly (while still pressing down the depth-of-field preview button) and observe the aperture blades: they should not move!
|
|
The lens is completely stopped down, you can see the aperture blades (red arrow) with just a small opening in the middle. |
Check the mirror and mirror bumper:
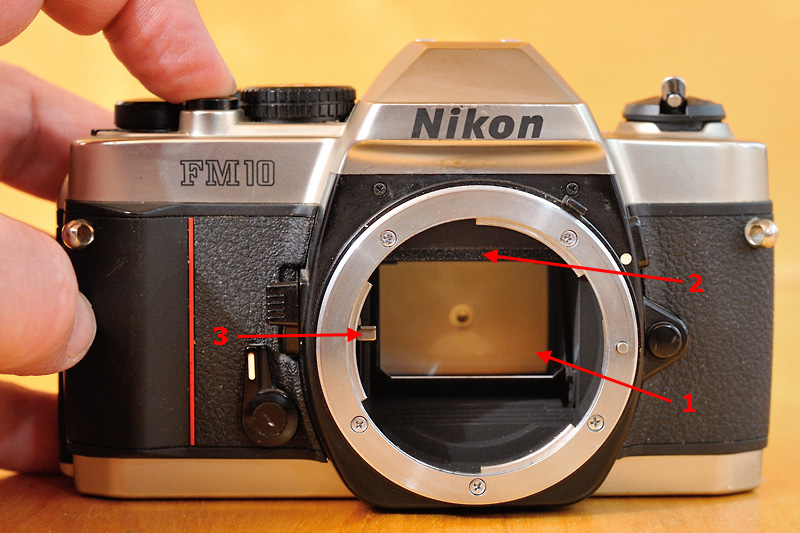
Set the shutter speed dial to B. Remove the lens from the camera and look into the bayonet mount. You can see the mirror in the down position with an angle of 45 degrees. On the left side within the mount there is the aperture lever in the "up" position. Beneath the top of the mirror box you should see a stripe of foam rubber - that is the bumper. Does it look ok?
|
|
(1) Mirror, (2) mirror bumper, (3) aperture lever. |
Now press the shutter release button and hold it. The mirror is up now and must touch the bumper! The aperture lever is down now:
|
|
(1) Mirror, (2) mirror bumper, (3) aperture lever. |
Check the exposure meter (batteries needed):
If you have a Nikon DSLR with an AI coupling, set it to manual exposure mode and center weighted metering. Use the same lens on both, the SLR and the DSLR! Uniform subjects have advantages for this test. Determine the proper exposure of a subject with each camera. If you repeatedly measure differences of more than half a stop, there could be something wrong. Without a DSLR with an AI-coupling the procedure is the same, but because you will have to use two different lenses, it is less precise.
Check the shutter:
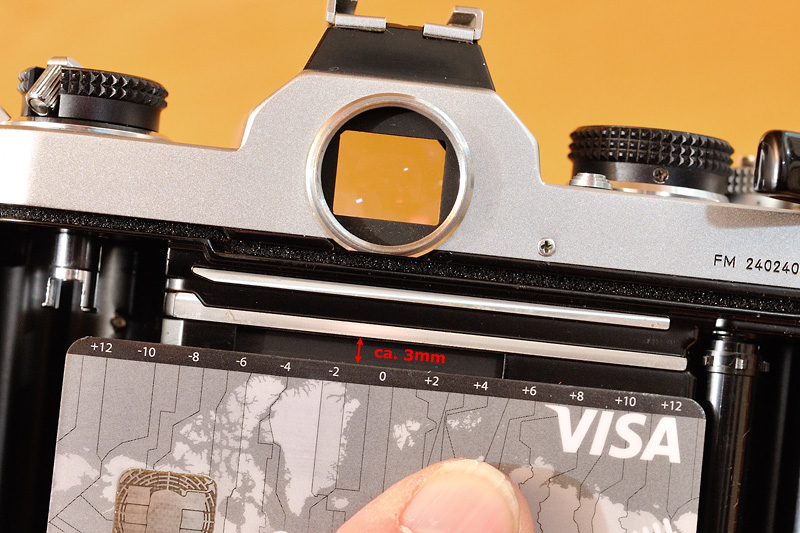
A first hands-on shutter test: try every shutter speed! At longer times you will hear two clicks - the first when the mirror flaps up and the second when it flaps down again. A 1/8sec must sound shorter than a 1/4sec, and so on. The shorter times are more difficult to test. For a first check you should set the camera to its shortest shutter speed. Open the camera back and check the travelling direction of the shutter (horizontal or vertical). Our three candidates have vertical shutters. Now take your credit card and press it against the shutter window. With a vertical running shutter leave the top 3 millimetres open first (then the lower 3 millimetres):
|
Hold the camera towards a bright subject and shoot. You should see a blink of light above (below) your credit card! The procedure for a horizontal shutter (Nikon F & F2 series) is similar, but here the 3 mm must be on the left (right) side. At last set the shutter speed dial to B, open the camera back, press the shutter release button and hold it. The shutter must be completely open now.
If the camera is your own, you can simply put in a film and use every shutter speed. If you have e.g. a 50mm f/1.4 lens on your camera, start at F2.8 (vignetting should be gone at F2.8!). Try to find a subject, where you need a 1/1000sec at F2.8. Shoot. Then set the camera to 1/500 and F4. Shoot. Then 1/250 and F5.6. Shoot, 1/125 and F8, shoot, 1/60 and F11, shoot, 1/30 and F16, shoot. The six images you have just captured should show the same brightness! It's easy to compare when using slide film. With negative film you will have to compare the negatives, not the prints from the lab! Now look for a subject that needs an exposure of F2.8 and 1/15sec. Perform the same routine up to F11 and 1sec. Again, the resulting images should show the same brightness! At last - if you have got a flash - set the camera to the shortest X-sync time (1/125sec for our three candidates), mount the flash onto the camera and shoot a uniform subject. The slide or negative must be uniformly exposed without a black stripe on top, bottom, left or right!
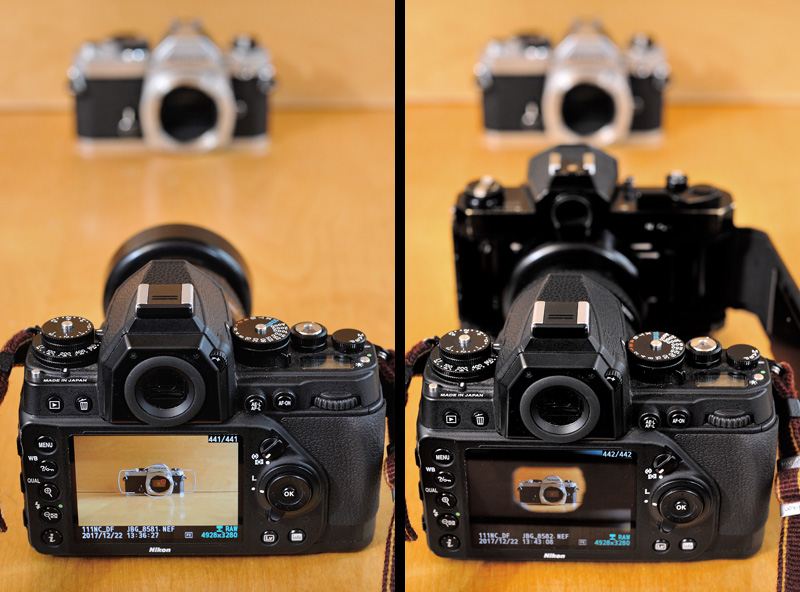
If you have a DSLR, you can check the longer shutter speeds with it:
|
|
Here I am checking the 1/2 sec of the Nikkormat FT3: Left image: I set the DSLR to M mode and selected a shutter speed of 1/2 sec. Then I adjusted ISO, aperture and/or the amount of light on my subject and took the first shot with my DSLR. Right image: I put the Nikkormat with opened back directly in front of the lens of my DSLR. I set the shutter speed of the Nikkormat to 1/2sec and the speed of the DSLR to 2sec. I released the DSLR and immediately hereafter the Nikkormat. The exposure time of this DSLR shot was determined by the shutter of the Nikkormat. |
|
|
Now I compared the two shots: they look pretty identical in terms of brightness. Thus, the 1/2sec of the Nikkormat works precisely! Very important: no stray light may come between the front of the lens and the shutter of the Nikkormat. |
Check the sealings:
The light sealings of the back are not really checkable without donating a film. Put a cap onto your lens and set the shutter speed dial to the shortest time. Load the roll and "photograph" 18 images in that way. Then put the camera out in the midday sun for an hour. The sun should be in its back. Now and then change the position of the camera a bit. Rewind the film and bring it to the lab for processing. The images should be dark (negatives bright) without any bright (dark) stripes or clouds on it!
|
|
The light seals are in these gouges. Please note: for modern cameras made of plastic like the FM10 not much sealing is needed, because the parts fit together more precisely. But there must be a good sealing around the film windows! |
Check the frame counter:
Open the back of the camera. The counter should jump to an initial value. Close the back. Now shoot and shoot and shoot... Observe the increasing of the frame counter. Open the back again and check if the counter shows the initial value again.
Don't forget:
...to check the self-timer!
Batteries:
Our three candidates need LR44 type batteries. The Nikkormat FT3 needs one, the FM and FM10 need two of them. These batteries are cheap and easy to find.
Lens:
If you have a Nikon DSLR with AI coupling, you could try buying a lens that fits into your DSLR lens portfolio as well. But do not try lenses slower than f/4. Such a lens will darken the split-image section of the focussing screeen of our three cameras (the focussing screens of the trio are not user changeable).
Otherwise I recommend a standard lens (around 50mm). You can find a lot of used 50mm Nikkors on the market. The slower variants (f/2 or f/1.8) are absolutely okay for our purpose. On ebay you should get one for 50 to 100 euros. Do not buy the Nikon series E 50mm f/1.8, which has a lower build quality.
For our three candidates I strongly recommend a lens with an AI aperture ring. You can easily recognise such a lens by the aperture ring with two aperture scales.
Eyepieces / correction lenses:
If you wear glasses, the first question is: do you use your glasses when looking through the finder? Then you do not need a correction lens, but you should have a rubberised eyepiece for your camera in order to avoid scratches. That is especially true for the Nikkormat FT3 and for the FM, while the FM10 has a plastic eyepiece, which is ok on its own I guess. The FT3 and the FM share the 19mm screw-mount for viewfinder accessories (see my article about Viewfinder accessories). The standard eyepiece of the FT3 was made of metal, while the one of the FM was rubberised. Many used cameras come without an eyepiece. Try and search ebay for an FM eyepiece (good to know: FM, FE, FE2, FM2, FM3a and FA shared the same eyepiece). It works on the FT3, too. For the FT3 the eyepiece of the F3 (not F3 HP!) also works fine. For the FM it is not usable because you cannot open the back if it is mounted.
|
|
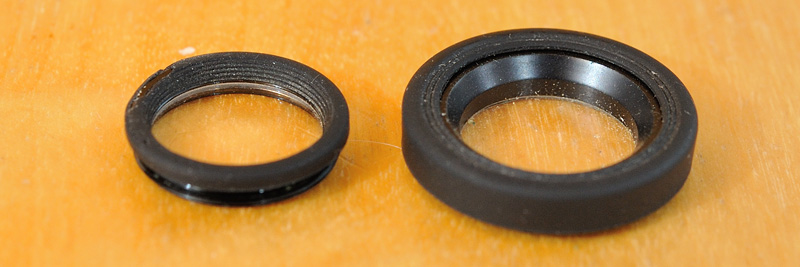
Rubberised eyepieces for the FM/FE series and for the F3. |
If you look through the finder without your glases, you will need a correction lens (the old cameras do not have a built-in diopter control like our modern DSLRs). For the Nikkormat FT3 you can use any correction lens with a 19mm mount (Nikkormat, F3, FM). For the Nikon FM you should only use the FM types. The FM10 has a rectangular eyepiece. You can use correction lenses of the older consumer cameras like EM, FG, F-501, etc..
|
|
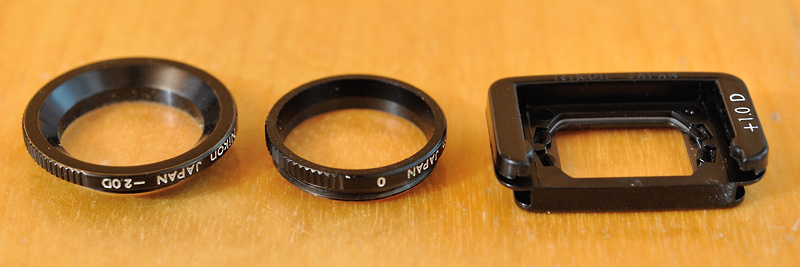
Correction lenses for Nikkormat, Nikon FM/FE series and for F-501. Please note: Nikon viewfinders have -1 diopter. Thus "0" is also a correction lens! |
|
|
|
|
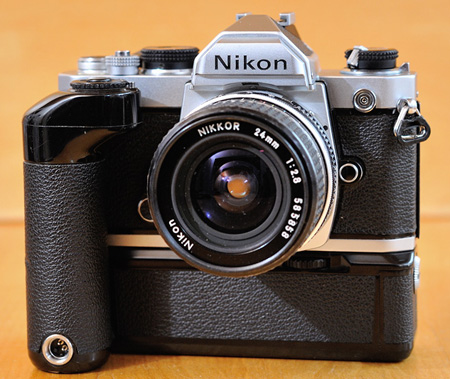
Nikon FM with MD-12 motor drive. |
|
|
|
Motor drive:
You can attach a MD-11 or MD-12 motor drive to the Nikon FM. You will pay between 40 and 80 euros on ebay for such a motor drive. Please note: the MD-15 is not usable in conjunction with the Nikon FM.
Carrying strap:
Buy whatever you like! But take into account that the three cameras use an eyelet mounting for the strap, like Nikon's pro and semipro DSLRs.
Cable release:
Depending on your photography you might need this early type of remote control. The three cameras work with standard cable releases. Moreover, the FT3 and the FM also take Leica-style cable releases. See my article about Remote controlling.
Flash:
Each of our three cameras have a hot-shoe - you can use standard flashes you can get on the used market for just a few euros! The Nikkormat FT3 and the Nikon FM also allow flashes with a cable via the sync terminal.
Instruction manual:
You will find PDF manuals for all three cameras on the Internet for free.
Seals und mirror bumper:
If you have to replace the seals and the bumper and you want to do it yourself, I recommend to buy a light seal kit (around 10 euros). I have done that for my Nikon FM2 about 15 years ago. It was easy! Otherwise, changing the sealings is also offered as a service (30-40 euros).
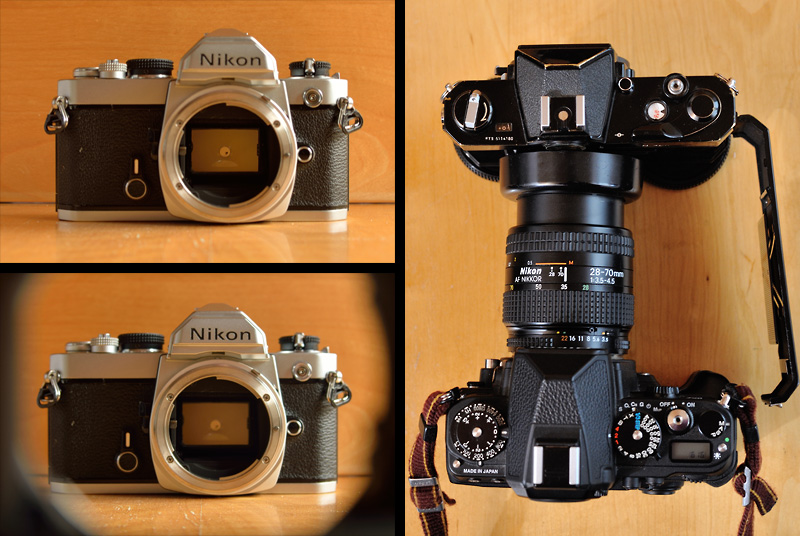
Repair handbook:
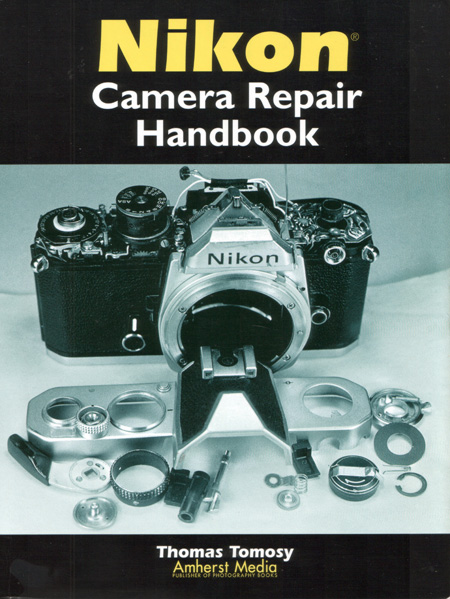
15 years ago I bought a "Nikon repair handbook" from Thomas Tomosy, which I can really recommend. The camera on the front side is an FM! Over the years I have made some smaller repairs, but I do not have the skills for things like repairing the shutter of the FM...
The Nikon FM10 works well and it is a lightweight camera. But it has a "plasticky" feeling, typical for consumer cameras of the 90s. Therefore I would not choose this camera!
Both, the Nikkormat FT3 and the Nikon FM were introduced in 1977. The FT3 was the last one of its series, while the FM was the first one of a new series. You will feel that! The FT3 is heavy and appears a bit old-fashioned, whereas the FM is very handy and leads in terms of features and options. I don't have a clear favourite among these two bodies.
Over the years I have tried about 10 Nikkormat F bodies. None of these had problems with the shutter. On the other hand: this is my fourth FM and it is the second one with shutter problems. Of course, that is not representative, but I think therefore I would tend to the Nikkormat FT3.