
Modern macro lenses, like the AF-S Micro-Nikkors 60mm f/2.8 and 105mm f/2.8, can focus from infinity down to life size. Microphotography begins beyond life size - photographing with a real magnification.
This article mainly deals with reproduction ratios in the range from 1:1 to 5:1, in which you can get satisfying results without using expensive special lenses.
|
|
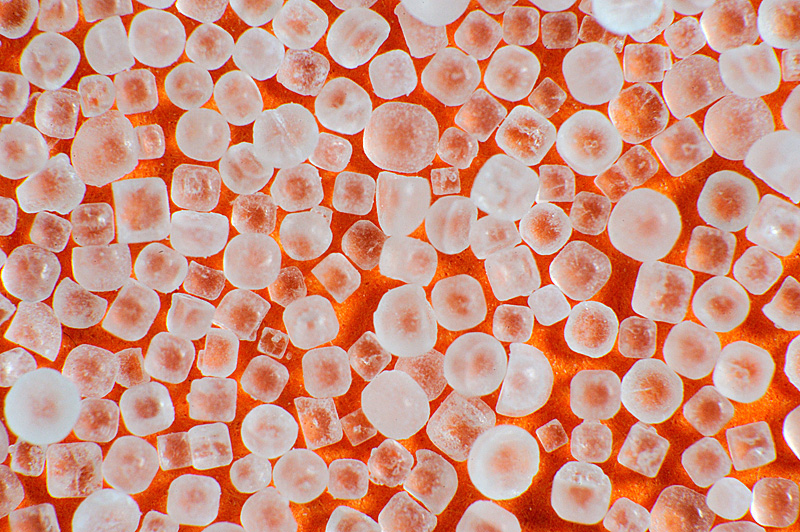
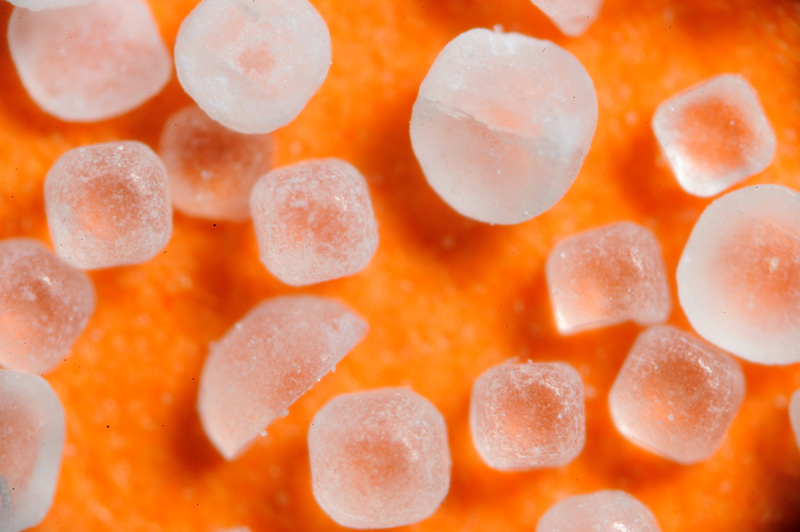
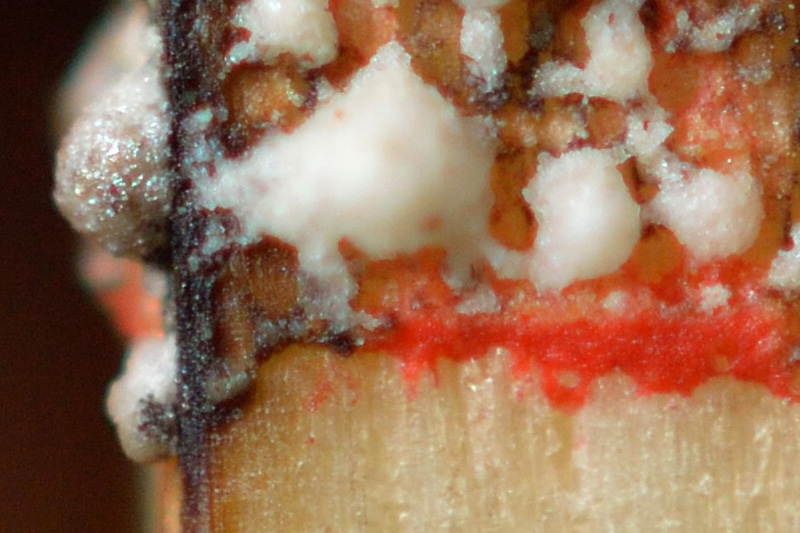
When my children were young, they loved to watch slides with highly magnified everyday objects and to guess what it could be. What do you think is shown in this image? You'll find the answer in the text below. The original size of the square above is 8x5.3mm. The image was taken with a full format sensor, thus the magnification is 36/8=4.5x. |
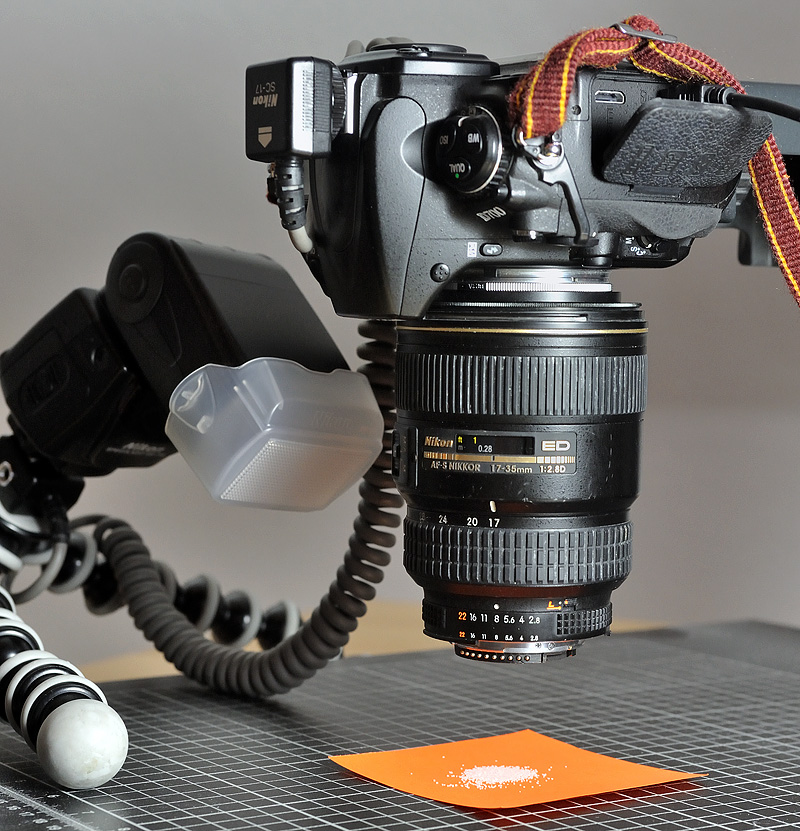
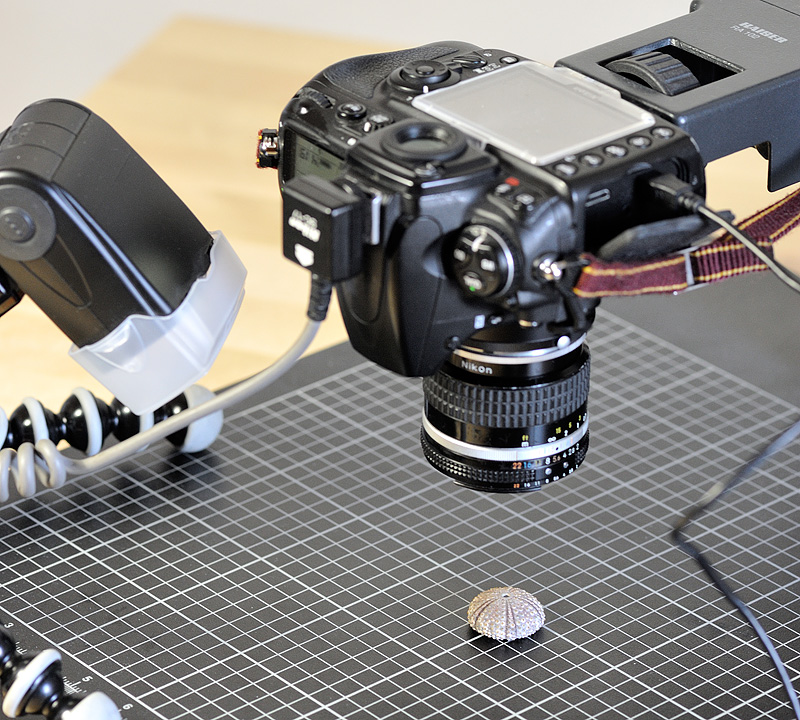
Above all, you need much light for focussing, much light for shooting, a very good tripod or stand and accessories which allow you to focus precisely. The salt above was captured with an appropriate setup:
|
|
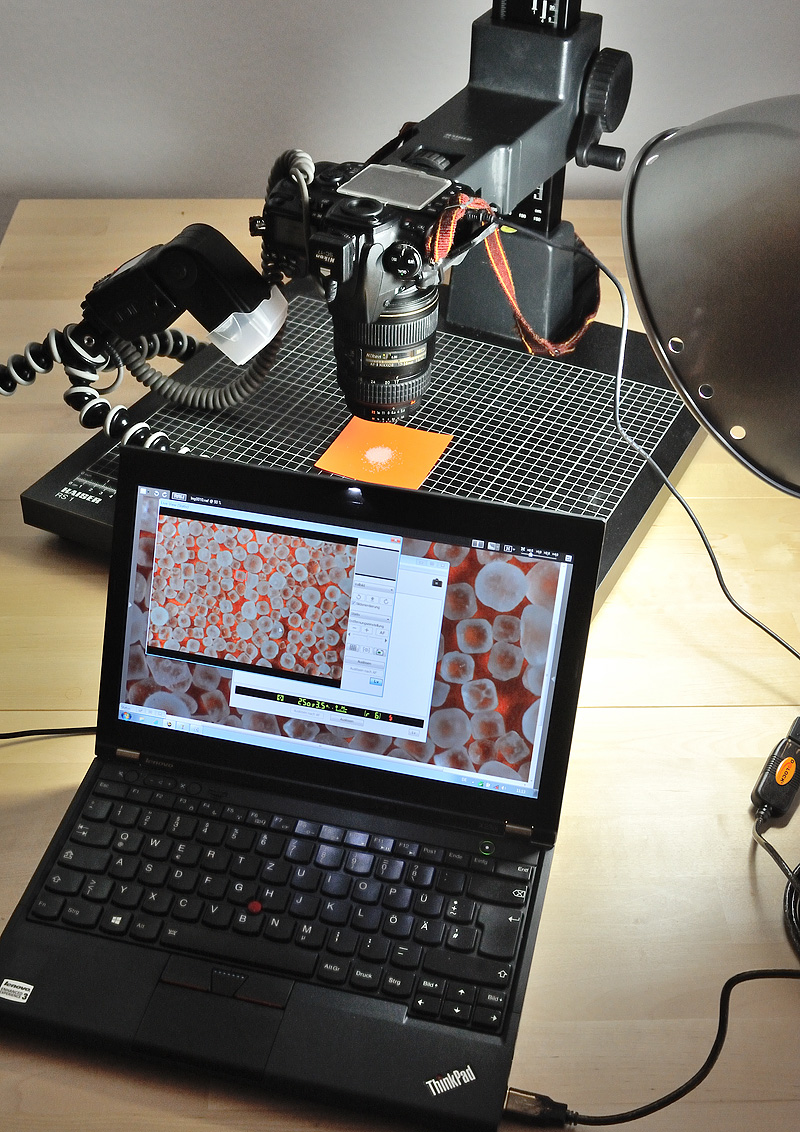
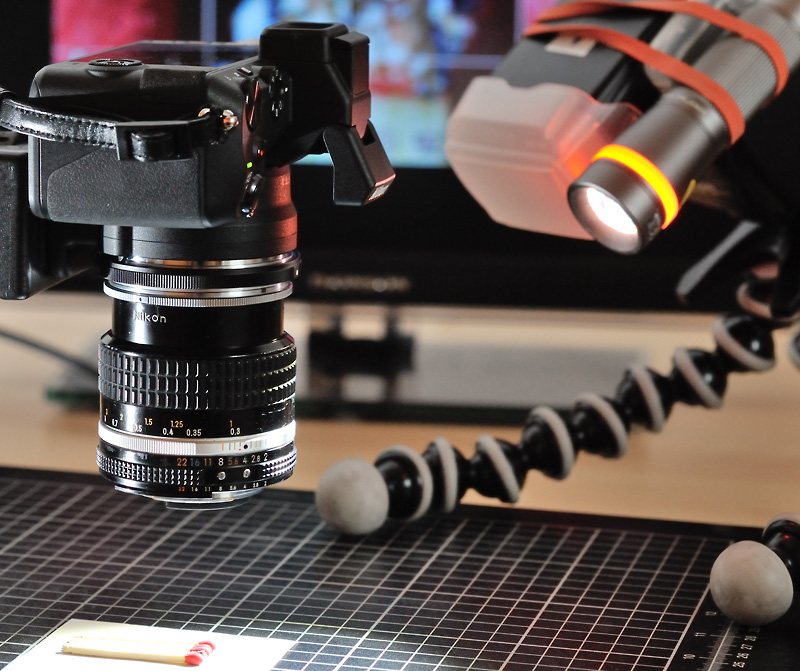
The D700 with the reversed AF-S Nikkor 17-35mm f/2.8 @17mm is mounted on my repro stand. The big wheel of the stand allows accurate focussing. The studio lamp illuminates the subject for focussing. On my notebook Nikon Camera Control Pro 2 shows me the live view of the camera which is great for controlling the proper focus. Besides, this software allows remote shooting, too. There is no memory card in the camera, each captured raw image is transferred to the notebook immediately after shooting. Thus, the final check is comfortably included in the workflow. The lighting for the shot was made by the SB-700 mounted on the Gorilla Pod and connected to the camera via the SC-17 cable. |
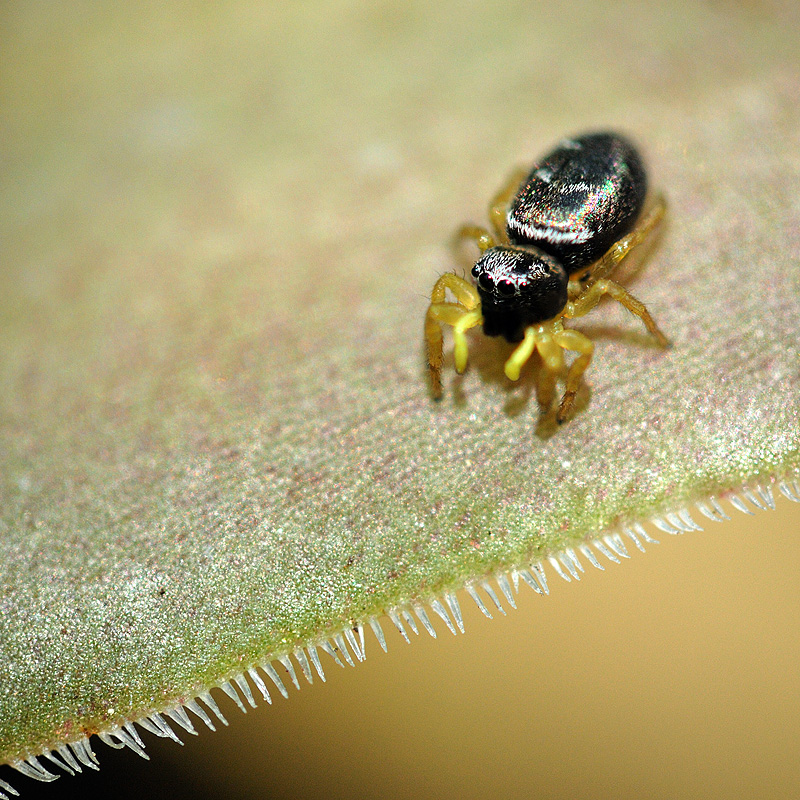
So much for theory! In real life things can be a bit different. Wait for a sunny day, set your camera to a high ISO value and then just shoot hand-held and without a flash. That can also work properly. See here:
|
|
Exactly one square centimetre of my garden - a really small jumping spider at the edge of a leaf. This image was manually stacked from two single images, both were shot hand-held at F11, 1/2000 sec and ISO 1600. |
I will give you some examples how to get real magnifications with "normal" lenses. Before you buy lenses you should try the ones you already own! Ask your friends and relations for old optical gear: even Minolta MD, Canon FD or M42 lenses can be put into service here!
|
|
|
|
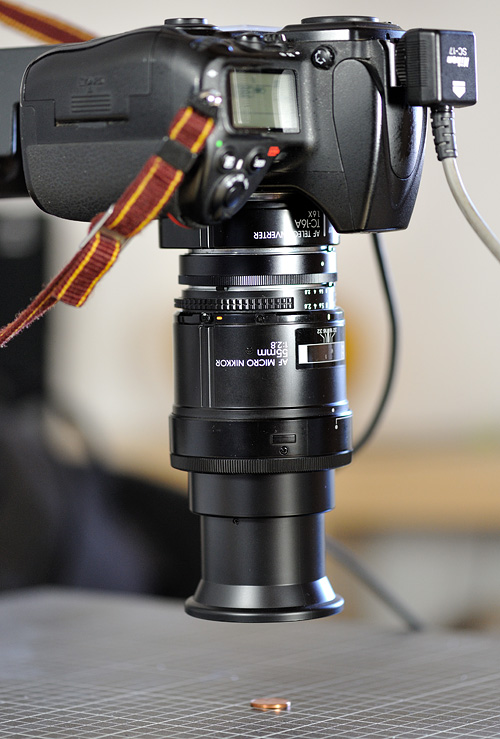
The combination TC-16A + PK-12 + AF Micro-Nikkor 55mm f/2.8 provides a maximum magnification of 2x and delivers a very good image quality. But the distance between the front of the lens and the subject is only 4cm.
|
The AF-S Micro-Nikkor 105mm f/2.8 works fine in conjunction with the TC-14E, see here. With that combo you can reach a magnification of 1.5x. Not that much, but you have AF (mostly) and full exposure control. You reach 2x if you screw in a 6T close-up lens additionally. But in terms of image quality I don't recommend that!
I have no experiences with the combination TC-20E + AF-S 105mm. The possible magnification should be around 2x. I guess AF will not work, but some people report the image quality to be still good.
The AF-S Micro-Nikkor 60mm f/2.8 is not compatible with any of Nikon's current TCs.
The 55mm Micro-Nikkors work very well with the TC-16A, please have a look at my review of the Micro-Nikkor 55mm f/3.5. Please note: You have to disable the CPU interface of the converter in order to make it usable with modern cameras! You can use tubes between the TC and the lens to increase the magnification.
If you own a TC-14A oder a TC-200/TC-201 you should try them in the same way. I expect they will work fine, too.
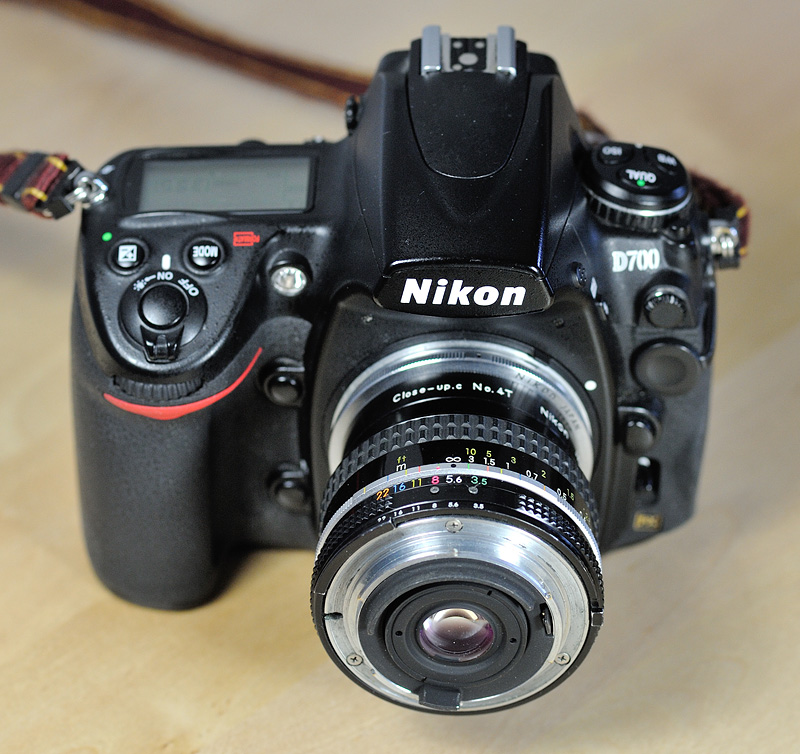
With a BR2A reversing ring you can easily reach higher magnifications. Just screw the BR2A into the filter thread of a wide angle lens and mount the lens reversed onto your camera.
For example: with a Series E 28mm f/2.8 you will get a magnification of about 2x with a working distance of 6cm. The image quality is very good, except for the farthest corners.
Some lenses deliver a bit better results - especially in the corners - with a 4T close-up lens between the lens and the reversing ring.
You can increase the magnification by putting tubes between the camera and the reversing ring. Instead of tubes you can also use a bellows unit. A further description can be found in the chapter "Going beyond life size" of my article about using a bellows unit.
Do not ignore your zoom lenses in this regard. They often work fine for this sort of photography!
Here there are some very well working setups as examples. Try your own lenses! Usually, the lens should be stopped down by one to three f-stops.
|
|
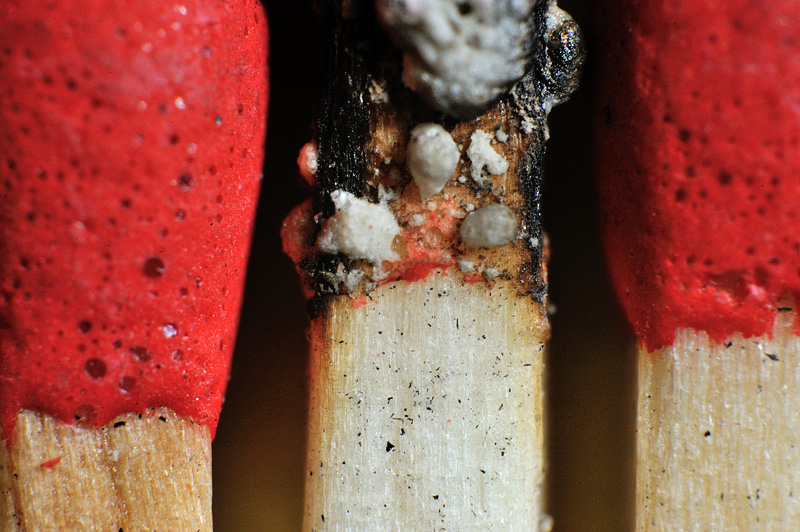
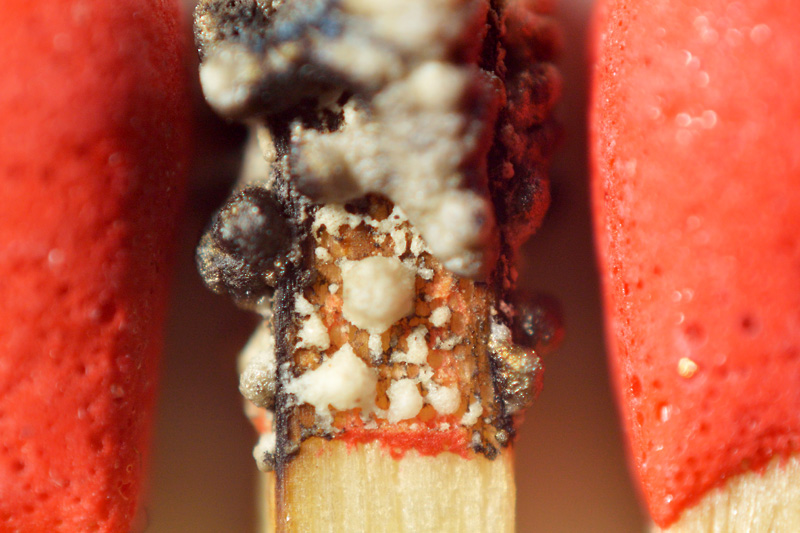
The reversed 17-35mm has a surprisingly high magnification: 2.5x @35mm to 4.5x @17mm. The working distance is around 4cm. As in normal use, the performance is a bit better at the long end, but still very good at 17mm, see the two images below. For connecting the lens to the BR2A I used a 77-62mm and a 62-52mm step-down ring. The lens is a bit heavy, nonetheless handling is really fine, because the lens does not change its size while zooming or focussing and because the filter thread does not rotate. Don't forget to set the focus ring of the lens to the closest setting! |
|
|
Matches, captured at 4.5x magnification. |

|
|
The original height of this 100% crop of the above image is 1mm. |
|
|
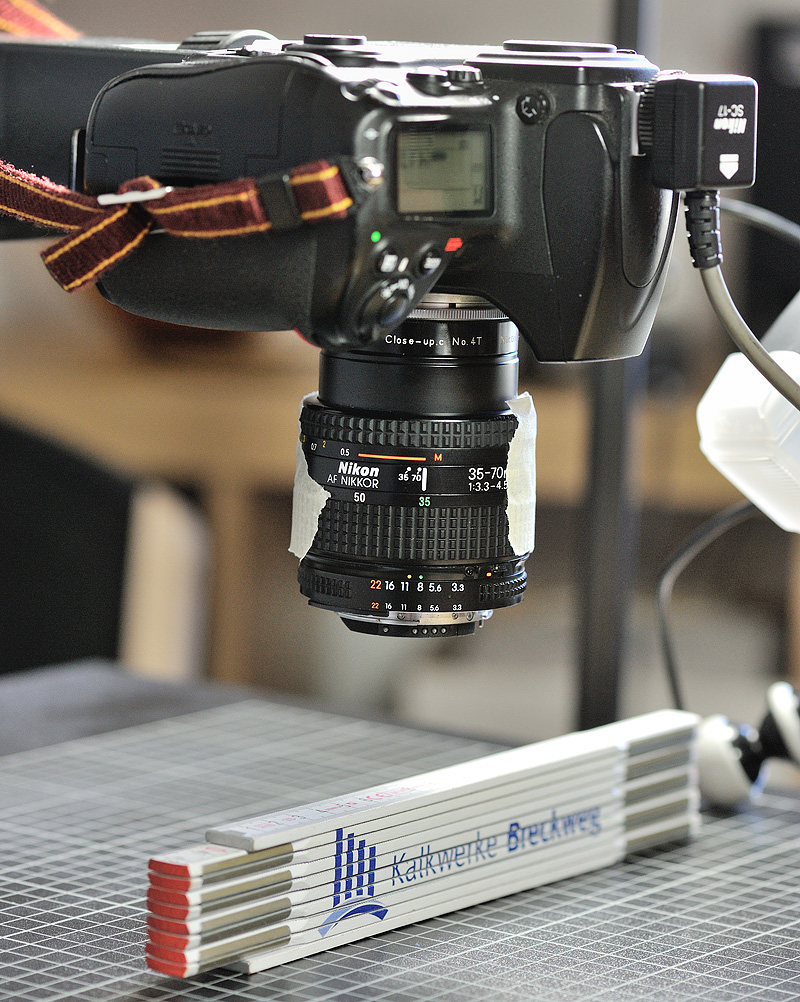
The AF Nikkor 35-70mm f/3.3-4.5 was Nikons cheapest kit lens in the 80s and early 90s. Still today, it is a good lens. But reversed and combined with the 4T close-up lens it is a great performer, see the two images below! The magnification is 2.25x at 35mm with a working distance of about 5cm. As it isn't a classical design set the lens to the closest focus! It is a lightweight lens, but handling is terrible, because everything moves and rotates. You can help yourself with sticky tape for fixing both the zoom and the focus ring. I use the type of tape that painters use for covering doorframes and such things, because it is easy to remove. Another advantage of this setup is that the internal flash of the D700 is usable! A comparable alternative is the AF Nikkor 28-70mm f/3.5-4.5. The reachable magnification is about 2.6x @28mm. For this lens you don't need a close-up lens. But you still need sticky tape. And the internal flash is not usable at 28mm. |
|
|
My folding metre stick, captured at 2.25x magnification with the AF Nikkor 35-70mm f/3.3-4.5. |

|
|
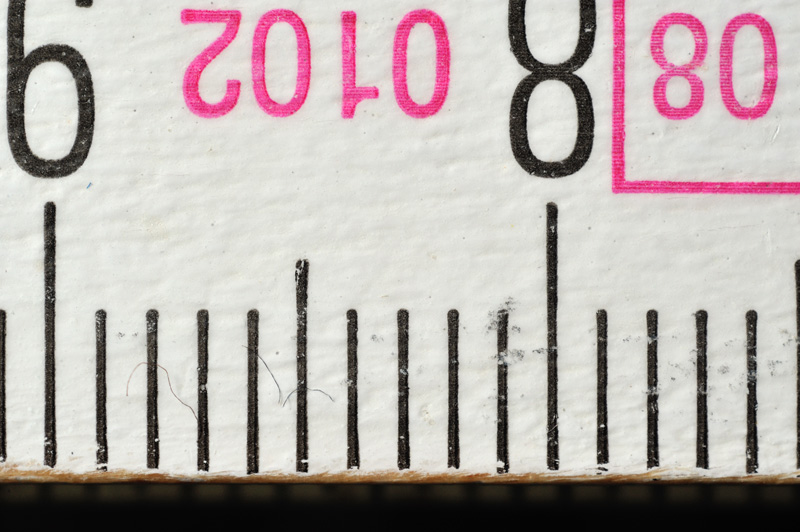
100% crop of the upper left corner of the above image. |
|
|
The tiny Nikkor 20mm f/3.5 is a great lens for many purposes. Microphotography is not an exception! I recommend to use a 4T close-up lens between reversing ring and lens. The magnification is a bit above 3x with a working distance of about 4.5cm. The internal flash of the D700 is usable, although the illumination is not very uniform. |
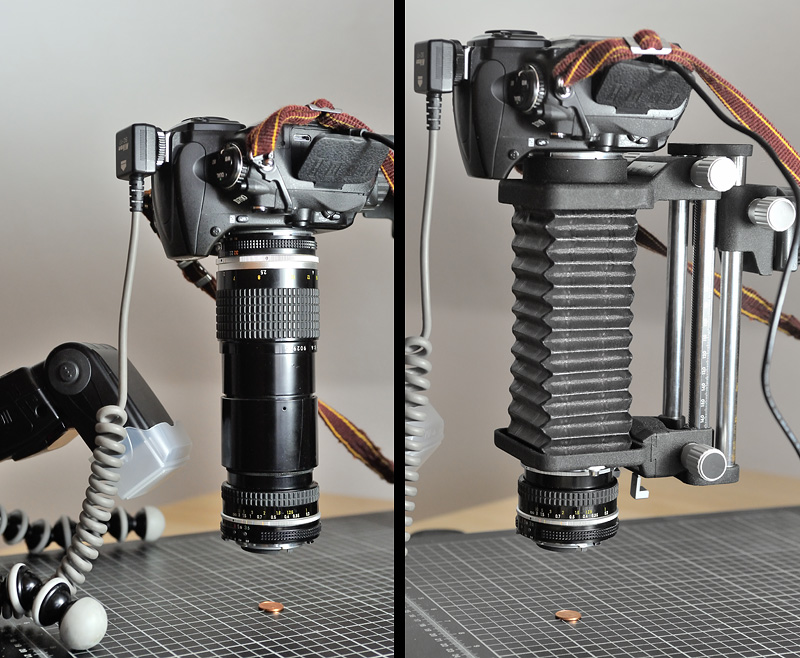
The usual setup for concatenating lenses goes like this: mount a telephoto lens onto your camera - I call it the "base lens". Then screw a macro coupling ring (a narrow ring with a male filter thread on each side) into the front thread and screw a second lens - I call it the "front lens" - reversed onto the coupling ring. The focal length of the front lens should be shorter than the one of the base lens. The greater the ratio of the two focal lengths (base:front) the higher is the magnification. Of course, focussing the base lens varies the magnification a bit.
The base lens I use is a Nikkor 200mm f/4, AI-S version. I already used it in this way in analogue times. For this article I also tried to use other lenses as base lenses: Series E 100mm f/2.8, AF-S Micro-Nikkor 105mm f/2.8, Nikkor 135mm f/3.5 AI-modified, AF Nikkor 180mm f/2.8 and Nikkor 200mm f/4 AI-modified. All of these show strong vignetting on the full-format sensor (but may be usable on a DX sensor). Try the lenses you currently own!
My favourite front lenses are the Bellows-Nikkor 105mm f/4 and my two Rodenstock Rodagon enlarging lenses: the 80mm f/4 and the 135mm f/5.6, I described them in the chapter "Standard lenses for the PB-4" of my article about using a bellows unit. They deliver a great image quality in such a setup. The Rodagons allow the usage of the internal flash of the D700, the Bellows-Nikkor not. The optimum aperture for the base lens is F8 or F11 and the front lens should be wide open. The magnification ranges are 1.5x-2x with a working distance of about 11cm for the 135mm Rodagon, 1.9x-2.4x with about 8cm for the Bellows-Nikkor and 2,5x-3x with about 6cm for the 80mm Rodagon.

|
|
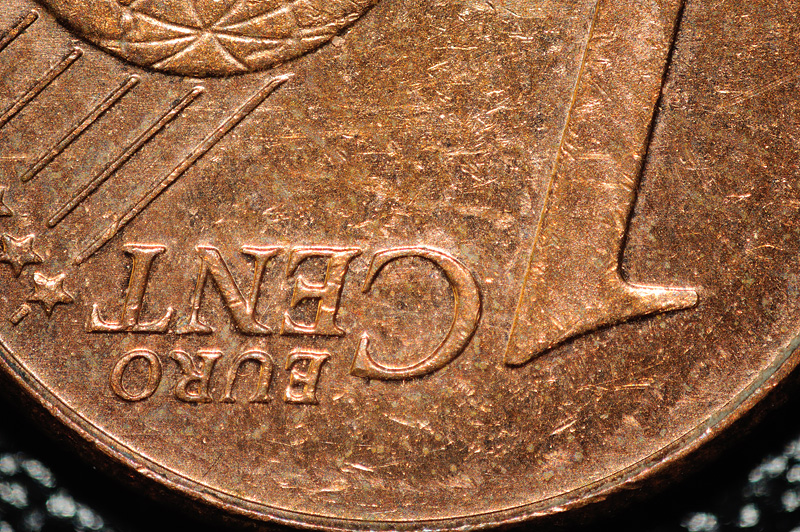
3x magnification: Nikkor 200mm f/4 + reversed Rodagon 80mm f/4. |
|
|
The resulting image - the diameter of the 1-cent coin is 16.25mm. |
|
|
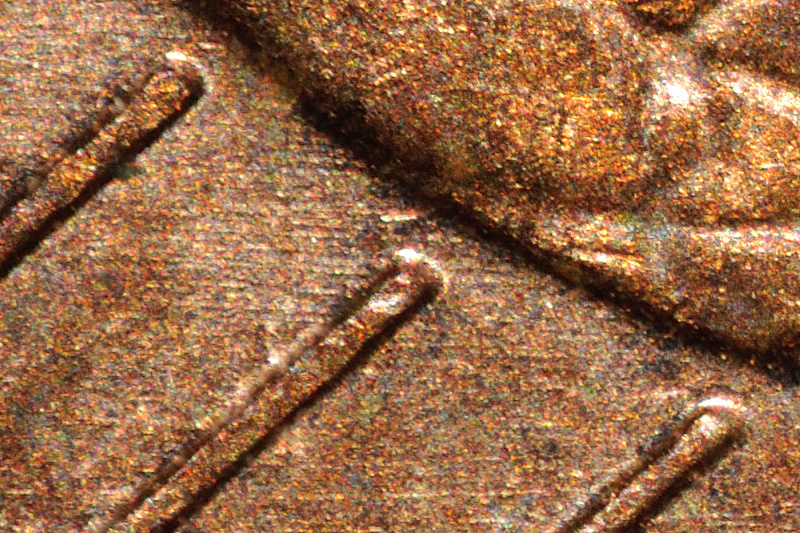
100% crop of the upper left corner. |
Shorter lenses are also usable as front lenses. On the one hand the image quality gets better if you stop down the front lens a bit, on the other hand you are fighting against diffraction. With the Nikkor 20mm f/3.5 as a front lens I can reach a magnification of 12x. I expect a specialised lens like a Macro-Nikkor, a Leica Photar or a Carl Zeiss Luminar will deliver significantly better quality at such magnifications.
|
|
Two times 12x magnification with the reversed Nikkor 20mm f/3.5: on the left mounted on the Nikkor 200mm f/4 and on the right in conjunction with a fully extended PB-4. The left setup is much easier to handle. It weighs less and the viewfinder appears much brighter! |
|
|
Salt, captured with the left setup above at 12x magnification. The image looks a bit foggy and shows all the specks on my sensor pretty sharp, because the actual aperture value is really high. The winner is: diffraction. |
|
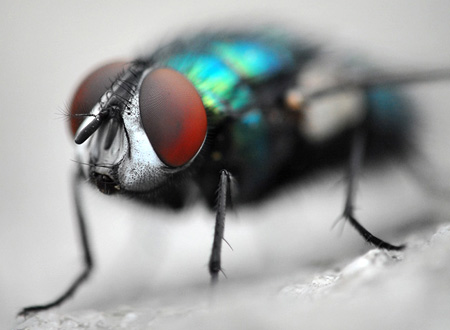
At a magnification of 2x it is nearly impossible for me to find the proper focus hand-held.
On the right you see a crop of an image that was captured hand-held with a magnification of 2.4x. It was a cold day in spring, but the stones in my garden were already warmed up by the sun. The fly loved to sit on one of the stones...
If you think the two statements lead to a contradiction you are wrong! The way to shoot hand-held here is just an ordinary trick: you need a fast camera, meaning a camera with both good high ISO capabilities and a high continuous shooting rate. My D700 is such a camera: images look good at ISO 1600 and it can shoot with 8 frames per second (in conjunction with the MB-D10 and the proper batteries). Then just try to hold your subject in focus while shooting with the highest possible rate. After a few seconds the buffer is full and you have to wait a moment. Then repeat the same procedure... That's it! The chance that one of the images you've just captured is as sharp as you want it should be above 50% ;)
If you have a steady hand you may succesfully throw a couple of the images into your stacking software. Or you stack a bit by hand like I did it with the spider image above.
On a tripod you must be able to focus very precisely. The usual tool for that is a macro focus rail slider. The prices begin at about 20 euros. But don't try to scrimp on this important accessory! An alternative is the usage of a bellows unit with a movable tripod mount.
If you photograph on film I recommend to use a Nikon F3 with a magnifying finder. That is the best choice for controlling the focus. The finder of my D700 is fine, but not as good as a specialised finder. A DG-2 eyepiece magnifier helps a bit. But the real benefit of the digital world is live view!
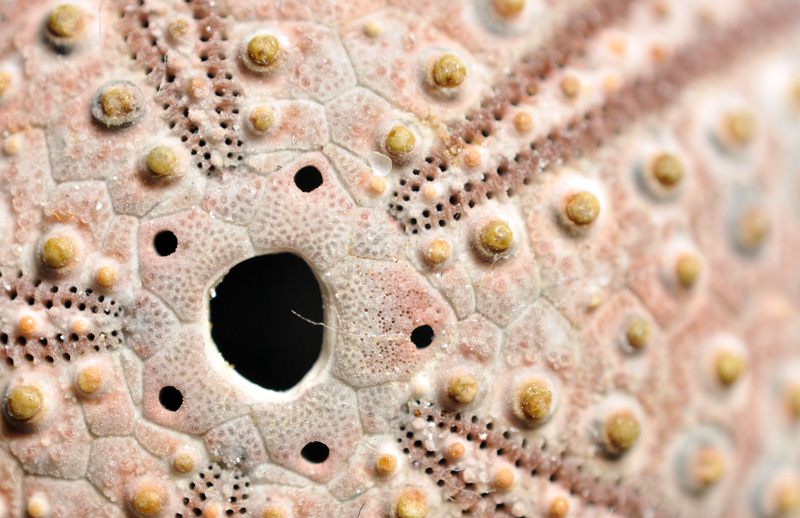
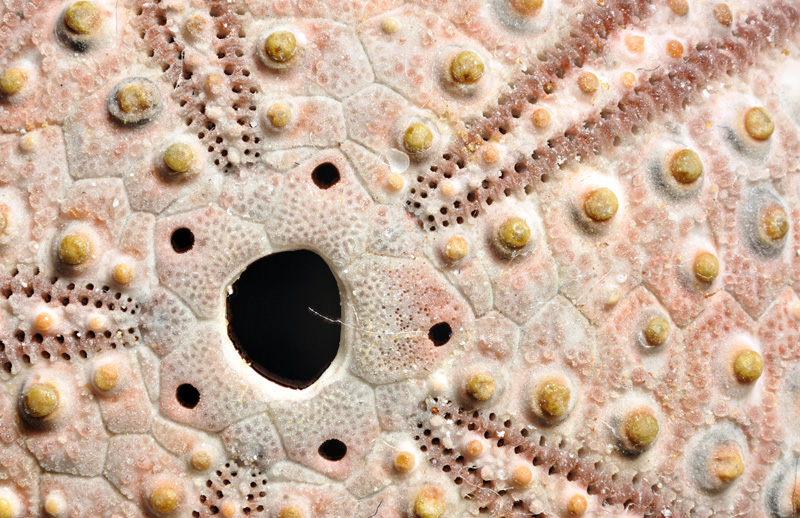
The higher the magnification the smaller is the depth of field. Positioning the focus plane carefully is essential in microphotography. But sometimes you have no chance! For example: try to photograph the shell of an urchin:
|
|
Working at 2x magnification. Used here: PK-12 + BR2A + Nikkor 35mm /f2. |
|
|
The result shows the small depth of field. The lens was stopped down to F5.6, but even stopping down the lens to F22 does not help. |
Welcome to the digital world, where you can increase the depth of field significantly! Just make a couple of shots, each one with a slightly further moved focus (no problem with the above mentioned macro focus rail slider). Then you need a so called "stacking software". This software isolates the sharp parts of every image and stacks them together. It works mostly automatical.
Try CombineZP (see my links section). It looks and feels a bit old-fashioned, but what matters is that the algorithms work very well. Moreover, it is freeware!
But please remember: for proper stacking all the images must be captured with the same fixed white balance and exposure settings (including flash)!
|
|
Again the urchin: now stacked of 16 single images. Shown here is the result of the stacking just as it comes out of CombineZP. The slightly visible artefacts within the big black hole are easily removable with some further post processing. |
|
|
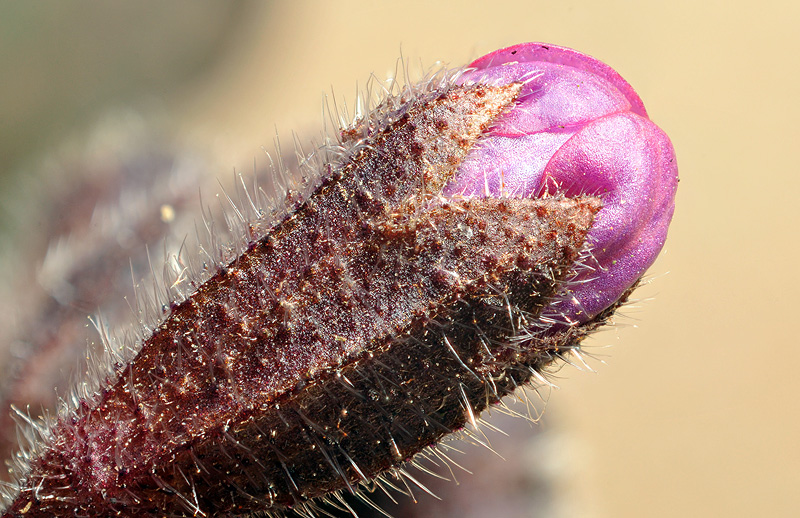
Another example of a stacked image. Again made with the combination PK-12 + BR2A + Nikkor 35mm /f2 and with 2x magnification. Due to very cold spring this year the flowers in my garden do not blossom, yet :( |
I'm currently trying a Nikon 1 V2 camera. Please have a look at my "Getting more reach" article.
A Micro-Nikkor is not available for the System 1. But thanks to the FT1 adapter we can use F-Mount options. Due to the small CX sensor (13.2x8.8mm) life-size is equivalent to a 2.7x magnification on an FX camera. Thus, a Nikon 1 camera is an interesting option for microphotography.
But before the CX camera can be put into service here, two general problems must be solved. Firstly, Nikon Control Pro does not support the V2. For more precise focussing I have used a HDMI device for magnifying the camera's display. Secondly, the Nikon 1 flash system is incompatible to anything else. I have used my SB-700 in "SU-4" remote mode. The camera was set to M and the SB-700 as well (in the setup below around 1/64). The proper exposure was determined by trial and error.

|
| My setup for using the Nikon 1 V2 for microphotography: For remote releasing the unit I have used the ML-L3. The integrated flash of the camera fires the SB-700 in "SU-4" remote mode. The torch reduces the noise of the sensor during focussing. On the LCD-TV in the background you can see the magnified display image of the camera. The lens mounted here is an AF-S Micro-Nikkor 60mm f/2.8. Of course, the camera has been set to base ISO for this application. |
A modern Micro-Nikkor submits the effective aperture value via its CPU interface. Reversed, an effective aperture value - independent from the lens' actual extension - can be preset from the camera. In conjunction with the CX camera that is a very helpful feature. Because the theoretical diffraction limit of the V2 is F5.3, I always limited the aperture by a preset of F5.6 for the 60mm Micro-Nikkor in the setup shown above.
The Micro-Nikkor 60mm f/2.8 performs great on the V2, even at life-size! The images are sharp and contrasty straight out of the camera.

|
|
Matches in life-size (equivalent to a 2.7x magnification on an FX sensor). The image was just RAW converted with Capture NX2. |
|
|
100% crop of the above image. |
I also tried the combination PK-13 plus Micro-Nikkor 55mm f/3.5 at 1:1. Sadly, the results are clearly worse in comparison to the modern 60mm Nikkor! Mounting the Micro-Nikkor 55mm reversed onto the PK-13 gives a bit more magnification and a little bit better image quality as well.
Be careful when trying to mount something onto the FT1 adapter! For example, the Micro-Nikkor 55mm f/3.5 on its own is not mountable - there is not enough space inside the adapter for this lens!
|
|
5x magnification (FX equivalent): Nikon 1 V2 + FT1 + PK-11A + BR-2A + reversed Nikkor 35mm f/2. |
The Nikkor 35mm f/2 is well known as a great micro lens when using reversed. Even in conjunction with the high pixel density of the V2 it delivers good sharpness at an FX equivalent of 5x magnification. I got the best results when the lens was set to F4, although diffraction is already visible. The contrast of the images is a bit low.
|
|
Matches at 5:1 (FX equivalent). I increased contrast which results in more noise. But I did not manipulate sharpness. |

|
|
100% crop of the above image. |
Conclusion: the combination of the V2 and the 60mm Micro-Nikkor is an easy step into microphotography and the performance is great. Maybe, other modern constructions behave in a similar way here, especially the two DX Micro-Nikkors (40 and 85mm). But I have not tried these lenses, yet.
The Nikkor 1 lenses are not usable for microphotography, because the aperture is electronically controlled. If a Nikon 1 lens is dismounted the aperture is completely closed. A pity I cannot try the Nikkor 1 18.5 f/1.8 reversed e.g...