
A hundred years ago field cameras became popular. I guess the name means that this sort of camera was very suitable for using in the field. They were collapsible and therefore easy to transport. As usual in that time, there was a bellows between the film and the lens. Focussing had to be done by moving the lens back and forth.
|
|
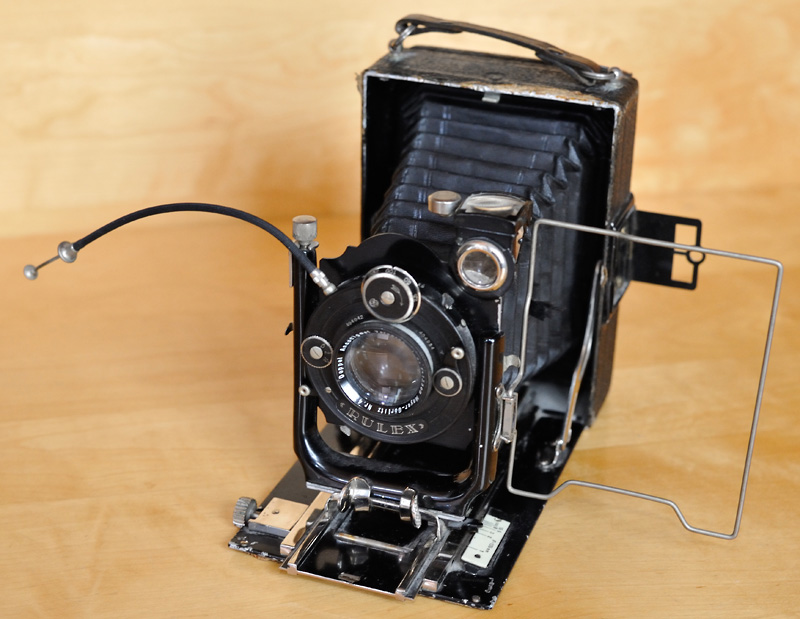
Around 1930 my great-uncle bought this 9x12cm amateur field camera. It was produced by Ihagee, Dresden, Germany. The shutter - providing speeds from 1sec down to 1/300sec - came from Rulex and the lens is a Meyer-Görlitz Veraplan 135mm f/4.5. The knob at the left side of the bottom is for focussing, the little plate on the right side of the bottom is the focus index. Above the lens there is an optical waist-level finder and on the right there is a hinged action finder. If you replace the film sheet by a focussing screen the camera offers live view as well ;) Could one expect anything more? |
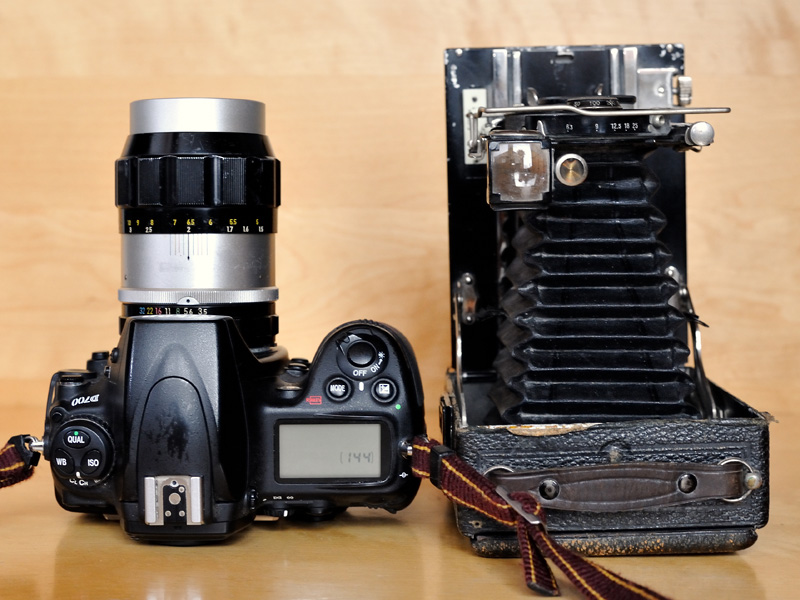
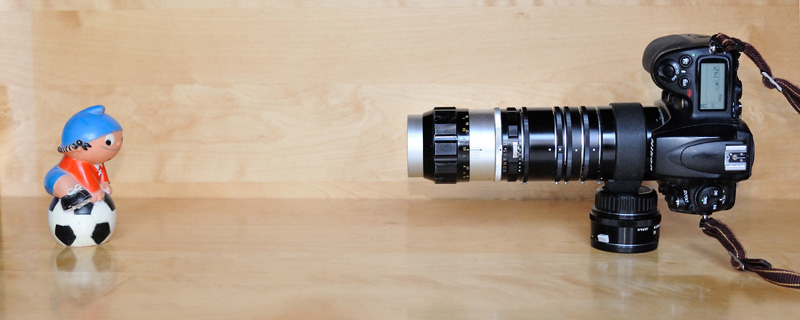
Let's start a little comparison between the field camera and an SLR with a classic telephoto lens of the same focal length. The image below shows an DSLR with an old Nikkor 135mm f/3.5 and the Ihagee field camera side by side. Both lenses were focussed to two metres. Please note: while a 135mm lens is a medium long telephoto lens for 35mm cameras, it is a standard lens for the 9x12cm camera. But that does not matter here.
|
|
Two very different cameras! They have the same focal length and therefore they have approximately the same length.
|
|
|
|
|
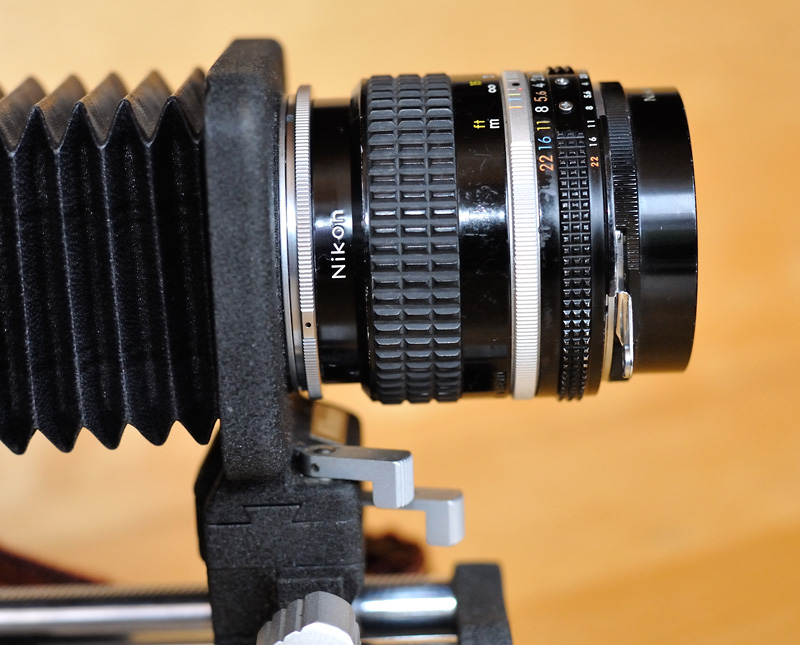
Nikon's first lens with CRC. Besides: this Nikkor is very usable on a bellows...
|
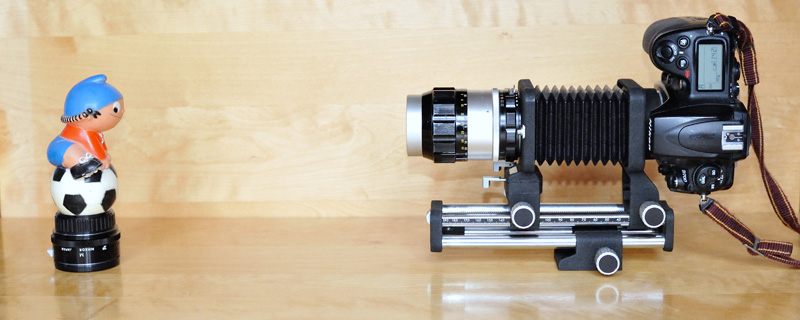
A closer look to the Ihagee's focus index shows: the difference in extension between infinity and two metres is about 1 cm. No surprise: focussing the Nikkor from infinity to two metres extends the lens by about one centimetre, too. The principle is the same, even in the classical SLR lens the entire optical design is moved with the help of the helical focus mount.
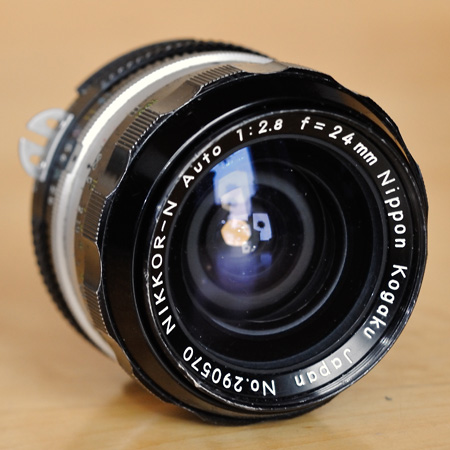
For the sake of completeness: things changed in 1967 when Nikon introduced the Nikkor 24mm f/2.8. It was the first lens with a Close Range Correction (CRC). Single lenses or groups are moved independently from each other in order to obtain optimum sharpness at different distances. Other examples for a non-classical design are Nikon's IF (internal focussing) lenses, introduced in the 70s. Today most lenses are non-classical designs. But please note: the type of the optical design is not an indicator for optical performance!
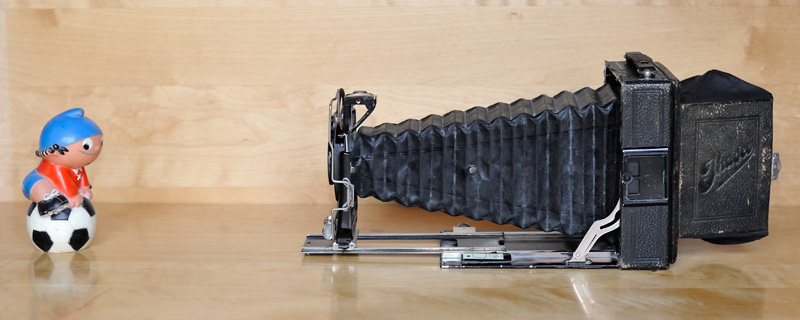
The focus index plate of the Ihagee goes down to one metre, but the camera allows to go significantly closer!
|
|
The Ihagee is focusable nearly down to life size on its own! For accurate focussing the usage of live view before loading the film is recommended. |
Maybe you remember the following equation from your photography textbook: M=E/f (M means magnification, E extension of the lens and f is the lens' focal length). At life size we can conclude E=f. For our 135mm lens that means we need an extension of 135mm to reach life size.
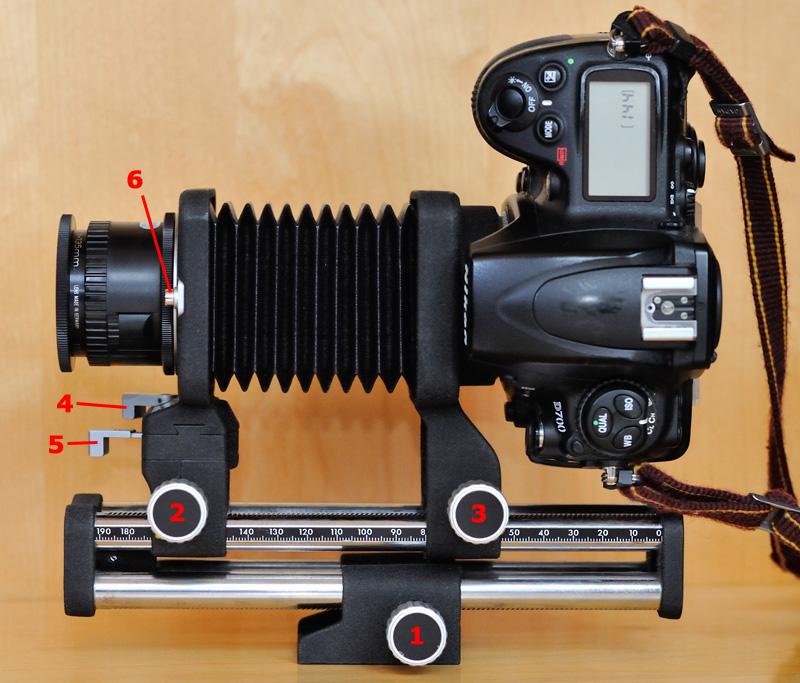
At the Ihagee I measured a difference of 12.7cm between the maximum extension of the bellows and the infinity mark. Of course, for reaching the same magnification with our DSLR we need the same extension.
First try: I throw in all my AI-tubes. An AI-tube is a tube including an AI mechanism, providing an automatic diaphragm and the option for metering wide open (in conjunction with cameras with an AI-coupling, see my article Using older lenses on your Nikon DSLR). I own a PK-11A (8mm extension), a PK-12 (14mm) a PK-13 (27.5mm) and a PN-11 (52.5mm). Putting them together makes for an extension of only 102mm in total. For the image below I had to borrow a second PK-12 from a friend and I had to focus the lens down to about 2m to get an extra centimetre...
|
|
A tube crowd! |
Using five tubes simultaneously is not a really good idea. Such a combination is not really stable. A bellows unit is better for such an extension. But a drawback is the loss of any coupling between camera and lens - you have to stop down the lens manually.
|
|
Back to the roots: Using a bellows unit (shown here: the PB-4). |
|
|
|
|
The Bellows-Nikkor 105mm f/4, mounted on the PB-4
|
The PB-4 was Nikon's top bellows unit in the 70s. As a companion Nikon offered the Bellows-Nikkor 105mm f/4. It is a F-Mount lens with a 52mm filter thread but without a helical focus mount and without an automatic diaphragm. Therefore it is compact and lightweight, which are nice properties on the bellows! Optically it is top-notch, only the coating is not that good by today's standards. It shares its optical design with its successor, the Micro-Nikkor 105mm f/4. On the PB-4 you can use the Bellows-Nikkor 105mm from infinity down to a magnification of about 1.3:1.
The main problem of this lens is the fact that it is 'only' a 35mm lens. If you want to use the tilting possibilities of the PB-4 this lens fails due to its small image circle. A better alternative are enlarging lenses for medium or large format.
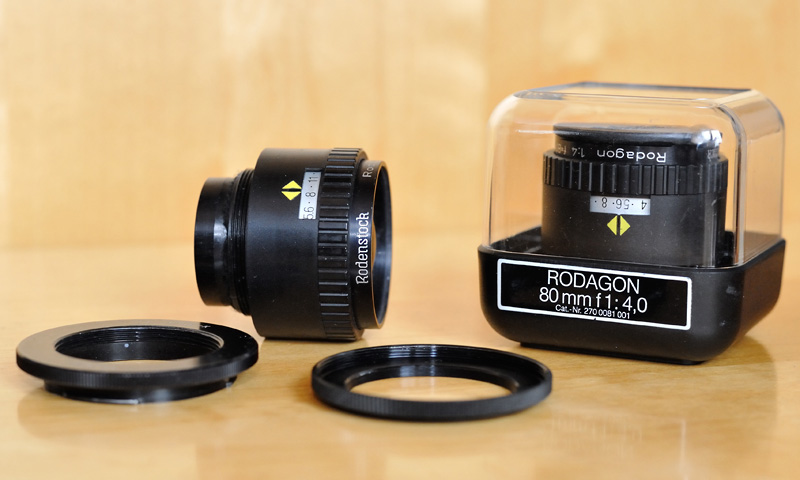
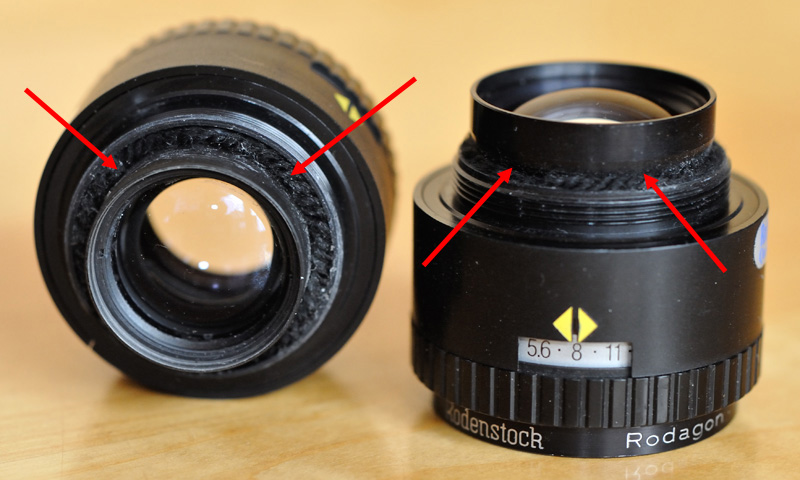
Many years ago I bought two used Rodenstock enlarging lenses for using on the PB-4, the Rodagon 135mm f/5.6 (built for enlarging 9x12cm negatives) and the Rodagon 80mm f/4 (for medium format negatives). These small and lightweight lenses are great performers on the bellows, and you can really use the tilting capabilities of the PB-4.
A problem of newer enlarging lenses - like my two Rodagons - is the illuminated aperture scale. If they are used for normal photography, the aperture window is a light leak. A little bit of light from the outside comes into the optical path and decreases the contrast. I closed this leak for my Rodenstock lenses by gluing black knitting wool around the lens group a few times. That works well, even after 14 years.
As usual for enlarging lenses, the two Rodenstocks have a Leica screw mount (M39). I use a Novoflex "NIKLEI" adapter for using them on F-Mount equipment. Both lenses have a filter thread of 40.5mm. With a step-up ring to 52mm I can use Nikon hoods and so on.
|
|
Rodenstock Rodagon 80mm f/4 and Rodagon 135mm f/5.6. In the foreground a Novoflex NIKLEI adapter (F-Mount to Leica screw mount) and a 40.5mm to 52mm step-up ring. These adapters make the Rodagons usable in the Nikon world. |
|
|
I closed the light leak (caused by the aperture window) with black wool around the optical unit. |
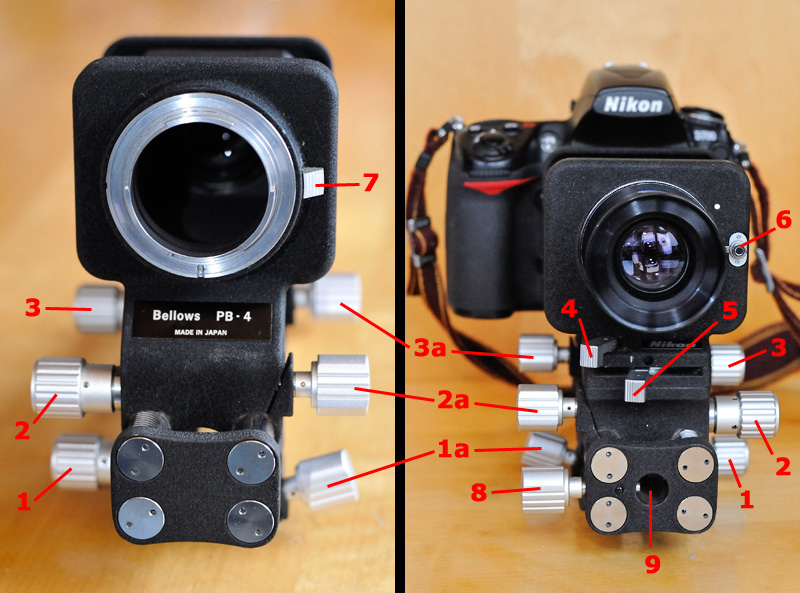
The full-metal PB-4 is of high-class workmanship. It is a joy to use! And it is easy, too. Have a look at the images below:
|
|
1: knob for moving the tripod mount. 1a: locking screw for the tripod mount. 2: knob for moving the lens mount (front standard). 2a: locking screw for the lens mount (front standard). 3: knob for moving the camera mount (rear standard). 3a: locking screw for the camera mount (rear standard). 4: lever for locking/releasing the shift mechanism. 5: lever for locking/releasing the tilt mechanism. 6: lens release button. 7: release button for changing the orientation of the camera mount (here it is in the portrait or vertical position). 8: locking screw for an attached slide copying adapter. 9: hole for mounting a PS-4 or PS-5 slide copying adapter. |
|
None of the Nikon bellows units are really usable in conjunction with 'G' type lenses (lack of an aperture ring), because the aperture of the lens is not controllable. Sadly, nearly all lenses Nikon introduced in the last years are of the 'G' type. Accessories for enabling the aperture control do not exist (although e.g. a small tube with a relative aperture ring would be possible).
The PB-4 has some size limitations. If you plan to put a very big lens into service, the shift lever could be a problem. Try it carefully! If neccessary, use an additional tube between the PB-4 and the lens.
More serious problems exist on the camera side. For bigger cameras - like the F4E, F5, D1, D2, D3 and D4 - the distance between the optical axis and the rails is too short. Maybe you can mount such a camera, if the camera mount of the PB-4 is at its rearmost position, but you can not move the camera along the rails if it is set to landscape (horizontal) orientation. Don't think about using those cameras in conjunction with the PB-4. Besides, the lighter the camera (and the lens), the better. But Nikon's professional top models are not really lightweight gear ...
Another problem is the size of the grip of some camera models. A Nikon F4 is therefore not mountable. But you can mount it, if you put a small tube between the camera and the PB-4 (for example a PK-11A). Otherwise the F4 (with the smallest battery pack, MB-20) is usable.
Many cameras are only mountable if the camera mount of the bellows unit is set to portrait (vertical) orientation. But after being mounted, there are no limitations. Examples are the F3 and the D700.
For most people the intention for buying a bellows unit is that they want to reach high magnifications. The 80mm, 105mm and 135mm lenses discussed above are not suitable for such an application. You need a shorter focal length!
Just put a wide-angle lens on your bellows and you will get an impressive magnification. But you will get a serious practical problem, too. The higher the magnification the closer comes the focal plane towards the lens (in the worst case it is inside the lens)!
Example: I put the Nikkor 35mm f/2 on the bellows and extend the unit by about two thirds of the maximum possible extension. The resulting magnification is 3.6:1. But the distance between the subject and the lens' front element is just 3.5mm! Therefore it is nearly impossible to illuminate the subject satisfyingly.
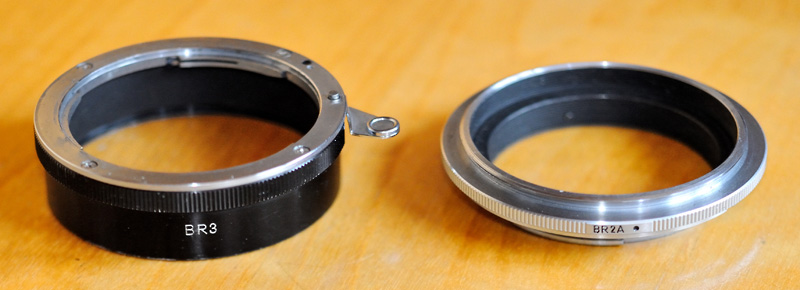
Because of this problem it is usual to reverse the lens here. That means you mount it on the top of the bellows with its front element towards the camera and its rear element towards the subject. Nikon offers a reversing ring for that, the current model is the BR2A. It has a usual F-Mount on one side and a male 52mm thread on the other.
|
|
On the right: Nikon's current reversing ring, the BR2A. It is often sold together with the BR3. Both rings screwed together give a small tube. If the BR2A is used for reversing a lens, the BR3 makes a good sun shade for the rear side of the lens. |
|
|
The Nikkor 35mm f/2 mounted reversed on the PB-4. Between the lens and the bellows unit there is the BR2A reversing ring and on the front of the setup the BR3 is mounted as a lens hood. |
With the reversed Nikkor 35mm f/2 mounted on the fully extended PB-4 the magnification is about 6.75:1. The distance between the lens and the subject is 43mm. That's comfortable for the illumination!
More examples for the achievable magnifications with reversed lenses:
What is about the focus setting of the reversed lens? For a classical lens design it doesn't matter, only the rear part of the barrel is moved back and forth (may work as a sun shade). For a non-classical design - like the Nikkor 24mm f/2.8 - I would use the shortest focus setting (0.3m on the 24mm), because it is closest to the real distance between the image sensor and the subject. But that's just a feeling, not knowledge.
Please note: the effective aperture in such a setup is very small and therefore diffraction is your enemy! Thus, stop down carefully!
Due to the small effective aperture, working with high magnifications causes a very dark image in the finder. A very good illumination of the subject is substantial.
If you prefer analogue photography, focussing screen and finder are very important. D and E screens in conjunction with a high-magnification finder (DW-2 for the F2, DW-4 for the F3, DW-21 for the F4, DW-31 for the F5) was my favourite setup in analogue times. I would not use the F4 or F5, because they are heavy and big. The F2 offers no metering in conjunction with the DW-2 and no TTL flash metering at all. In my opinion the F3 is the best analogue camera for using on the bellows. It provides center weighted metering with every finder and it was Nikon's first camera with TTL flash metering.
From my point of view a digital body should fulfil the following criteria:
I would rate these cameras as suitable for the job: D300/D300s, D7000, D600, D700, D800. Personally, I have experiences with the D300 and D700.
A seperate article about microphotography is planned - stay tuned.
The workflow for shooting for the setups described above is this: firstly, you should focus. Important: open the lens' aperture for it! Secondly, stop down the lens, then meter (if necessary) and shoot. That's it. The difference to normal photography is the manual control of the aperture, which is a bit less comfortable.
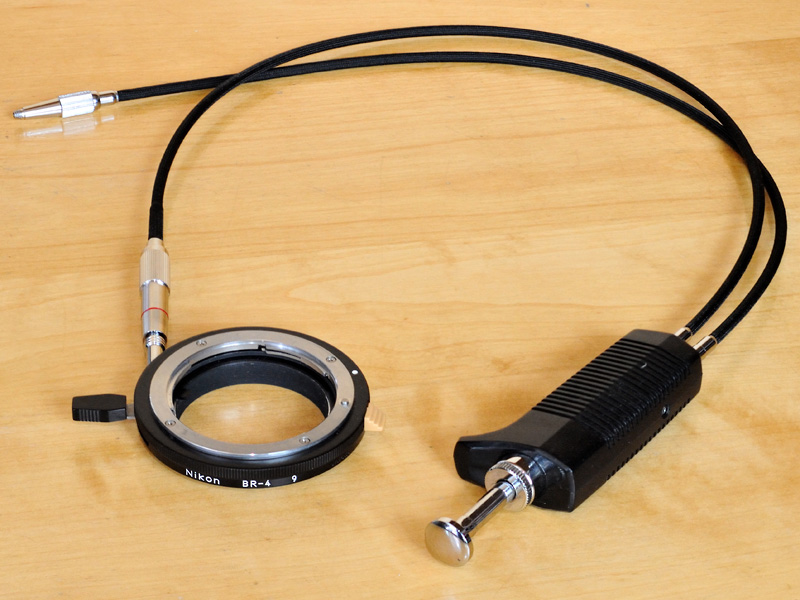
If the lens you are using is an automatic type, you can make the setup work with a semi-automatic diaphragm. You need a BR-4 tube and a double cable release (for example the Nikon AR-7) for that. The BR-4 has an integrated aperture lever, that can open or close the lens' aperture. Closing here means to stop down the lens to the aperture value you have preselected on the aperture ring. This small lever inside the bayonet mount can be controlled by a bigger lever on the outside of the tube. Additionally the BR-4 provides a cable release port. If you set the lever to the open position (and lock it), the lens can be stopped down by a cable release.
Important restriction: do not use lenses with CPU-interface in conjunction with the BR-4 - the CPU contacts could be damaged. As a workaround you can set a small automatic tube between the BR-4 and the lens.
|
|
BR-4 and AR-7. |
|
|
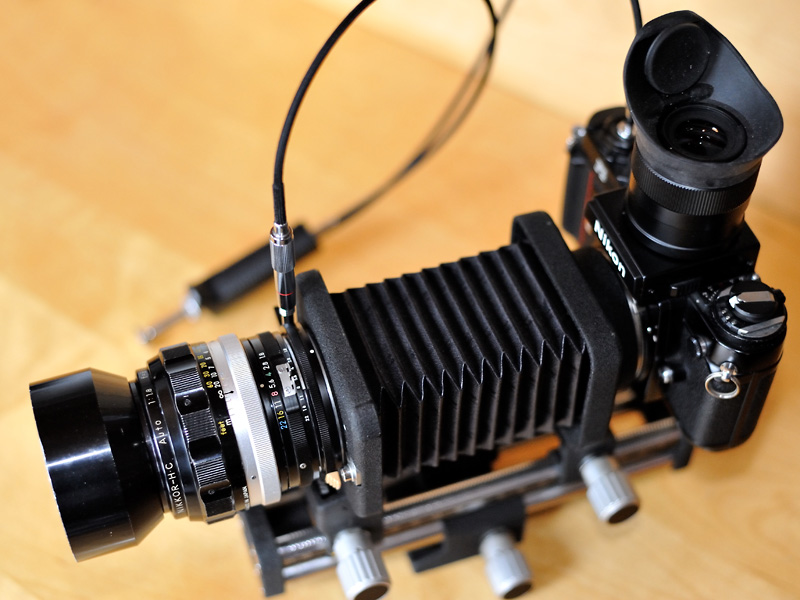
Semi-automatic diaphragm in use. |
|
|

|
|
With the help of two adapters (MC-25 plus MR-3) a mechanical cable release is usable in conjunction with a DSLR that has a 10-pin connector.
|
A double cable release consists of one release button with two attached release cables. One of the release cables "shoots" earlier than the other - at the Nikon AR-7 the one with the red ring shoots first. The earlier one must be connected to the BR-4, the other one to the camera. The result is that the diaphragm is closed before the camera shoots. Your camera does the same if an automatic lens is mounted. This works for both regular and reversed mounted lenses.
Our modern DSLRs do not have a mechanical cable release port and therefore the AR-7 is not usable on its own. But you can adapt it to the modern 10-pin connector. Unfortunately you need two adapters. But it works fine. You will find more details about this in my article Remote controlling your Nikon SLR or DSLR.
Another example of such a setup can be found in my Micro-Nikkor 55mm f/3.5 review.
The PB-4 is unique! It is the only bellows unit from Nikon that allows tilting and shifting.
|
|
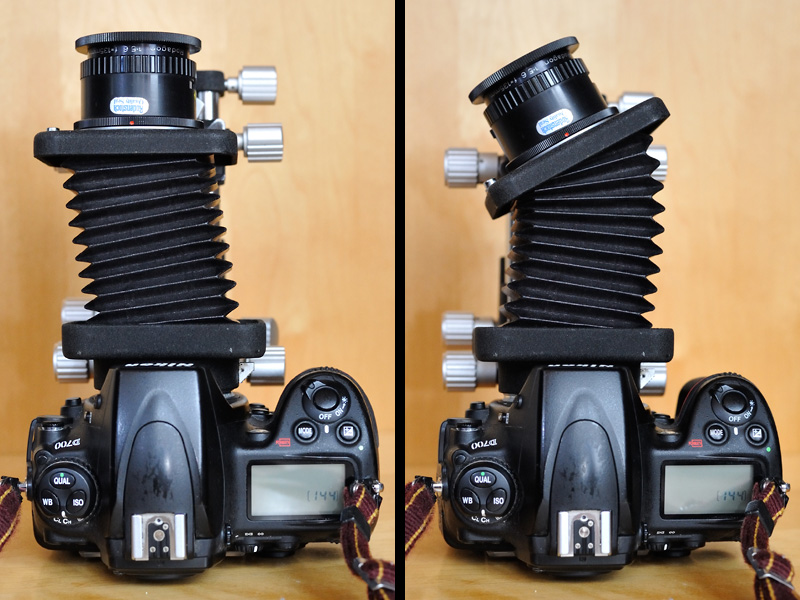
The PB-4 allows shifting by about 1cm to the left or to the right. Titlting is possible up to about 33 degrees in both directions! |
In contrast to the T&S Nikkors (see Tilting the 85mm PC Nikkor lenses), the orientation of the tilt and shift movements are identical at the PB-4. That makes sense here, because you sometimes need a bit of shifting in conjunction with tilting in order to avoid shading.
|
|
The subject of our test setup shown below. |
The maximum tilting angle of 33 degrees is much greater than the 8 degrees of the T&S Nikkors. My two Rodagons allow the full use of such great tilting angles. But a problem is the tilting mechanism itself - because there is only a lock/release lever, the vernier adjustment is a bit difficult. Moreover I miss a degree scale for tilting, which is essential for me when working with my PC-E Nikkor 85mm f/2.8.
With the PB-4 I use a different workflow for tilting. I take a step back and try to imagine the image (or sensor) plane, the lens plane and the plane of focus. Having the Scheimpflug principle in mind I know the three planes must have a common intersection line. With my PC-E 85mm my approach is more abstract: I preselect a tilting angle and a matching distance between the camera and the plane of focus. These values mark my starting point for finding the proper focus.
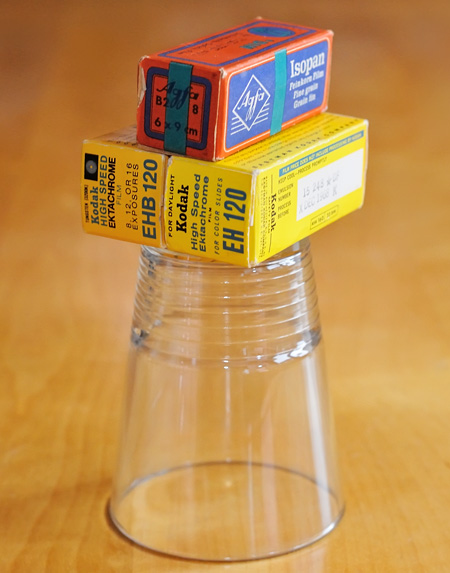
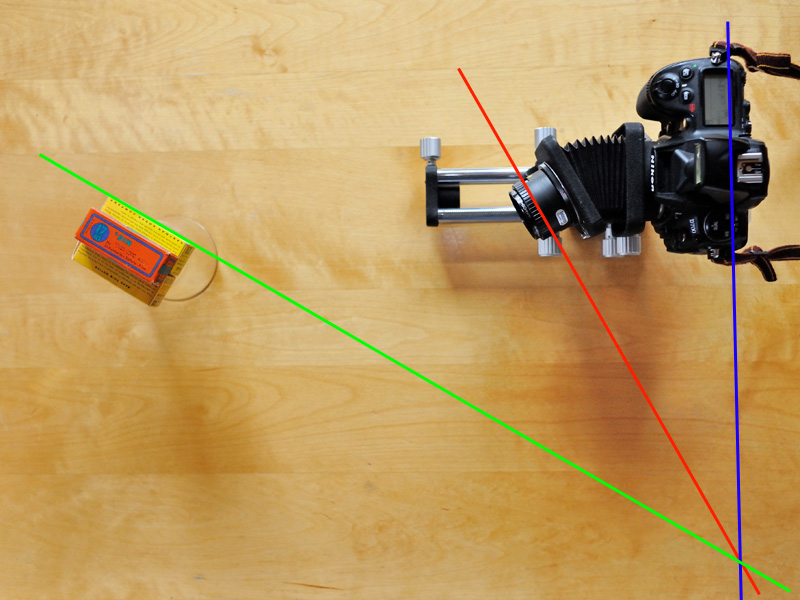
Here comes an example: the subject consists of three packages of roll film. On the right you see the subject. I want to position the plane of focus on the right side of the right Kodak package with the expiry date on.
|
|
Test setup: D700 with the PB-4 and the fully tilted (and a bit shifted) Rodagon 80mm f/4. The green line represents the plane of focus, the red one the lens plane and the blue one the image plane. The three lines have a common point of intersection. |
|
|
The result is what we expected: the Kodak film is sharper than the Agfa film ;) |
Over the years Nikon produced five different bellows units for the F-Mount.
The first one was the Model II (the first one ever had been for the S-Mount). Model II was introduced around 1960. It is still usable, but has many limitations in comparison to the PB-4. Firstly, it has an even stronger size limitation due to the shorter distance between the rails and the bayonet mount. For instance, a D700 is not moveable along the rails. Secondly, there is no separate tripod mount. Model II has two fixed tripod mounts - one at the front of the rail and one in the rear standard. The moveable tripod mount of the PB-4 is great for fine focussing, I wouldn't want to miss it! The third limitation is the movement of the standards. There is only a lock/release lever and no rotating knob for the camera mount (rear standard) and there is no locking opportunity for the lens mount (front standard). Overall, it is terrible to work with the Model II in upright position, especially if a more heavy lens is used!
|
|
Nikon Model II bellows unit. It has many limitations. |
The next model was the PB-3. It was a strongly simplified bellows unit that was offered additionally to the Model II. The PB-3 has a fixed rear standard, only the lens mount is moveable. In contrast to the other bellows units with their squarely-shaped bellows the one of the PB-3 is octagonally shaped. Switching the orientation of the camera is not possible. Nevertheless, the PB-3 might be a nice bellows for using in the field, because of its small size. But a PB-3 is not that easy to find!
The next generation consists of the PB-4 and the PB-5. The PB-5 is a simplified version of the PB-4: only one pair of rails and no separate tripod mount, no shifting and tilting capabilities.
The last one is the PB-6. It was introduced around 1980 as the successor of the PB-4 and as far as I know it is still in Nikon's product line. Tilting or shifting is not provided. On the Web critical reports on the build quality of the PB-6 can be found. On the other hand, the PB-6 offers two new extension options: Firstly, Nikon offers the PB-6D spacers for increasing the distance between the mount and the rails. It allows you to use even big cameras - like the D3 - in conjunction with the PB-6. Secondly, a bellows extension unit is available. It is a second bellow that doubles the possible extension of the unit! Another nice feature is that the front standard has the funcionality for a semi-automatic diaphragm (like the BR-4).
Except for the PB-3 every Nikon bellows unit has a mount for an optional slide copying unit. Today, that is very usable for digitising slides. More about this can be found here: How to digitise your slides (and negatives).
|
|
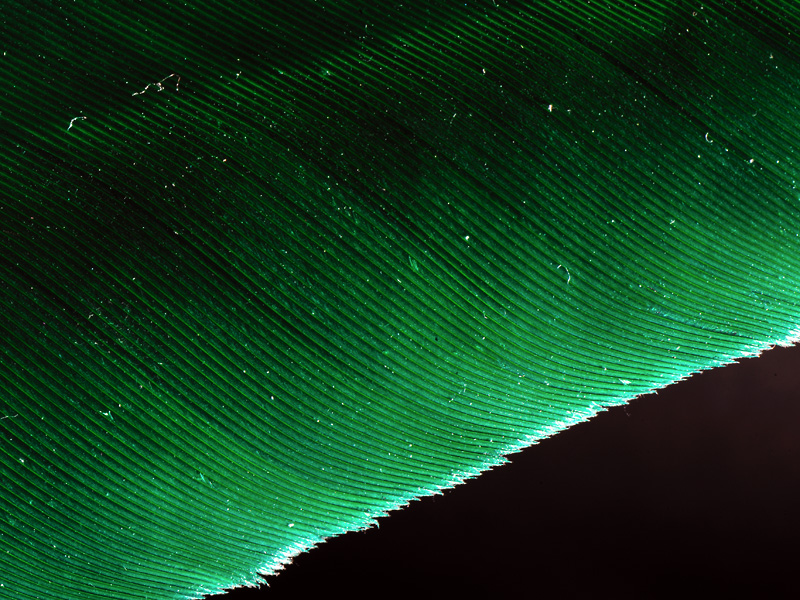
Don't forget to clean your subjects before you photograph them like I did with this feather! Nikon D700 + PB-4 + Rodagon 80mm f/4 + Nikon SB-24. |
|
|
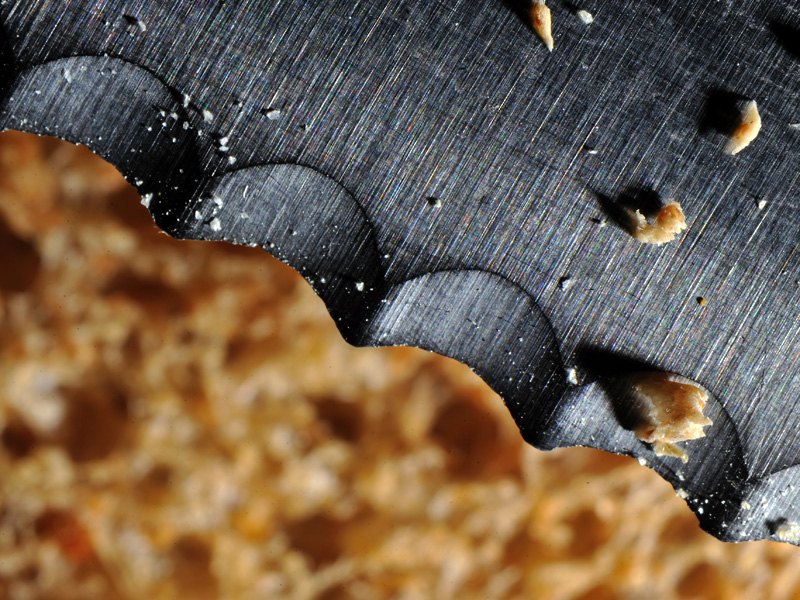
My bread knife just after having been used. Nikon D700 + PB-4 + Rodagon 135mm f/5.6 + Nikon SB-24. |
|
|
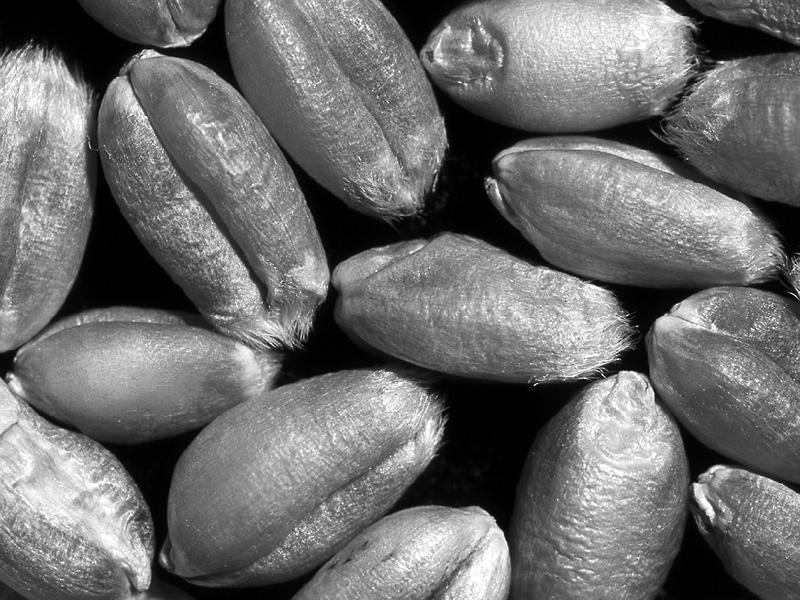
Wheat. Nikon F3 + PB-4 + reversed Nikkor 35mm f/2 + Nikon SB-24 (adapted via an AS-17) on Fujichrome Sensia. |
|
|
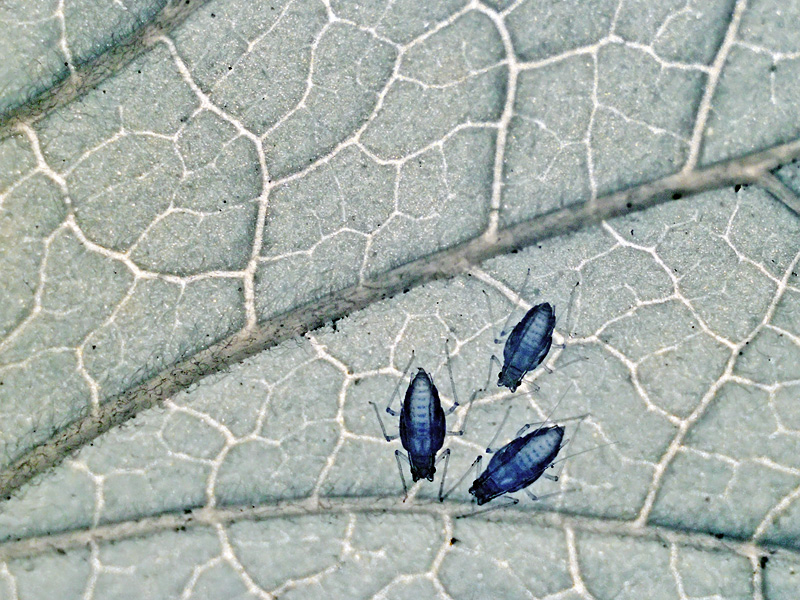
Greenflies on the green underside of the leaves of my currant bush. A very good camouflage, but - as you can see here - it doesn't work in infrared light! Nikon D300IR + PB-4 + reversed Micro-Nikkor 55mm f/3.5. |