
In the good old analogue times I shot around one third of my images in portrait format. Since 2004 - when I started to photograph digitally - the percentage of portrait formats decreased continously down to zero in 2013. Do you observe a similar trend in your photography?
In Spring 2004 - just before I bought my first DSLR - I spent three weeks in terrific Fjord Norway with my family. I exposed a lot of rolls including many shots in portrait format. Exactly 12 years later I visited Fjord Norway again. On this occasion I decided to reanimate the portrait format in my photography, see the example below and more examples at the end of this article.
|
|
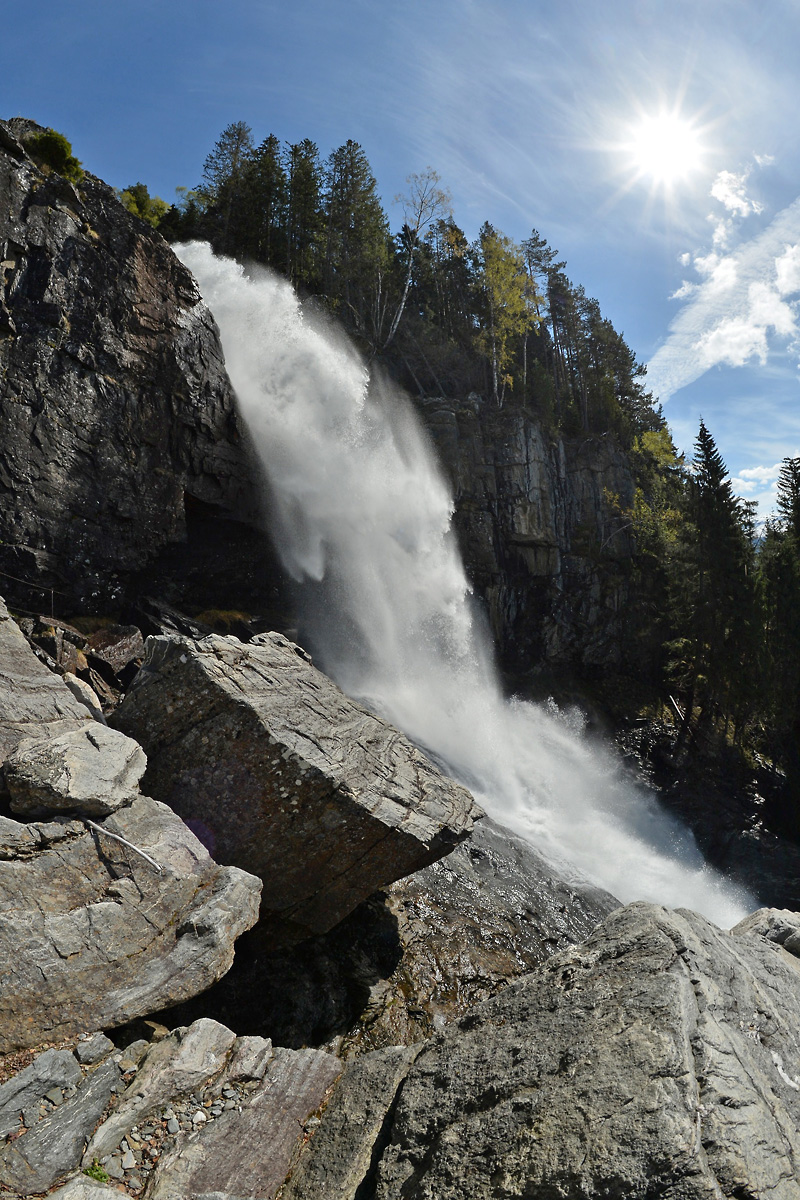
Tvinnefossen, Fjord Norway, May 2016. Shot with my Df plus Samyang 12mm f/2.8 fisheye. |
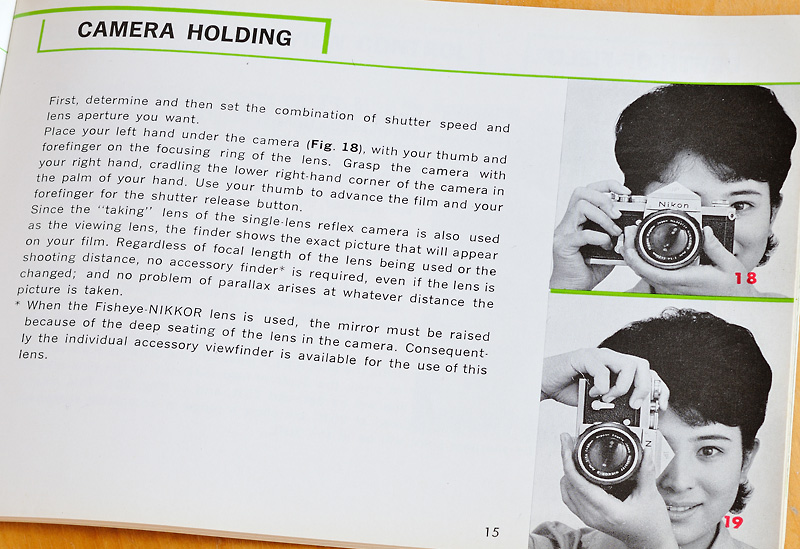
If you are not sure how to hold the camera for portrait format take a look at the manual of your camera. Of course, you must rotate the camera by 90 degrees. Please do it anticlockwise, like the lady with the Nikon F in the image below! The left hand holds and stabilises the unit while the right hand releases the shutter.
|
|
Manual of my Nikon F, printed in 1969. |
|
|

|
Curiously enough, in the manual of the Nikkorex F Nikon recommends the rotation clockwise, see image at the left.
That is not a good idea, because setting the aperture, focussing or maybe zooming is more complicated here, especially if your lens is a heavy one! The right hand has two tasks: holding the weight and firing - that implies the risk of camera shaking! Moreover, releasing the shutter button with your thumb is more difficult than with your forefinger.
|
|
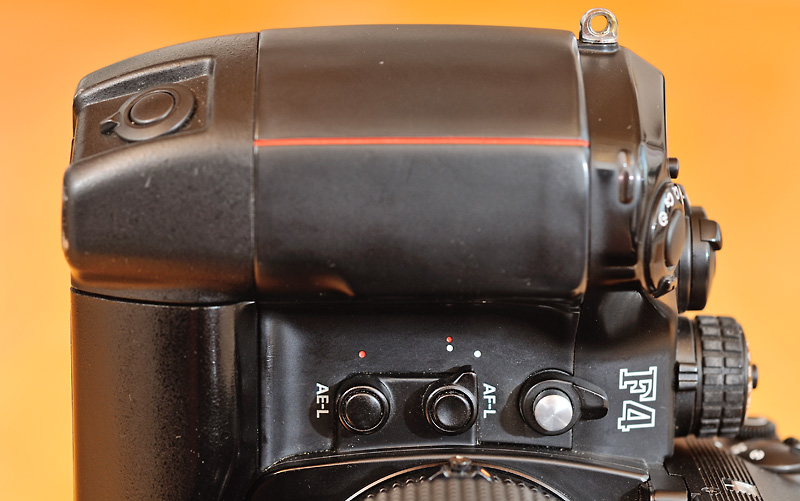
Nikon F4s: the first Nikon with a vertical shutter button. |
In 1988 things changed for professional photographers: the Nikon F4 was released. In conjunction with the MB-21 battery pack - then called F4s - the unit has got a secondary shutter release button for upright shooting.
The F5 has got a second AF-ON Button, the D1 a second back command dial and the D2 series a second front command dial.
The next improvement came with the D4: it has got a second multi selector and a function button near the vertical release button. Thus, the D4 (and the D5, too) has the most complete set of controls for upright shooting.

|
|
Nikon D4: controls for upright shooting. |
The additional battery grips for smaller cameras like the D810, D750, D610, D500 or D7200 also offer similar controls for upright shooting. Only with the D3300, D5500 or Df you have to use the old method, shown in the F manual above.
Conclusion: it is easier than ever to shoot in portrait format!
So why have I stopped shooting vertical images in 2013?
|
In analogue times we had two options for viewing images: printed or projected.
Hanging up a print is a nice thing (if it is properly illuminated!). I have always had (and still have) some on my walls.
Of course, you can also use prints for showing your images to other people. A 30x20cm print on glossy paper (because of the better sharpness) is very good for handing around. Landscape or portrait - the format does not matter. But illumination is essential and often not that easy to ensure. Moreover the glossy prints tend to get fingerprints.
I often used that method when my children were small. In that time I frequently used negative film in the ISO 400 to 1600 range because high-sensitive slide film produced ugly results in my eyes. I scanned the negatives and made prints with my inkjet printer.
But over the 30 years of my analogue photography I mostly preferred slides. Because both, the slide mounts and the screens for slide projection are square-shaped, neither horizontal nor vertical format is disadvanteged. On the other hand, slide projection is not trouble-free. If you use mounts without glass, you will have soft corners due to curvature. But if you use glass mounts, the glass will become foggy over the years. Moreover, you need darkness. If you do not have the possibility to darken your room, you must wait for the night!
Today, in the digital age, we have three options for viewing our images: as prints, on the monitor or projected by a beamer.
Prints are prints; the source - analogue or digital - makes no difference in principle.
Using a monitor is the "natural" way to view digital images. Assumed your monitor is a good one, you can view your images in high quality under various lighting conditions.
I began with a 5:4 19" Sony X-Brite monitor with a resolution of 1280x1024 pixels as my main monitor for imaging. In 2012 I replaced it by a NEC PA241W, a 16:10 24" monitor with 1920x1200 pixels. I have always been satisfied with the quality of my monitors. But my portrait format problem is caused by the monitor:
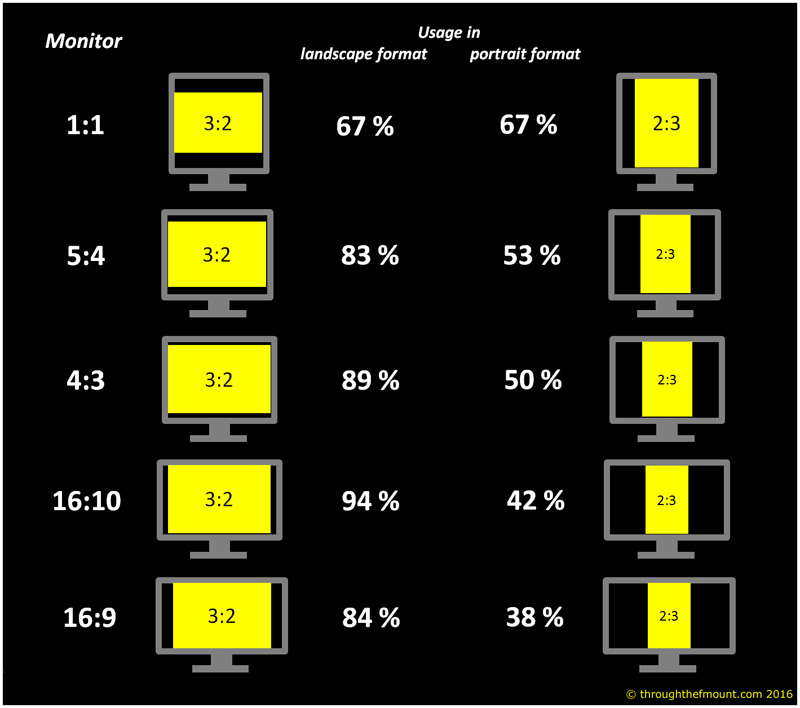
|
The images from your DSLR have an aspect ratio of 3:2 (2:3 in vertical format). For displaying a 3:2 image in maximum size, my 16:10 Monitor uses 94% of its pixels. But in portrait format it uses only 42%! Thus, a vertical image appears much smaller than a horizontal one. A popular full-HD (or ultra-HD) monitor with its aspect ratio of 16:9 is the worst for us DSLR shooters!
Of course, I usually try to use the complete display for landscape formats, because it looks better. But in turn that impacts on composing my image: I include additional space at the lower or upper end for later cropping to 16:10. Thus I use 100% of the display but max. 94% of my camera. With a 16:9 monitor I would only use max. 84% of my camera pixels. Overall I think that is a wrong trend!
In contrast to slide projection a beamer does not have problems with curvature or foggy glas. But the problem with vertical images is present, too. Today, most beamers have an aspect ratio of 16:9.
How could I solve the described problem? Three possible solutions come to my mind immediately:
Solution 1: rotating the monitor if the format changes
Yes, my monitor allows rotation. But with all the cables connected to it, it is practically impossible to rotate the display quickly between two images. Technically, it should be possible to implement a quick rotation option, e.g. by using wireless technologies. But I usually have a viewing distance of about 80cm to my monitor - too far for my arms to reach it...
Solution 2: using two monitors
I could connect a second monitor to my PC and rotate it to vertical orientation. In this way I would have one monitor for each format. Finding a proper viewing software for such a setup could be a problem. What I do not really like is the fact that this setup is not exactly subtle. Besides, the resulting area of the two screens is large. That can cause vignetting, especially if there is more than one viewer.
A setup with two beamers adjusted to project on the same screen - one vertical and one horizontal - is problematical in my opinion, because the images then would have a square intersection in the middle. Even a black-all-over image projected by the non-active beamer would lower the contrast there.
Solution 3: using a square-shaped monitor
For both, portrait and landscape format you would use only 67% of the pixels, but you have the advantage that both formats are equally large. A special viewing software is not needed here. This solution has one drawback: there exists exactly one 1:1 monitor on the market! The EIZO FlexScan EV2730Q is a 26.5" monitor with a resolution of 1920x1920 pixels. It is targeted at office usage, but after all you can read it is also a good monitor for viewing images. The main drawback is the poor connectivity this monitor offers (only two inputs, no USB-switch for keyboard/mouse coupled to the input switch). A pity! Additionally, in my opinion it could be a little bit larger.
A 1:1 Beamer would be very interesting, too. But you will not find such a beamer on the market currently.
Maybe, I will make some trials with Solution 2*. But my favourite is number 3. I hope, EIZO will soon announce an update of their 1:1 monitor with better connectivity. Maybe, other manufacturers will also introduce square format monitors. Why not advertise them as monitors for photographers!
* September 17, 2016: new article "Presenting images on two monitors"
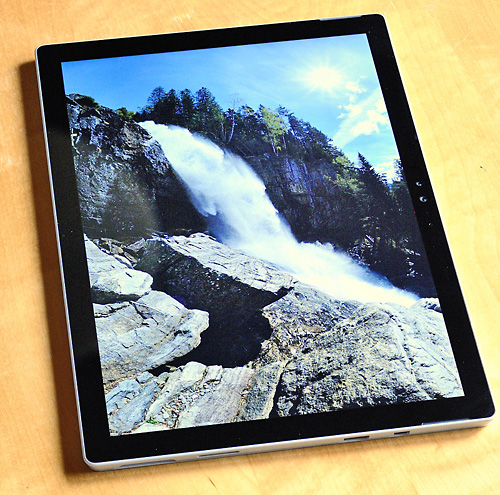
Nevertheless I found a partial solution for my problem, which makes it easier for me to wait for a nice 1:1 monitor ;)
|
I have two main reasons for calling it 'the photographer's tablet':
In terms of viewing methods a tablet is a cross between handing around prints and using a monitor. In contrast to a print it does not need illumination, thus you can use it under various lighting conditions. Of course, the image is much smaller than on a usual monitor (approx. 26x17.3cm), but the resolution of the Surface Pro 4 is higher (2736x1824 pixels). Therefore, even with my strongest reading glasses I cannot see the individual pixels. For viewing a portrait format image, you simply rotate the tablet in your hands. Having the chart above in mind: it's 100% for both, landscape and portrait format!
From my point of view there are further advantages of the Surface Pro 4:
My Surface Pro 4 is the cheapest variant with an Intel m3 processor, 4GB RAM and a 128GB SSD. It weighs 765 grams and does not need a fan. I am really satisfied with its speed (I am not a gamer, though).
I have found just one problem until now: the cable of the charger is too short. Even worse: I can't find real alternatives!
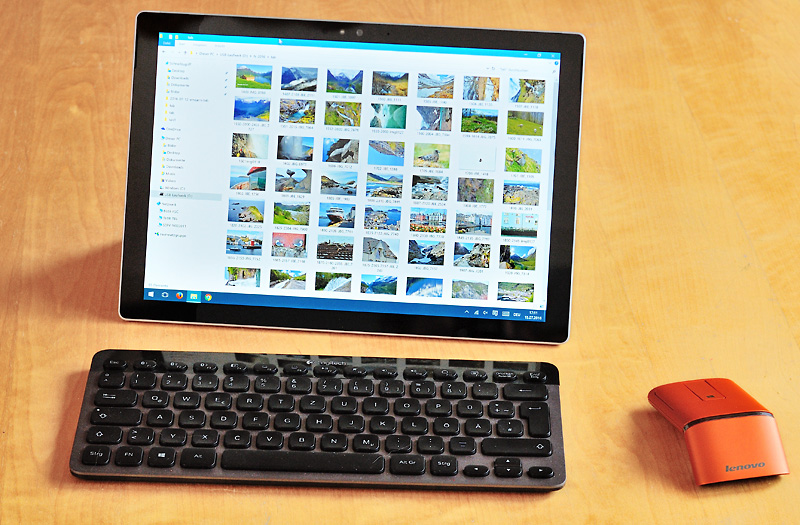
Microsoft's Type Cover is a clever accessory, but I prefer a separate bluetooth keyboard and mouse. Here is my complete PC setup for the tablet that allows serious working if neccessary:
|
The Logitech K810 keyboard combines very good build quality with a nice illumination and a great key feeling. You can connect up to three devices and swap between them with just a keypress. For example, while selecting images I can simply switch to my iPhone for writing an email in between.
|
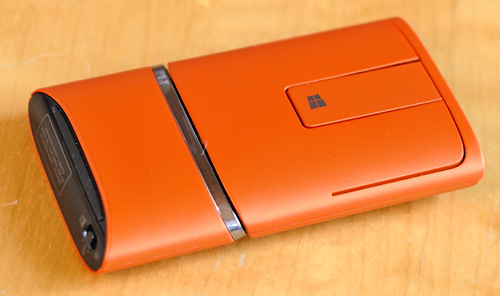
The Lenovo Touch Mouse N700 is a combination of a wireless mouse and a presenter. You can switch between the modes by rotating the two parts of the device against each other. On the image to the left you can see the N700 in presenter mode.
If I travelled by plane I would have the tablet in my hand baggage and save 50% weight compared to my notebook. If I also needed the keyboard and the mouse I would throw these gadgets in my checked baggage.
I rotate the vertical images anticlockwise by 90 degrees:
|
Just before the presentation begins I go through these steps:
Using touch gestures to skip to the next (or last) image is difficult if the tablet must be rotated in between. Therefore I prefer the presenter. Moreover, the danger of touching accidently while handling the tablet is prevented. It is your decision to hand over the presenter to the viewers or to be the master of presentation yourself. But please do not use the laser pointer of the presenter - the surface of the Surface reflects it very well, which is dangerous!

|
|
Ferry on Geirangerfjord, Fjord Norway, May 2016. Nikon Df plus AF-Nikkor 28-70mm f/3.5-4.5 at 60mm. |
|
|
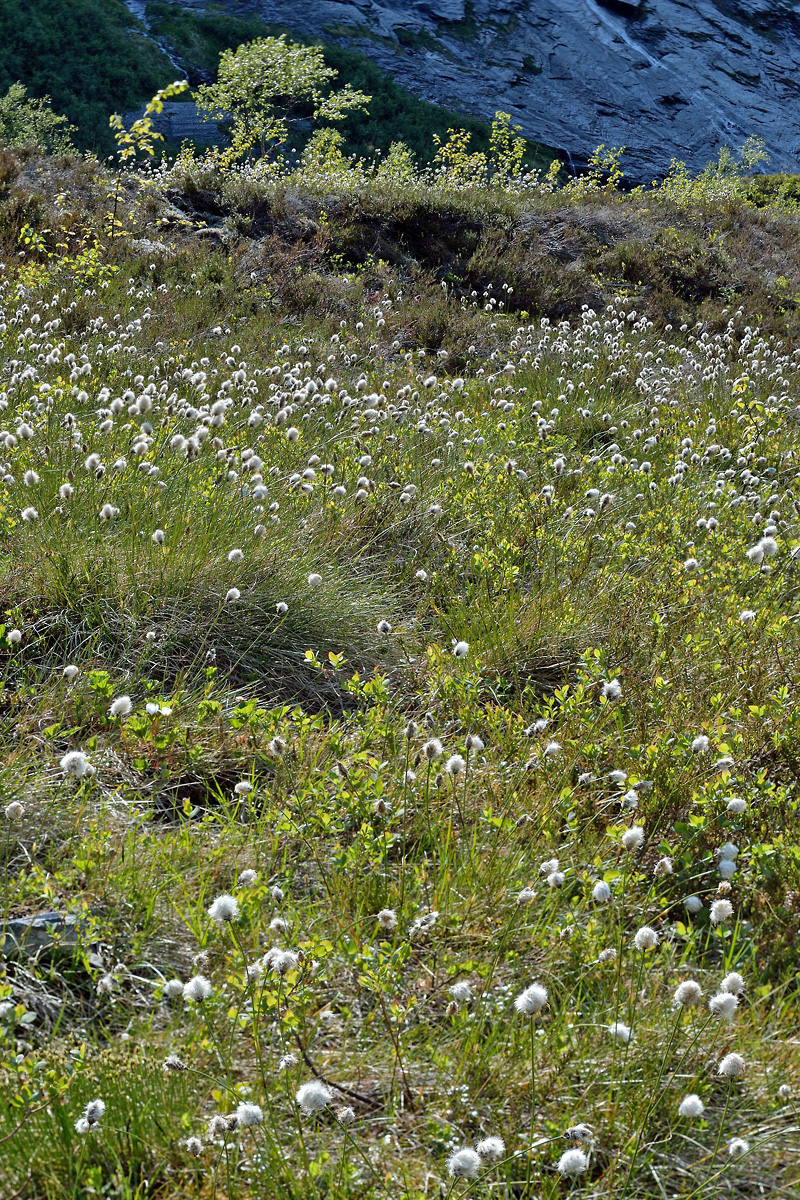
Cotton gras on swampy soil, Fjord Norway, May 2016. Nikon Df plus PC-E Nikkor 85mm f/2.8 (tilted). |
|
|
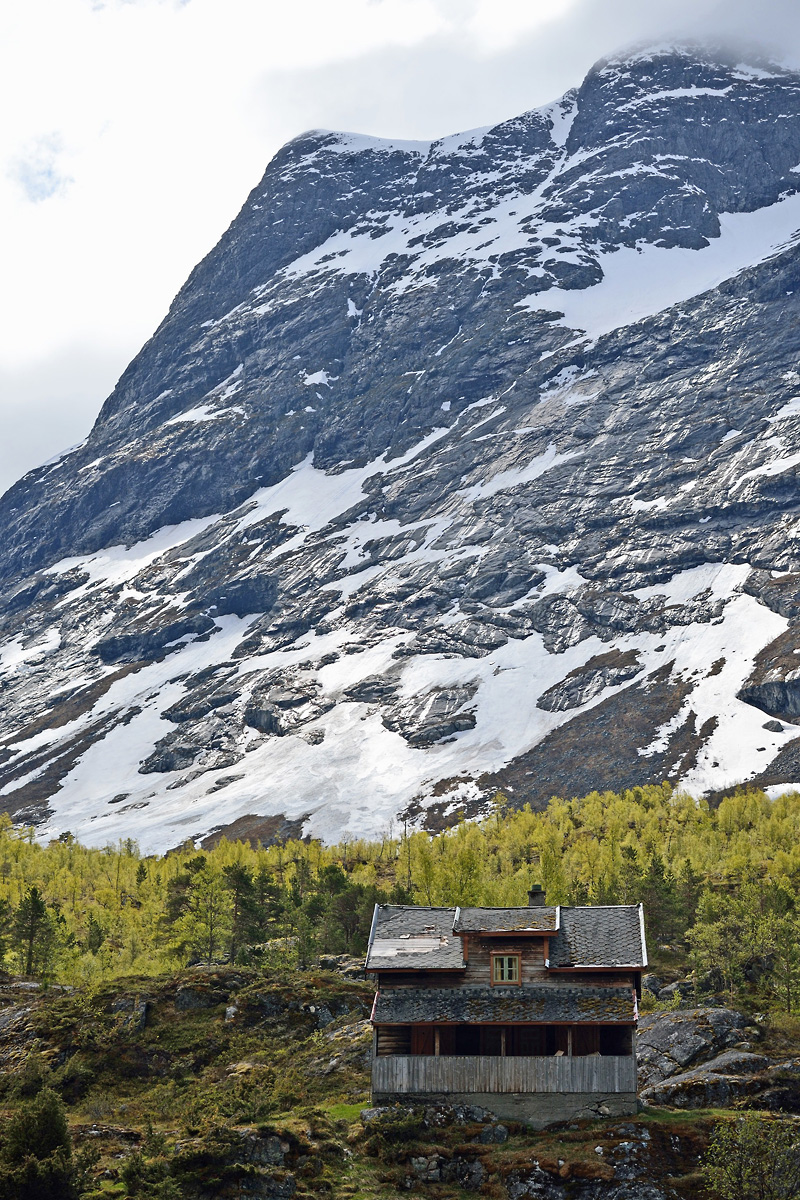
Abandoned cottage, Fjord Norway, May 2016. Nikon Df plus AF-Nikkor 28-70mm f/3.5-4.5 at 60mm. |
|
|
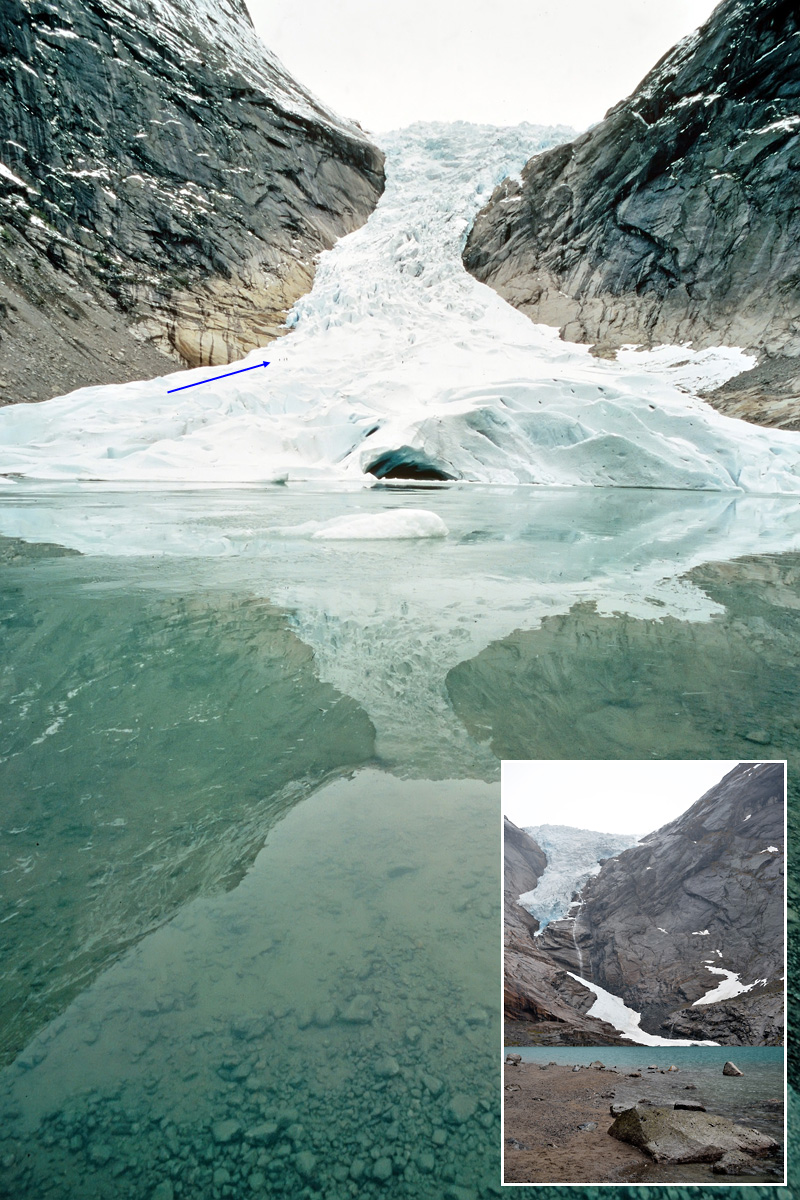
Retreat of the glaciers! Briksdalsbreen, a tongue of Jostedalsbreen, the largest glacier in continental Europe. Size comparison: the blue arrow points to a group of three people. I captured this image in May 2004 with the Nikon F4 plus AF-S Nikkor 17-35mm f/2.8 at 20mm on Fujichrome Sensia. The embedded image was shot at the same place in May 2016 with the Nikon Df plus AF-Nikkor 28-70mm f/3.5-4.5 at 40mm. |